Your Insignia TV crops the screen edges. HDMI content loses borders. PC inputs cut off taskbars. The standard picture menu doesn’t fix it because overscan is locked. You need the service menu.
The primary code is 9876. It works on most Insignia LCD and LED models from 2010 to 2024. Older models use 2580. Plasma TVs require 1979. This guide covers all access methods, common adjustments, and critical warnings about settings that can damage your TV permanently.
Service menu access may void your warranty. Best Buy does not support customer adjustments to factory settings. Proceed only if you understand the risks.
What Is the Insignia Service Menu
The service menu is a hidden diagnostic interface used by technicians during manufacturing and repair. It contains parameters not available in consumer settings. You can adjust overscan, white balance, geometry, and panel voltages.
Standard TV menus hide these options because incorrect values can cause display failure. The service menu exposes raw hardware controls. Changes apply directly to the display panel and processing board. There are no safety limits.
You need service menu access when normal settings cannot fix your problem. Common reasons include overscan locked to “on,” vertical centering issues on older models, and white balance drift on aging panels. Use it for specific fixes, not casual adjustments.
Primary Access Method: The 9876 Code
This method works on most Insignia LCD and LED TVs manufactured between 2010 and 2024.
Step-by-step instructions:
- Turn on your TV using the remote power button
- Set volume to zero using the remote volume down button
- Press Input on the remote
- Enter 9876 using the number keys
- Press OK within 5 seconds
If successful, a menu labeled “Factory Set Menu” or “Service Mode” appears. Navigation uses arrow keys. Exit by pressing Menu or powering off.
Compatible models include:
- NS-L series (2010-2014)
- NS-LCD series (2012-2016)
- NS-50D420NA20 and similar D-series (2018-2020)
- Most 24-inch through 55-inch LCD models
The timing window is critical. If you wait longer than 5 seconds after entering 9876, the sequence fails. Volume must be at absolute zero, not muted.
Alternative Service Menu Codes by Model Type
Input 2580 Method (Older LCD Models)
This code works on Insignia models from 2006 to 2012, particularly NS-LCD32 and NS-LCD42 series.
Access sequence:
- Power on the TV
- Press Input on the remote
- Enter 2580 using number keys
- A service menu appears immediately
No timing window exists for this method. The menu label may read “Factory Menu” or show technical options without titles. Some units display a text-based interface instead of graphics.
Compatible with: NS-LCD series manufactured before 2013, early Best Buy house brand models using Prima panels.
1979 Code (Plasma Models)
Insignia plasma TVs (NS-P series) use a different access method.
Steps:
- Power on the TV
- Press Menu on the remote
- Navigate to WINDOWS or SETUP section
- Enter 1979 using number keys
- Service options appear in the existing menu
Plasma models include NS-P501Q-10A, NS-P421Q, and other P-designation sets from 2008-2011. These TVs are no longer manufactured. Plasma service menus contain convergence and geometry controls specific to CRT-based display technology.
Hidden Remote Button Method
Some Insignia remotes have a physical service button concealed under the battery cover or label.
Look for a small rubber button labeled “SERVICE” or an unmarked button near the battery compartment. Press this button while the TV is on. The service menu appears without code entry.
This method exists on OEM remotes shipped with specific 2009-2012 models. If you’re using a universal remote programmed for Insignia, it won’t have this physical button. Universal remotes lack this button regardless of brand—whether you’re using RCA, GE, or One For All models. You cannot add it through programming.
Physical Button Combinations
When the remote fails, try panel buttons.
Method 1: Hold CH+ and VOL+ on the TV panel simultaneously while pressing power. Release after the display turns on. Some models enter service mode automatically.
Method 2: Press and hold MENU on the TV panel during power-on. Keep holding for 10 seconds. A diagnostic screen may appear.
These methods work inconsistently. Success depends on the specific control board revision. Try multiple attempts with different hold durations.
Service Menu Access for 2024-2026 Fire TV Models
Insignia Fire TV Edition models use Amazon’s operating system. Service menu access is restricted or removed entirely.
Most Fire TV models do not respond to 9876, 2580, or physical button codes. Amazon’s software layer blocks factory menu access to prevent user modifications that could affect Fire TV certification.
Alternative diagnostic mode: Some Fire TV models offer limited diagnostics through Settings > Device & Software > Developer Options. This requires enabling developer mode first. Options include display information and HDMI diagnostics but not service-level adjustments.
Fire TV models manufactured after 2023 increasingly disable traditional service menus. Best Buy positions these as consumer appliances, not serviceable electronics.
Common Service Menu Adjustments Explained
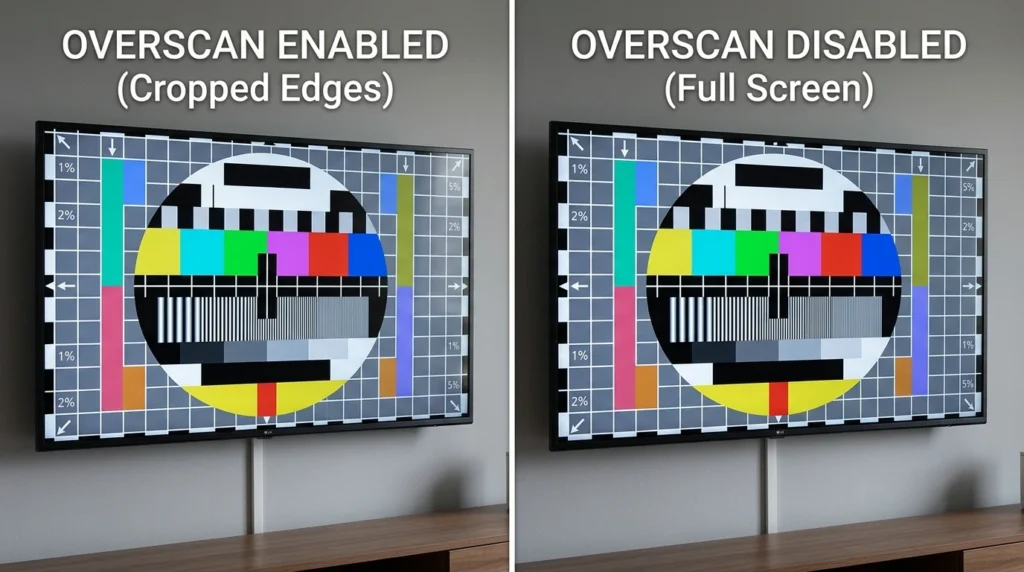
Fixing Overscan (Most Common Issue)
Overscan crops 3-5% of the image edge to hide broadcast signal noise. Modern digital sources don’t need this. HDMI and PC inputs should display pixel-for-pixel.
In the service menu, look for “OVERSCAN,” “H-SIZE,” “V-SIZE,” or “JUST SCAN” options.
To disable overscan: Navigate to the overscan setting. Change value from 1 to 0, or from “ON” to “OFF.” Some menus use percentage values—set to 0%. Exit and power cycle the TV.
The setting often appears greyed out in normal menus because manufacturers assume consumers want overscan. Service menu bypasses this restriction. Changes apply immediately to the current input. You may need to repeat for each HDMI port.
White Balance Calibration
White balance controls color temperature. Factory settings drift as the panel ages, causing blue or yellow tint.
Service menu white balance sections show RGB gain and offset values. These adjust red, green, and blue intensity at different brightness levels.
Safe adjustment approach: Change values in increments of 1 or 2. Never exceed +/- 10 from factory default. Test with a neutral grey image. Large adjustments can cause color clipping or uneven brightness.
Professional calibration uses colorimeters. Manual adjustment risks making the problem worse. Only adjust if you have a reference image and can record original values.
Geometry and Picture Centering
Older models allow geometry adjustment for vertical and horizontal position.
Look for “V-POS,” “H-POS,” “V-CENT,” or “H-CENT” in the service menu. Values typically range from 0 to 100 or -50 to +50.
Adjustment increments: Change by 1-3 units at a time. Watch the screen edges. Center the image so borders are equal on all sides. Excessive adjustment can shift the picture off-panel entirely.
Geometry controls apply to the physical panel alignment. They do not fix resolution mismatch or aspect ratio problems. Use these only for centering issues, not scaling.
Critical Warnings Before You Start
Record Factory Defaults First
Write down every value before changing anything. Use your phone camera to photograph each service menu screen.
If adjustments fail, you cannot restore settings without these records. The TV has no “undo” function. Factory reset in consumer menus does not restore service menu changes.
Many users brick their TVs by changing multiple values without documentation. Recovery requires reprogramming the EEPROM chip or replacing the main board.
Settings That Can Permanently Damage Your TV
Never adjust these service menu options:
Panel voltage settings: Options labeled “V-DRIVE,” “PANEL-V,” or voltage references control power to the LCD backlight. Incorrect values cause immediate backlight failure or panel burn.
Timing parameters: Settings like “H-FREQ,” “V-FREQ,” “CLOCK,” or refresh controls adjust signal timing. Wrong values create permanent display corruption or prevent the TV from turning on.
Factory engineers calibrate these during manufacturing. Consumer adjustment serves no purpose and risks hardware damage.
If a setting has “DO NOT ADJUST” in the label, the warning is literal. These controls exist for factory test equipment, not field service.
Warranty Implications
Best Buy’s warranty explicitly excludes damage from unauthorized service menu access. Support will refuse claims if they detect non-factory settings.
Some service menu changes write flags to the TV’s memory. Technicians can identify that service mode was accessed even if you restore values. The EEPROM stores an access counter on certain models.
Proceed only if you accept full responsibility for repair costs. Out-of-warranty TVs have nothing to lose. New TVs under warranty should use service menu access only as a last resort.
Troubleshooting Failed Access Attempts
9876 Code Not Working
Volume not at zero: The code requires actual zero volume, not mute. Press volume down until the on-screen display shows 0. Mute does not count.
Timing too slow: You have 5 seconds after entering 9876 to press OK. Count “one-thousand-one, one-thousand-two” and press OK by the third second. Hesitation breaks the sequence.
Wrong remote type: Universal remotes programmed with Insignia codes may not send Input commands correctly. Use the original Insignia remote if possible. Some third-party remotes like Blackweb, Onn, or Philips universal remotes lack the exact signal timing required for service menu access, even when properly programmed for basic TV control.
Try the sequence 5 times before concluding it doesn’t work. Remote button wear can cause missed inputs.
Menu Exits Immediately
Firmware updates on 2020-2024 models add service menu lockouts. The menu appears briefly then closes.
This indicates intentional blocking by the manufacturer. Fire TV models and smart TV updates often disable service access to prevent modifications that affect streaming certification.
No workaround exists short of downgrading firmware, which most users cannot do safely.
Service Options Greyed Out
Some service menu items appear but cannot be changed. This happens when settings are hardware-locked or input-dependent.
Overscan often locks when using certain HDMI ports or the TV’s smart platform input. Switch to a different HDMI port or component input before accessing the service menu. The same setting may become adjustable on a different input.
Hardware locks occur when the control board lacks the physical capability. Budget models sometimes show service options that only work on higher-end versions using the same software.

Model-Specific Code Reference
| Model Series | Code | Method | Year Range |
|---|---|---|---|
| NS-L (all sizes) | 9876 | Input + code + OK | 2010-2014 |
| NS-LCD32, NS-LCD42 | 2580 | Input + code | 2008-2012 |
| NS-P plasma series | 1979 | Menu > Windows + code | 2008-2011 |
| NS-50D420, NS-55D420 | 9876 | Input + code + OK | 2018-2020 |
| NS-24D310NA21 | 9876 | Input + code + OK | 2020 |
| Fire TV Edition (2019-2021) | 9876 | Input + code + OK | 2019-2021 |
| Fire TV Edition (2022-2026) | Disabled | No access | 2022-2026 |
NS-L series specifics: Models like NS-L37Q-10A and NS-L42Q-10A respond reliably to 9876. These TVs have persistent overscan issues that standard menus cannot fix.
NS-LCD series specifics: Older 720p models (2008-2010) use 2580 exclusively. The 9876 code was added in later firmware revisions around 2011.
NS-P plasma series specifics: All plasma models require the 1979 code via the Windows menu path. Plasma service menus include convergence grids and geometry controls not present on LCD models.
When to Use Normal Settings Instead
Try standard menu options before accessing service mode.
Aspect ratio alternatives: Most overscan problems resolve by changing Picture Size to “Direct,” “Just Scan,” or “Screen Fit” in the normal picture menu. Check every picture mode preset.
Picture mode solutions: Switching between Standard, Vivid, and Movie modes may enable options greyed out in your current mode. Some picture modes lock aspect ratio controls.
Source device adjustments: Gaming consoles and PCs often have their own overscan compensation. Check device settings for “screen bounds,” “display area,” or “overscan” before modifying the TV.
Service menu adjustments should be your final option after exhausting standard controls.
Exiting Service Menu Safely
Press the Menu button to exit. The service menu closes and normal operation resumes.
Alternative exit method: Press the power button. The TV turns off. Settings save automatically. Power on normally to verify changes.
Changes take effect immediately. You do not need to “save” manually. Exiting without power cycle still applies your adjustments. Power cycling ensures the TV reinitializes with new values.
If the TV behaves erratically after changes, unplug power for 30 seconds. This forces a cold boot. If problems persist, re-enter service menu and restore photographed factory values.
Conclusion
The 9876 code provides service menu access on most Insignia LCD and LED models. Older sets use 2580. Plasma models need 1979 via the Windows menu. Fire TV editions from 2022 onward block access entirely.
Use service mode to fix overscan, adjust geometry, and calibrate white balance when normal menus fail. Record all factory values before making changes. Avoid voltage and timing parameters completely.
Service menu access voids warranty and carries permanent damage risk. Proceed only when standard settings cannot solve your problem and you accept responsibility for repair costs. For valuable or new TVs, professional calibration is safer than DIY adjustment.
If you’re working with other TV brands, similar service menu access methods exist for Hisense, Samsung, Vizio, Sony, and Element TVs, though codes and methods differ by manufacturer.