Micromax TV service menu codes unlock hidden settings on your television. These codes let you access factory settings, adjust advanced picture controls, and fix technical issues.
You need these codes when your TV shows display problems, requires deep settings reset, or needs professional-level calibration. The service menu is different from your regular settings menu.
Most users access service menu to fix color issues, reset frozen systems, or adjust backlight values that normal menus don’t show.
What is Micromax TV Service Menu
The service menu is a hidden interface built into Micromax televisions. Factory technicians use it during manufacturing and quality testing.
This menu controls core TV functions. It includes picture engine settings, audio processor values, panel calibration data, and system diagnostics.
Regular users need service menu access for specific repairs. When your TV won’t respond to factory reset from regular settings, service menu provides deeper reset options.
Purpose and Functions
Service menu serves three main purposes.
First, it provides diagnostic information. You can check panel hours, firmware version, hardware codes, and error logs.
Second, it enables advanced adjustments. You change white balance values, backlight PWM frequency, overscan settings, and color temperature curves.
Third, it offers recovery options. When regular menus fail, service menu can restore factory defaults at hardware level.
When You Need Service Menu Access
You need service menu in five situations.
Your TV displays wrong colors after a power surge. Service menu lets you reset color calibration values.
The screen shows only half the picture with black bars. Overscan settings in service menu fix this.
Your TV freezes on startup and won’t respond to regular reset. Service menu hard reset works when nothing else does, similar to how Samsung TV factory reset resolves system freezes.
Backlight flickers at low brightness. Service menu backlight frequency adjustment solves this.
You accidentally changed a setting and can’t find your way back. Service menu shows all active values.
Complete List of Micromax TV Service Menu Codes
Micromax uses different codes for different TV series. Each series has its own access code based on manufacturing year and panel type.
Entering wrong codes won’t damage your TV. The system simply won’t open the service menu.
B Series Service Menu Code (2580)
B Series TVs use code 2580 for service menu access.
This series includes models from 2016-2018. Most B Series TVs are LED models ranging from 32 to 50 inches.
To enter: Press SOURCE button on your remote, then navigate to source number 2580. The service menu appears immediately.
B Series models have model numbers starting with “32B” or “40B” or “50B”.
C Series Service Menu Code (3138)
C Series TVs use code 3138 for service menu access.
This series launched in 2017-2019. C Series introduced smart TV features to Micromax lineup.
Access method: Press SOURCE button, scroll to source 3138, press OK. Service menu opens within 2 seconds.
C Series models show “32C” or “43C” or “50C” in model number.
K Series Service Menu Code
K Series TVs use code 4729 for service menu access.
K Series represents Micromax budget models from 2018-2020. These TVs lack smart features but offer reliable LED panels.
Enter code: Press SOURCE button, find source 4729, select it. Service menu loads.
K Series model numbers contain “32K” or “40K”.
E Series Service Menu Code
E Series TVs use code 5621 for service menu access.
E Series launched in 2019 as energy-efficient models. These TVs have lower power consumption than other series.
Service menu access: Press SOURCE button, navigate to 5621, confirm. Menu appears.
E Series models start with “32E” or “39E” or “43E”.
T Series Service Menu Code
T Series TVs use code 6892 for service menu access.
T Series represents the latest Micromax models from 2020-2022. These include 4K panels and Android TV features.
Access: Press SOURCE button on remote, scroll to source 6892, press enter. Service menu activates.
T Series model numbers begin with “43T” or “50T” or “55T”.
Universal Codes for Other Models
Older Micromax models use these alternative codes:
- 1947 – Works on 2015 and earlier models
- 7777 – Works on some Android TV variants
- 0000 – Works on certain Chinese panel imports
Try codes in order listed. One will work for your specific model. If you need codes for other TV brands, check our complete LCD LED TV service menu codes guide which covers multiple manufacturers.
How to Enter Service Menu on Micromax TV (Step-by-Step)
Three methods exist to access Micromax service menu. Most users succeed with Method 1.
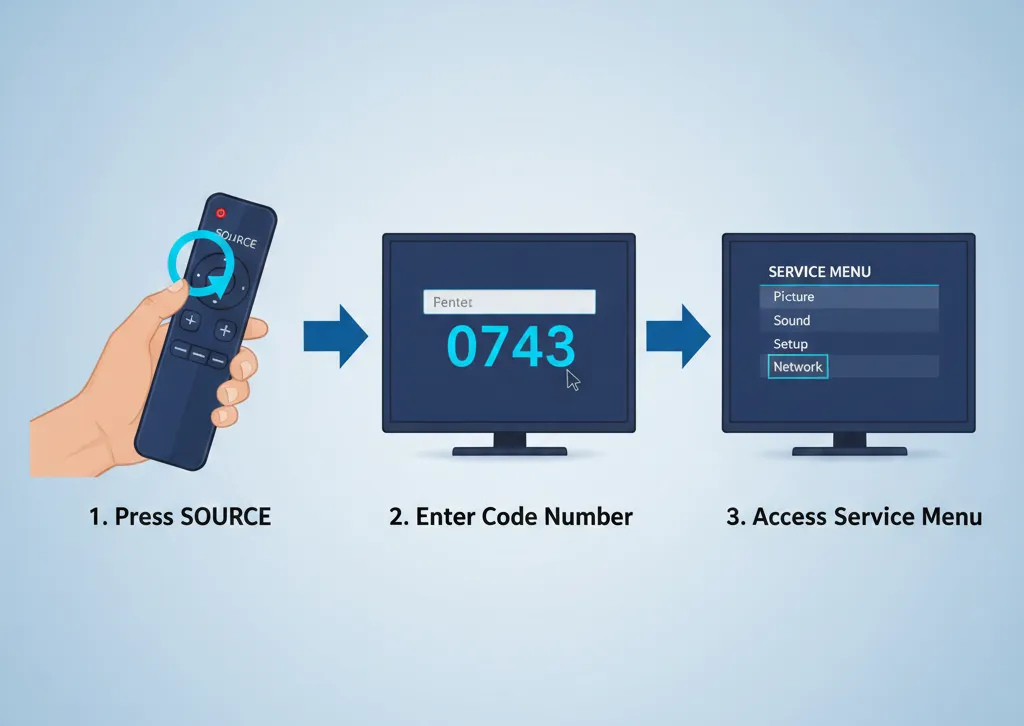
Method 1: Using Source Button + Code
This method works on 90% of Micromax TVs.
Step 1: Turn on your TV normally. Wait for home screen to fully load.
Step 2: Pick up your original Micromax remote. Third-party remotes may not work.
Step 3: Press the SOURCE button once. The input source menu appears on screen.
Step 4: Look at your TV series code from the list above. B Series uses 2580, C Series uses 3138, and so on.
Step 5: Use arrow keys to navigate. Scroll through source numbers until you reach your series code.
Step 6: Press OK or Enter button when your code number is highlighted.
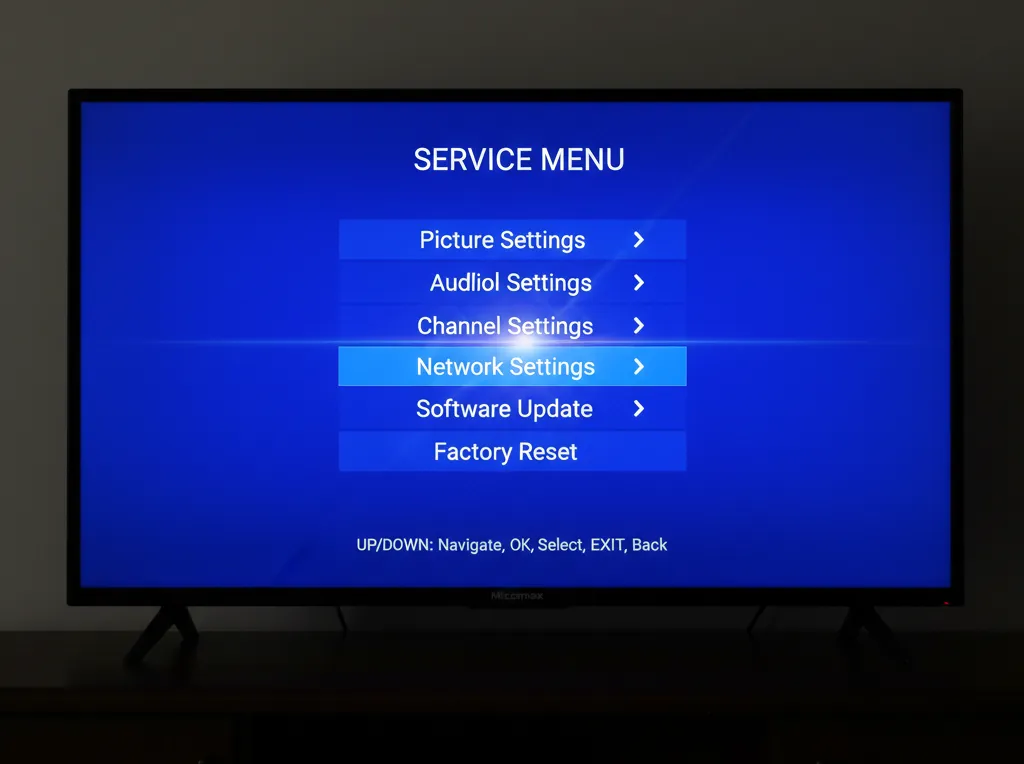
Step 7: Service menu opens immediately. You see a blue or green screen with multiple options.
This takes 15-20 seconds total.
Method 2: Remote Button Combination
Some Micromax models respond to button sequences instead of source codes, similar to Sony TV service menu access which also uses button combinations.
Step 1: Turn off your TV completely. Unplug it for 10 seconds, then plug back in.
Step 2: Turn on TV using power button on remote.
Step 3: Within 5 seconds of power on, press this sequence: MENU + 1 + 4 + 7 + 2
Step 4: Press each button quickly. Hold each button for 1 second before pressing next.
Step 5: Service menu appears after last button press.
If this fails, try alternative sequence: MUTE + 1 + 8 + 2 + POWER
Method 3: Physical Button Method
When remote methods fail, use TV panel buttons. This works when you need to turn on TV without remote.
Step 1: Locate buttons on TV. Most Micromax TVs have buttons on right or bottom edge.
Step 2: Turn off TV completely using power button.
Step 3: Press and hold MENU button on TV panel.
Step 4: While holding MENU, press POWER button on panel.
Step 5: Keep holding MENU for 8 seconds after TV turns on.
Step 6: Release MENU button. Service menu appears.
This method works when remote is broken or lost.
How to Identify Your Micromax TV Series Model
Finding your TV series determines which service code you need.
Check model sticker on back panel of TV. The sticker shows model number in format like “32B6000FHD” or “43C5500FHD”.
The letter after screen size indicates series. 32B means B Series. 43C means C Series. 50T means T Series.
If sticker is damaged, check original purchase box. Model number is printed on box sides.
Third option: Go to TV settings menu. Select About or System Information. Model number appears on screen.
Note down your series letter before attempting service menu access.
Service Menu Options Explained
Service menu shows 8-12 main sections. Each section controls different TV functions.
Warning: Changing random values can damage your display. Only adjust settings you understand.
Picture and Display Settings
Picture section controls image output.
White Balance: Adjusts red, green, blue levels separately. Factory values are 128 for all colors. Changes fix color tinting.
Backlight PWM: Controls backlight flicker frequency. Default is 240Hz. Increase to 480Hz to reduce eye strain.
Overscan: Adjusts image borders. Default is 95. Increase to 100 to show full picture without cut edges, which helps when you need to fix TV not displaying full screen.
Sharpness Engine: Controls edge enhancement. Default is 50. Lower values reduce artificial sharpness.
Gamma: Controls brightness curve. Default is 2.2. Don’t change unless you know exact target value.
Audio Settings
Audio section manages sound processing.
Volume Limit: Sets maximum volume level. Default is 100. Lower it if speakers distort at high volume.
Audio Delay: Syncs audio with video. Default is 0ms. Increase by 50ms if lips don’t match speech.
Speaker Protection: Prevents speaker damage. Keep this enabled always.
Subwoofer Level: Controls bass output. Only appears on models with subwoofer output. If you experience complete audio failure, check our LG TV sound not working fix guide.
System and Software Settings
System section shows technical data.
Panel Hours: Displays total TV runtime. This number only increases, never resets.
Firmware Version: Shows current software version. Write this down before any changes.
HDMI Settings: Controls HDMI handshake timing. Default works for most devices.
USB Settings: Manages USB port power. Only change if USB devices won’t work.
Factory Reset Options
Reset section has three levels.
Soft Reset: Resets user settings only. Keeps apps and accounts. Use this first.
Hard Reset: Resets all settings to factory defaults. Removes all apps and data.
Factory Restore: Complete system wipe including firmware cache. Use only when TV won’t boot.
How to Exit Service Menu Safely
Exiting properly prevents system errors.
Method 1: Look for EXIT option in service menu. Select it and press OK. TV returns to normal mode.
Method 2: Press POWER button on remote. TV turns off. Turn it back on normally.
Method 3: Unplug TV for 30 seconds. This force-closes service menu. Plug back in and power on.
Never leave service menu open for more than 5 minutes. Long exposure can cause menu burn-in on screen.
Common Problems and Solutions
Users face three main issues accessing service menu.
Service Menu Not Opening
Your code isn’t working.
Solution 1: Verify your TV series. Double-check model number on back sticker. You might have wrong series code.
Solution 2: Try pressing SOURCE button twice quickly instead of once. Some units need double press.
Solution 3: Update TV firmware to latest version. Older firmware versions sometimes block service menu access.
Solution 4: Remove batteries from remote for 30 seconds. Reinsert them and try again. This resets remote communication.
Code Not Working
You entered correct series code but nothing happens.
Solution 1: Your TV might use regional variant code. Try universal code 1947 instead.
Solution 2: Check if SOURCE button works at all. Press it and see if input menu appears. If not, remote SOURCE button is broken.
Solution 3: Try button combination method instead of source code method. Some batches require different access methods, similar to Panasonic TV service menu access.
Solution 4: Your TV might have service menu disabled at factory. This happens on special distributor models. Contact Micromax support.
Screen Frozen After Entering
Service menu opened but TV is now frozen or shows black screen.
Solution 1: Wait 60 seconds. Some models take time to load service menu interface.
Solution 2: Press BACK button on remote three times. This cancels service menu loading.
Solution 3: Unplug TV from wall for 2 minutes. Plug back in. TV resets and returns to normal.
Solution 4: If screen stays black after replug, contact Micromax service center. A setting might have been accidentally changed before freeze. For persistent black screen issues, review our TV black screen troubleshooting guide.
Safety Precautions and Warnings
Service menu poses risks when used incorrectly.
Settings You Should Never Change
Eight settings can permanently damage your TV.
Panel Voltage: This controls power to screen. Wrong values burn pixels or kill backlight completely, leading to issues like dark TV screen problems.
EEPROM Write: This saves settings to chip. Multiple writes can corrupt firmware storage.
Aging Mode: This runs high-power burn-in test. Running it at home will damage panel within hours.
Factory Test Patterns: These drive specific pixels at maximum power. Extended display causes burn-in.
Bootloader Options: Changing boot sequence can prevent TV from starting.
Hardware ID Values: These identify TV to software. Changes cause app failures.
LVDS Timing: This controls panel data signals. Wrong timing creates permanent lines on screen.
ADC Calibration: This sets analog-digital conversion. Bad calibration creates color bands.
Only adjust settings you specifically need to fix known problems.
Warranty Considerations
Service menu access affects warranty coverage.
Micromax warranty states that unauthorized service menu changes void coverage. If you make changes and TV fails later, repair costs are your responsibility.
Document everything. Write down original values before changing any setting. Take photos of service menu screens.
Some changes leave evidence in system logs. Service technicians can see service menu was accessed.
Safe operations that don’t void warranty:
- Viewing diagnostic information only
- Checking panel hours
- Reading firmware version
- Soft reset that restores factory settings
Operations that void warranty:
- Changing voltage levels
- Modifying panel timings
- Disabling protection circuits
- Updating firmware from service menu
When to Call Professional Support
Call Micromax support in four situations.
Your TV won’t start after service menu changes. Technicians have factory restore tools unavailable to users, especially helpful when dealing with issues similar to TV won’t turn on problems.
You see permanent lines or spots on screen after adjustments. Panel damage requires hardware repair.
Service menu is stuck and won’t exit after trying all methods. This indicates firmware issue.
You need specific calibration values for your exact panel model. Only factory database has these numbers.
Micromax support number is on your TV manual and purchase receipt.
Frequently Asked Questions
Will entering service menu void my warranty?
Just entering service menu doesn’t void warranty. Making changes to values does. If you only view information without changing anything, warranty stays valid.
Can I brick my TV using service menu?
Yes, changing wrong settings can make TV unusable. Panel voltage, LVDS timing, and EEPROM writes can permanently damage hardware. Stick to safe adjustments like picture settings and soft reset.
Why does my TV series use different code than listed?
Manufacturing batches use variant codes. Regional models might have custom codes. Try universal code 1947 if your series code doesn’t work. You can also check Onida TV service codes or Videocon TV service codes for similar Indian brand patterns.
How do I reset service menu changes?
Select Factory Reset option in service menu System section. Choose Soft Reset to keep apps or Hard Reset for complete restore. TV returns to factory settings within 30 seconds.
Can I access service menu without original remote?
Yes, use physical button method. Press and hold MENU button on TV panel while pressing POWER. Hold MENU for 8 seconds after TV turns on.
What does “Panel Hours” mean in service menu?
Panel hours shows total operating time of your screen. This number indicates display age. LED panels typically last 60,000 hours. After 50,000 hours, brightness degrades noticeably.
Is service menu the same as hidden menu?
Service menu and hidden menu are same thing. Different users call it factory menu, engineering menu, or secret menu. All names refer to same interface.
Why won’t SOURCE button open service menu?
SOURCE button might be damaged on remote. Try physical button method instead. Or your TV uses button combination method rather than source code method, similar to how LG TV service menu or Samsung TV service menu work on their respective brands.
Are service menu codes same across all LED TV brands?
No, each manufacturer uses different codes and access methods. Micromax codes won’t work on Sony, Philips, Toshiba, or Hisense TVs. Each brand requires its specific service codes.