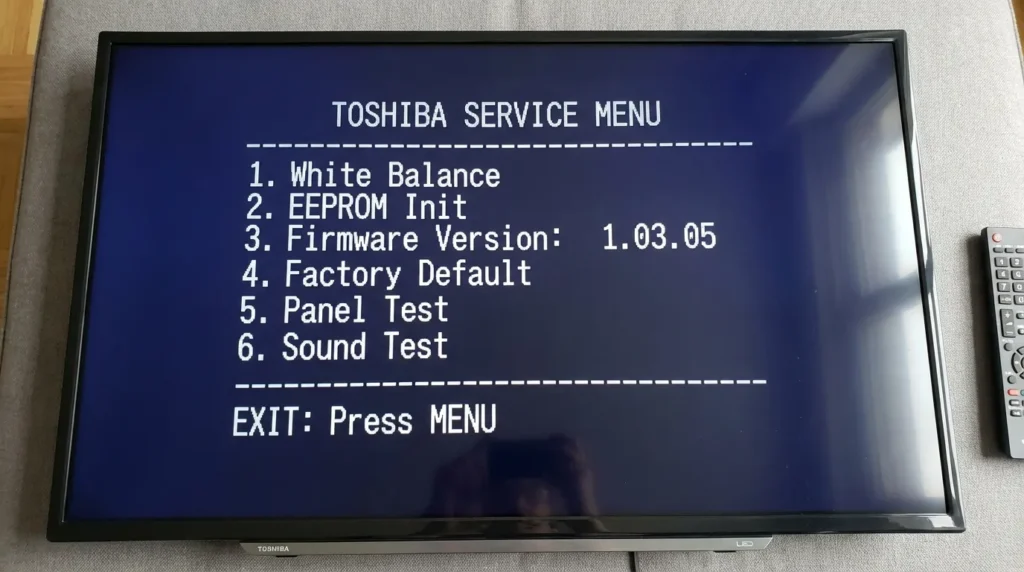
The Toshiba service menu is a hidden diagnostic interface built into the TV’s firmware. It gives access to calibration settings, factory reset options, software version data, and hardware diagnostics that don’t appear in the standard on-screen menu. Technicians use it after board replacements. DIY repairers use it to fix picture issues. This guide covers every known working method — organized by TV type — including LCD, LED, CRT, Smart TV, Android TV, and Fire TV Edition models.
If you need codes for a different brand, see the complete list of all LCD and LED TV service menu codes for a full brand index.
What Is the Toshiba Service Menu?
The service menu is a protected settings layer. It exists in virtually every Toshiba TV ever made, but the entry method changes depending on the panel technology and firmware generation.
What You Can Access and Change
Inside the service menu, you’ll typically find:
- White balance and color temperature adjustments (R, G, B gain/offset values)
- Picture geometry settings on CRT models
- Factory reset (deeper than the standard menu reset)
- Firmware and software version numbers
- Panel-specific calibration data including backlight settings
- EEPROM initialization — resets all stored settings to factory state
- Self-diagnostic displays showing error codes and component health
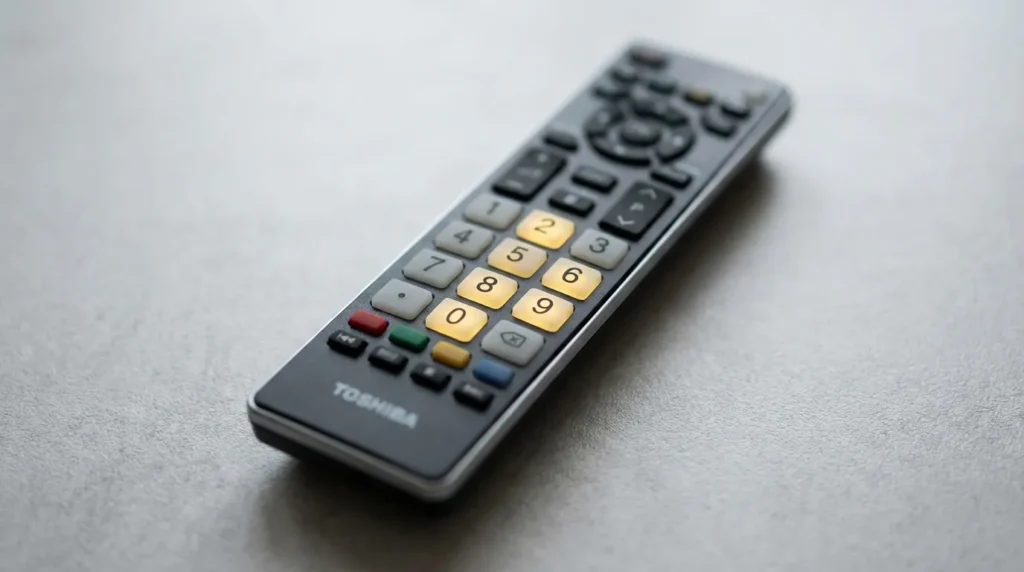
Why You Need the Original Remote
Most Toshiba service menu entry methods require the original Toshiba remote control. Universal remotes usually lack the correct IR codes for Mute+Menu simultaneous presses or 4-digit entry sequences. If you’ve lost your remote, you’ll need a replacement before proceeding.
Before You Start — Important Warnings
Read this before touching anything.
- Do not change values you don’t understand. Incorrect EEPROM settings can corrupt calibration data and cause a blank screen or distorted image that’s difficult to reverse.
- Write down original values before adjusting anything. Take a photo of each screen if possible.
- Do not power off during a write operation. If the TV is saving a setting and loses power, EEPROM corruption can result.
- Service menu access is intended for qualified technicians. Proceed at your own risk.
- Post-2021 Toshiba TVs in most markets are manufactured under license by Hisense. The Toshiba branding is licensed. These models may use Hisense firmware internally, which can change service menu access codes. If the standard Toshiba methods don’t work on your 2022–2026 model, try Hisense TV service menu codes as an alternative.
Toshiba LCD Service Menu Code
This method works on most Toshiba LCD flat-panel TVs from the mid-2000s through early 2010s.
Code: 9301
Steps
- Turn the TV on normally.
- Press the MENU button on the remote.
- Use the navigation buttons to highlight the Picture icon.
- Without pressing OK, type 9, 3, 0, 1 on the remote’s number keys.
- The service menu will open.
Navigation inside the menu:
- OK — enter a submenu or confirm
- VOL+ / VOL– — increase or decrease a value
- P+ / P– or CH+ / CH– — move between options
Toshiba LED TV Service Menu Code
Most Toshiba LED TVs from 2010–2020 respond to the same LCD method above (9301 via Picture menu). If that doesn’t work, try the Mute-based method below.
Mute + Menu Method:
- Turn the TV on.
- Press and hold the MUTE button on the remote.
- While holding MUTE, press the MENU button on the TV’s front panel (not the remote).
- Release both buttons.
- The service menu should appear.
Navigation: Same as LCD method above.
To exit: Turn the TV off.
If your Toshiba LED won’t power on at all and you can’t get to the service menu, check this guide on Toshiba TV won’t turn on fixes before proceeding.
Toshiba CRT TV Service Menu — 5 Methods
CRT (tube) Toshiba TVs have several entry methods depending on firmware version. Try them in order.
Method 1 — Mute + Front Panel Menu
- Press and hold the MUTE button on the remote.
- Press the MENU button on the TV’s front panel.
- The service menu opens.
Method 2 — Mute ×3, Hold, Front Panel Menu
- Turn the TV on.
- Press MUTE three times on the remote.
- Press and hold MUTE a fourth time.
- While holding, press MENU on the TV’s front panel.
- Release both buttons.
- A letter “S” appears in the upper right corner — this confirms service mode is active.
- Press MENU on the front panel again to open the full menu.
Method 3 — Mute ×2, Hold, Front Panel Menu
- Turn the TV on.
- Press MUTE twice on the remote.
- Press and hold MUTE a third time.
- While holding, press MENU on the TV’s front panel.
- Release both buttons.
- “S” appears upper right. Press MENU on the front panel to continue.
Method 4 — Mute Once, Hold, Front Panel Menu
- Turn the TV on.
- Press MUTE once on the remote.
- Press and hold MUTE again immediately.
- While holding, press MENU on the TV’s front panel.
- Release both buttons.
- “S” appears. Press MENU on the front panel to open the full menu.
Method 5 — VOL– on TV + 9 on Remote
- Press and hold the VOL– button on the TV’s front panel.
- Simultaneously press the 9 button on the remote.
- Hold both for 3–5 seconds.
- The service menu opens.
Navigation for all CRT methods:
- CH+ / CH– — navigate between options
- VOL+ / VOL– — change values
To exit: Turn the power off. Do not use MENU to exit on CRT models.
Toshiba Smart TV / Android TV Service Menu Code
Toshiba Smart TVs running Android TV (primarily 2018–2021 models) have a different entry method. The 9301 sequence via the Picture menu still works on some. Others require a different code.
Method 1 — 9301 Code (Standard)
Same as the LCD method:
- Press MENU on the remote.
- Highlight Picture.
- Enter 9, 3, 0, 1 on the number keys.
Method 2 — Code 4725
- Press MENU on the remote.
- Navigate to Setup or System.
- Enter 4, 7, 2, 5 on the number keys.
Method 3 — Code 0000 or 1048
On some Android TV firmware versions:
- Press MENU.
- Enter 0, 0, 0, 0 or 1, 0, 4, 8.
If none of these work, the model may be using Hisense-based firmware (common on 2022+ models sold under the Toshiba brand). Try Hisense TV service menu codes as a direct alternative.
Toshiba Fire TV Edition — Service Menu Access
Toshiba Fire TV Edition models (sold primarily in the US and Canada from 2018 onward) run Amazon’s Fire TV OS, not Toshiba firmware. The standard Toshiba service menu codes do not apply to these models.
Known working approach:
- Press and hold MUTE on the Fire TV remote.
- Simultaneously press the MENU (hamburger) button on the TV’s front panel.
On some Fire TV Edition models, there is no accessible technician service menu in the traditional sense. Diagnostic information is accessed via the Fire TV settings under Settings → My Fire TV → About → Network and the hidden diagnostic screen triggered by pressing Back + Menu + Left on the Fire TV remote simultaneously.
For deep hardware calibration on Fire TV Edition Toshiba TVs, contact an authorized service center. These models have locked firmware that blocks third-party service menu access.
If the screen has gone black on your Fire TV Edition model, this guide on fixing a Fire TV black screen covers the most common causes before a service menu approach is needed.
How to Navigate the Service Menu
Once inside the service menu, the controls are the same across most Toshiba LCD and LED models:
| Button | Function |
|---|---|
| CH+ / CH– | Move between menu items / submenus |
| VOL+ / VOL– | Increase or decrease a value |
| P+ / P– | Alternative navigation on some models |
| OK | Enter a submenu or apply a change |
| MENU | Exit (LCD/LED models) |
| Power Off | Exit (CRT models — use this, not MENU) |
Common Settings Found in the Toshiba Service Menu
Picture Calibration Options
- Color temperature — adjusts RGB gain and offset values
- Backlight level — sets base backlight intensity beyond user menu limits
- Sharpness offset — fine-tunes edge enhancement at the hardware level
If picture problems persist after calibration, see this guide on how to fix a TV with no picture for hardware-level diagnosis steps.
Factory Reset via Service Menu
A service menu factory reset (sometimes labeled INIT, EEPROM Init, or Factory Default) is deeper than the standard user-facing reset. It clears all stored calibration data and resets the TV to its original factory state. Use only if you’re performing a board replacement or the TV has persistent corruption issues.
Firmware & Software Info
Most Toshiba service menus display firmware version, panel ID, and model code on an information screen. This is useful for identifying exact hardware configurations before ordering replacement parts.
What to Do If No Method Works
Remote not responding correctly: The most common failure point. Most Toshiba service menu entry methods require the original OEM remote. Check that the remote’s IR emitter is working by pointing it at a phone camera and pressing buttons — you should see a light flash on the camera screen. If not, replace the batteries or the remote.
Wrong method for your model: Try all applicable methods for your TV type before concluding none work. CRT methods don’t work on LCD panels, and vice versa.
Post-2021 Toshiba models: As noted, Toshiba brand TVs sold since 2021 in most markets are Hisense OEM products. The firmware is Hisense-based. If you own a 2022–2026 Toshiba TV and none of these codes work, check Hisense TV service menu codes for the equivalent method.
Locked firmware: Some Fire TV Edition and newer Smart TV models have service menus that are locked at the firmware level. In these cases, authorized service access requires Toshiba/Hisense service tools and a technician login.
Dark or black screen after entering the wrong values: If adjusting service menu settings caused a dark or blank screen, see how to fix a dark TV screen — in many cases, a hard reset resolves it without a full EEPROM initialization.
Frequently Asked Questions
What is the Toshiba service menu code? The most common code is 9301, entered via the Picture menu after pressing MENU on the remote. CRT models typically use Mute + front panel Menu button combinations instead.
Can I use a universal remote to enter the service menu? Usually not. Universal remotes typically lack the correct IR signal for the simultaneous Mute + Menu press required on CRT and LED models. For numeric code entry (9301, 4725), a universal remote may work if it supports full number key input.
What does the “S” in the corner mean? It confirms the TV has entered service mode. It appears on CRT models during the Mute-based entry sequence before the full menu opens.
Will entering the service menu void my warranty? Accessing the service menu itself typically doesn’t void a warranty, but changing values in it can. Toshiba and authorized service centers can check whether service menu settings have been altered.
Is the Toshiba service menu the same as a factory reset? No. A factory reset restores user settings to default. The service menu also contains hardware-level calibration data, EEPROM settings, and diagnostic tools that a standard factory reset doesn’t touch.
My Toshiba TV is from 2023. None of these codes work. Why? Post-2021 Toshiba TVs sold in Europe, North America, and Australia are manufactured by Hisense under a brand license. The firmware is Hisense-based. Try Hisense TV service menu codes for your specific panel size and year.
Last updated: 2026. Methods verified against known Toshiba firmware versions for LCD, LED, CRT, Android TV, and Fire TV Edition models.