Your TV has power. Maybe you can hear sound. But the screen is black — completely dark or just barely glowing with no image. This happens to every TV brand, every panel type, every year. Most cases come down to one of five fixable problems. This guide walks through each one in order, from the fastest fix to the hardware-level causes that need a repair decision.
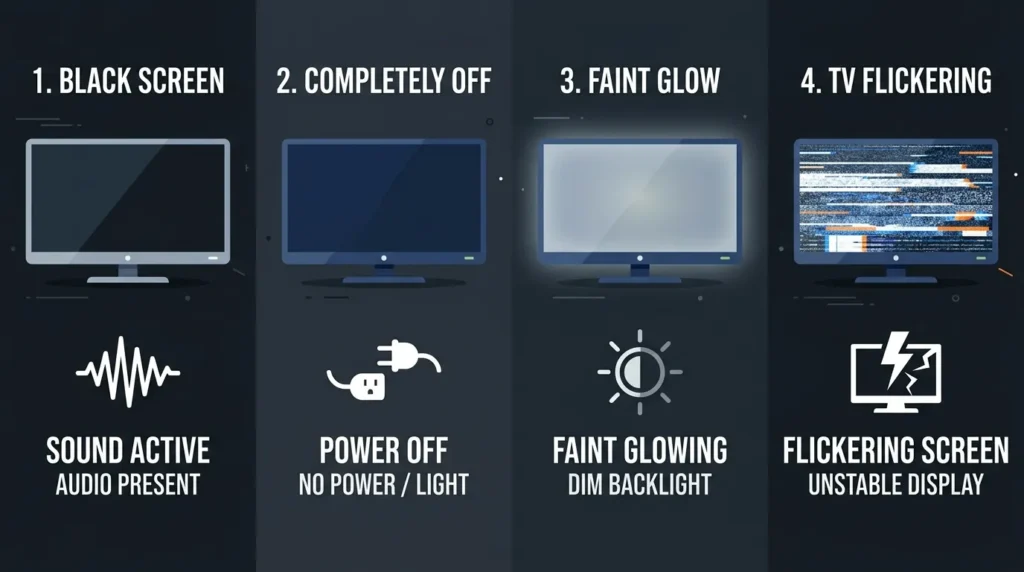
Read Your Symptoms First — 30-Second Diagnosis
Your symptoms tell you where to start. Don’t skip this.
Sound works, screen is black — This is almost always a backlight failure or a T-Con board issue. The TV is processing video, but nothing is reaching the display. Go straight to Fix 3 (the flashlight test).
No sound and no picture — The TV may not be completing its boot sequence, or the input source is wrong. Start with Fix 1 (power cycle) and then Fix 2 (input source).
Screen has a faint glow but no visible image — This means the backlight is on but the picture signal isn’t getting through. T-Con board or LVDS cable is the likely cause. Fix 3 will confirm it. If you own an LG and this is the symptom you’re seeing, the LG TV black screen fix guide covers model-specific steps in more detail.
TV turns on then goes dark after a few seconds — This is a protection shutdown, often triggered by a failing power supply board or failing LED backlight circuit. The TV detects a fault and cuts the display to protect itself. Fix 1 may resolve it temporarily; if it returns, see the hardware section.
Fix 1 — Power Cycle the TV (Resolves ~40% of Cases)
This is not the same as pressing the power button twice. A proper power cycle fully drains the TV’s capacitors and clears any corrupted memory state.
Steps:
- Turn off the TV using the remote or power button.
- Unplug the power cable from the wall outlet — not from the TV, from the wall.
- Press and hold the TV’s physical power button (on the TV itself, not the remote) for 30 seconds. This drains residual charge from the capacitors.
- Wait 60 seconds total from the time you unplugged.
- Plug directly into a wall outlet — skip the surge protector for now.
- Power on and check the screen.
Why 60 seconds? Large capacitors in the power supply board hold charge for up to 45 seconds after unplugging. A 10-second wait doesn’t fully discharge them. Sixty seconds guarantees a full reset.
If the picture returns, the issue was a corrupted HDMI handshake or a temporary firmware glitch — both common on 2024–2026 smart TV firmware after software updates. Samsung owners dealing with recurring black screen issues after updates can find additional steps in the Samsung TV black screen fix guide.
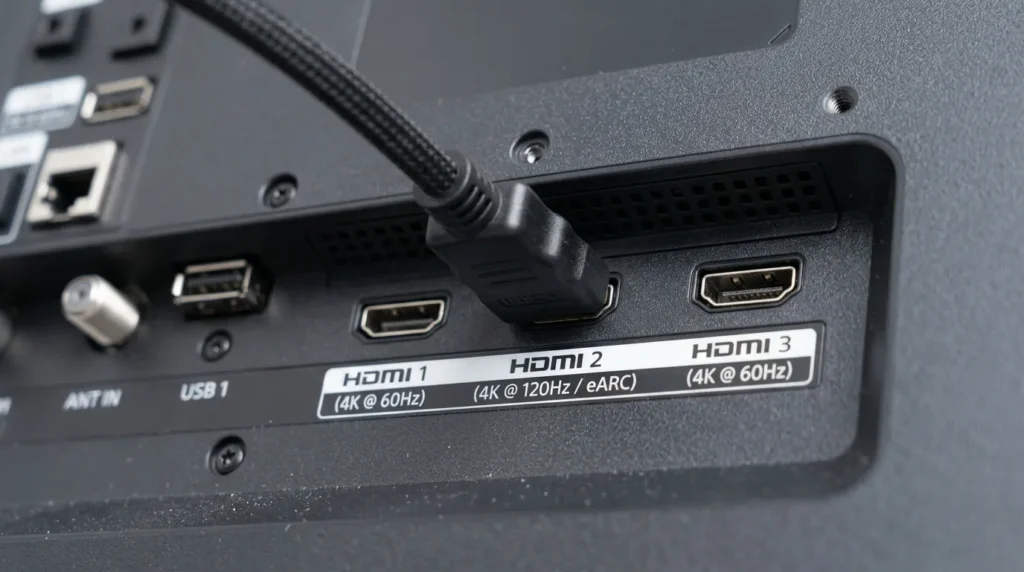
Fix 2 — Check Input Source and Cables
A blank screen with a working TV is one of the most common issues, and it’s almost always an input selection problem or a bad cable.
Wrong input selected: Press the Input or Source button on your remote. Scroll through every available input — HDMI 1, HDMI 2, HDMI 3, AV, Component — even if you think you know which one is correct. The TV may have reset to a different default after a power cut. Not sure which port your device is plugged into? The TV HDMI port selector tool can help you identify the right input quickly.
HDMI cable swap: Pull the HDMI cable out of both ends. Use a different cable. Cables degrade, especially if they’ve been bent sharply or run behind furniture. A failed HDMI cable often shows as a black screen rather than a fuzzy image — there’s simply no signal.
HDMI port swap: If swapping the cable doesn’t help, try a different HDMI port on the TV. HDMI ports fail individually. HDMI 1 being dead while HDMI 2 works is common.
HDCP handshake failure: HDCP (High-bandwidth Digital Content Protection) is the authentication protocol between your TV and connected device. When it fails — especially with streaming boxes, Blu-ray players, or newer game consoles — the screen goes black even though the cable and port are fine. Fix: unplug the HDMI cable from the source device (Roku, PS5, Apple TV, etc.), wait 10 seconds, then reconnect. This forces a fresh HDCP handshake. If you’re having this issue with a Fire TV Stick specifically, the steps in the Fire TV black screen fix article apply directly.
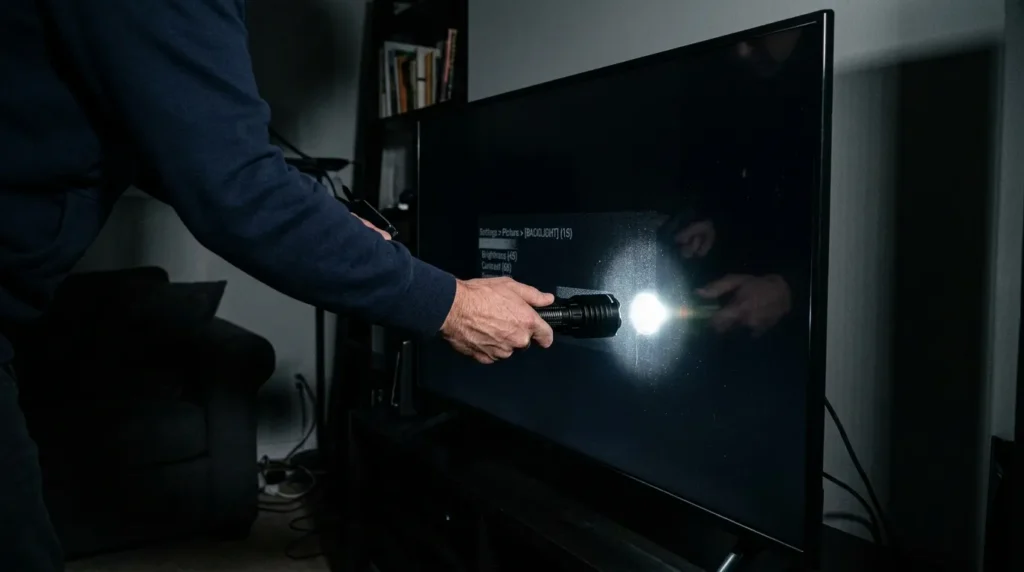
Fix 3 — Run the Flashlight Test (Backlight Check)
This test tells you in 15 seconds whether your backlight has failed.
How to do it:
- Turn the TV on.
- Darken the room as much as possible.
- Hold a flashlight or your phone’s torch directly against the screen — within 2–3 centimetres.
- Shine it at the centre of the screen and look closely for any faint image.
What the result means:
If you see a faint image — a menu, a desktop, the outline of what should be on screen — the backlight has failed. The TV is producing a picture, but nothing is illuminating it. The backlight circuit, LED driver board, or individual LED strips need replacement. For Element TV owners, this is often the exact cause covered in the Element TV black screen fix.
If you see nothing at all, even with the flashlight pressed against the screen, the problem is deeper. Either the panel itself has failed, the main board is not producing a signal, or the T-Con board is dead.
Backlight failure is the most common hardware cause of no-picture complaints on LED TVs. On sets 4–7 years old, LED strips fail in sections, often the bottom row first. A replacement LED strip kit for most 55-inch panels costs $25–$60 as of 2026. If your screen shows unusual brightness problems rather than a full blackout, the dark TV screen fix guide covers partial backlight failures in detail.
Fix 4 — Check Picture Settings
Some TVs save picture settings per input source. After a factory reset or firmware update, your brightness may have been set to zero on that specific input.
Check these:
- Press Menu or Settings and navigate to Picture or Display settings.
- Set Brightness to 50 and Backlight to maximum.
- Disable Game Mode if it’s active — some TVs set backlight to minimum in Game Mode by default.
- Disable HDR Auto-Detect temporarily. On some TCL and Hisense models, an HDR signal mismatch causes the display to go black while the TV tries to switch modes.
Not sure what picture mode your TV is currently running? The TV picture mode optimizer tool identifies the best settings for your panel type and viewing environment. If you cannot see the menu at all, go directly to Fix 5.
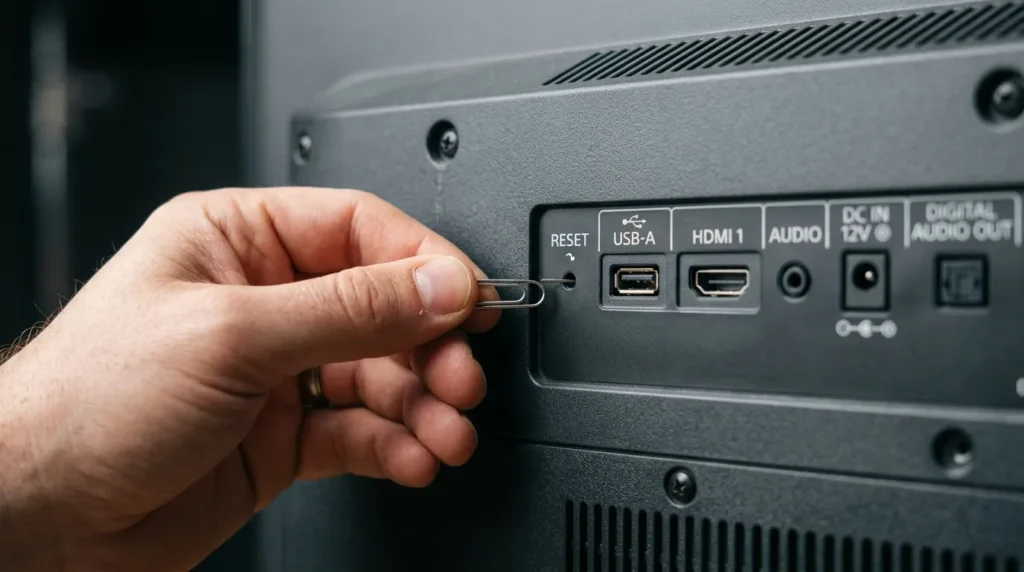
Fix 5 — Factory Reset Without a Picture
If the picture settings are corrupted, or a firmware update left the TV in a broken state, a factory reset may resolve it even without being able to see the screen.
Using physical button combos (no screen needed):
Most manufacturers include a hardware reset method:
- Samsung: Hold the power button on the TV body for 15 seconds. On some models, hold the Menu button on the TV plus the power button simultaneously. The full process is documented in the Samsung TV factory reset guide.
- LG: Hold the power button on the TV body for 10 seconds, or look for a pinhole reset button on the back. If you need to access deeper diagnostic settings, the LG TV service menu codes page lists the full entry sequences by model.
- Vizio: Press and hold the Volume Down and Input buttons simultaneously for 10 seconds.
- Sony: With the TV off, press and hold the Power and Volume Down buttons simultaneously for 10 seconds. For advanced diagnostics, Sony TV service menu codes are useful if the reset doesn’t restore the picture.
- TCL / Hisense: Check for a physical reset pinhole on the back panel — insert a pin and hold for 5–10 seconds. If the TV shows blink codes during this process, the TV error code lookup tool can decode what each sequence means.
After a factory reset, the TV will restart. If the backlight comes on during setup, the issue was a software or settings problem.
When It’s a Hardware Problem
If none of the above fixes restore the picture, the cause is a failed internal component. Here are the four hardware faults responsible for nearly all remaining cases.
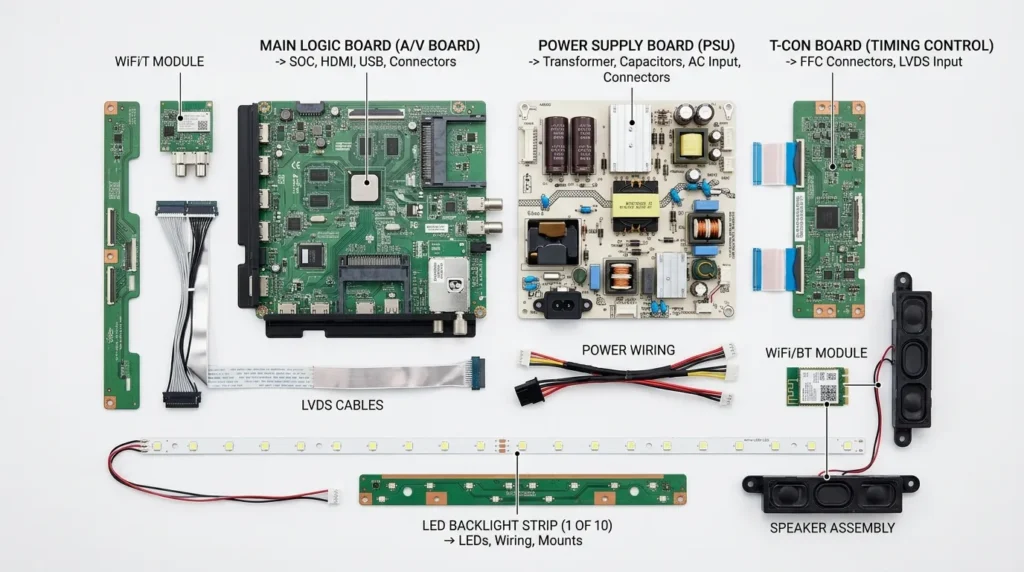
Backlight / LED strip failure — Confirmed by the flashlight test showing a faint image. Individual LED strips arranged in rows behind the panel have burned out. Replacement is DIY-possible with basic tools and a $25–$60 strip kit, but requires full panel disassembly.
T-Con board failure — The Timing Controller board sits between the main board and the LCD panel. It converts the video signal into the commands that drive each row of pixels. A dead T-Con board produces a black screen even with a working backlight. Symptoms often include horizontal or vertical lines before complete failure. Replacement T-Con boards for common Samsung, LG, and Sony models run $30–$90 on sites like shopjimmy.com and TVpartsToday.
Power supply board failure — The power supply provides regulated voltage (typically 12V and 5V rails) to every other component. A capacitor failure — extremely common on power supply boards 5+ years old — causes undervoltage to the backlight circuit. The TV may turn on briefly then shut off, or show no picture at all. Replacement boards run $30–$120. Capacitors alone cost under $5 and can be resoldered by someone comfortable with a soldering iron. If your TV’s power indicator is blinking rather than staying solid, the TV error code lookup tool can help identify which fault the blink pattern points to.
Main board failure — The main board runs the operating system, processes the video signal, and sends it to the T-Con. A dead main board shows no picture, no menu, often no response to the remote. Replacement boards run $60–$180 for common models. At this price point, the repair-vs-replace calculation becomes important. The TV lifespan and health estimator can help you assess whether the repair makes financial sense based on your TV’s age and model.
LCD panel failure — A physically cracked or dead LCD panel has no repair path. Replacement panels cost as much as a new TV for most models. If the screen shows large dark patches, spreading black areas, or physical cracks, the TV needs to be replaced.
Repair vs. Replace — The Real Cost Breakdown
Use this framework before spending money on parts.
The rule of thumb used by most TV repair technicians: don’t spend more than 25–30% of the TV’s current replacement value on a repair.
| Problem | Repair Cost (2026) | Replace if TV is worth… |
|---|---|---|
| LED strip failure | $25–$60 parts | Under $100 total value |
| T-Con board | $30–$90 | Under $120 total value |
| Power supply board | $30–$120 | Under $160 total value |
| Main board | $60–$180 | Under $240 total value |
| LCD panel | $200–$600+ | Almost always replace |
A 7-year-old 55-inch TV with a dead T-Con board might have a replacement value of $300 for a comparable new set. A $60 repair is a reasonable bet. The same repair on a 10-year-old 40-inch TV worth $120 doesn’t make economic sense. Before deciding, the TV lifespan and health estimator gives a clearer picture of your set’s remaining useful life based on its age and usage patterns.
Also factor in: any TV older than 8 years with one failed component often has a second failure within 12–18 months. Aging capacitors fail in groups.
When to Call a Professional
Call a TV repair shop when:
- The flashlight test shows no image at all (main board or panel failure — harder to DIY diagnose)
- The TV shows blink codes on the power indicator (count the flashes; each brand has a published fault code list — the TV service menu code finder covers codes for most major brands)
- You’ve replaced one component and the problem persists
- The TV is still under warranty — any self-repair voids it
Bench fees at TV repair shops typically run $50–$80 for diagnosis. Ask the technician for a written estimate before authorising the repair. If the estimate exceeds 30% of replacement value, walk away.
No picture on a TV is almost always fixable. Work through the five quick fixes first — the power cycle alone resolves four out of ten cases. The flashlight test tells you within 15 seconds whether it’s a backlight or a deeper hardware issue. If the fix requires a replacement board, weigh the cost against the TV’s current value before ordering parts.