Your Onn TV isn’t turning on. The screen is black, the red light is blinking, or nothing is happening at all. Before you assume the TV is dead, know this: most Onn TVs that won’t power on have a fixable cause. Power glitches, drained remote batteries, a locked-up startup sequence, or a faulty power board are the most common culprits. This guide walks you through every fix — from the 60-second soft reset to hardware-level diagnosis — in the exact order you should try them.
What’s Actually Stopping Your Onn TV From Turning On
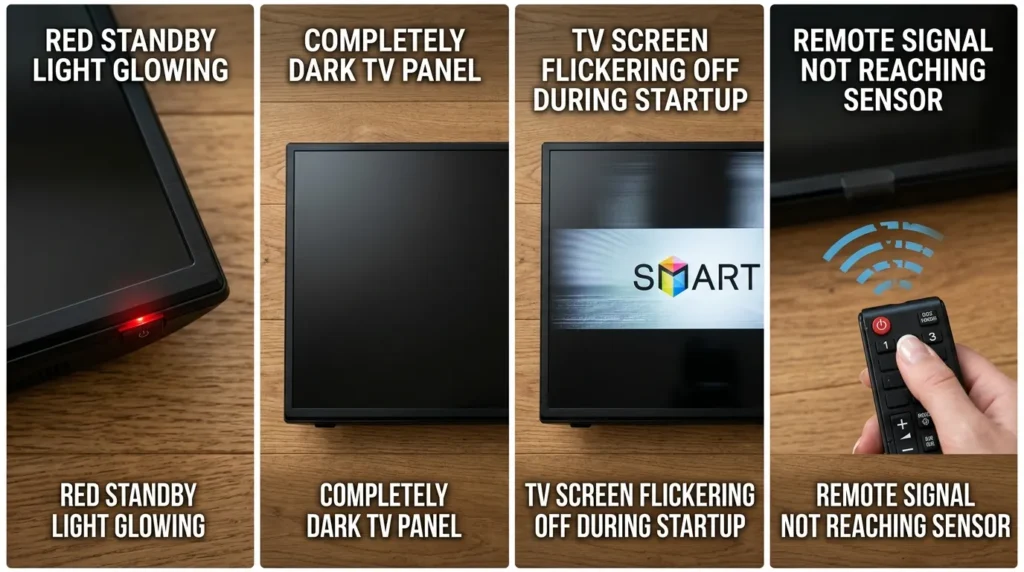
Not all “won’t turn on” symptoms are the same. The exact behavior tells you a lot about where the fault is.
Red Light On, No Picture
The standby light is active. That means the TV is receiving power. The problem is inside — either the startup sequence is frozen, the backlight has failed, or the main board isn’t completing its boot cycle. If the screen stays dark even with power, the fix for a dark TV screen may also apply here.
No Light at All — Completely Dead
Zero indicator light means zero power reaching the TV. The issue is almost always the outlet, the power cable, the power strip, or a blown fuse inside the power supply board.
TV Turns On Then Shuts Off Immediately
The TV starts its boot sequence, then cuts power within seconds. This usually points to a failing power supply board that can’t maintain stable output, or a short on the main board triggering a protective shutdown.
Remote Not Responding, TV Physically Fine
If the TV powers on fine with the physical button but ignores the remote entirely, the fix has nothing to do with the TV’s power system. That’s a remote-specific fault — dead batteries, a stuck button, or a failed IR transmitter.
Fix 1 — Power Cycle Your Onn TV (Do This First)
A power cycle clears frozen processes, drains residual charge from the internal capacitors, and forces the TV to restart its startup sequence from scratch. This single step fixes the problem for a large number of Onn TVs that won’t turn on.
Step-by-step:
- Turn off the TV using the remote or the physical power button.
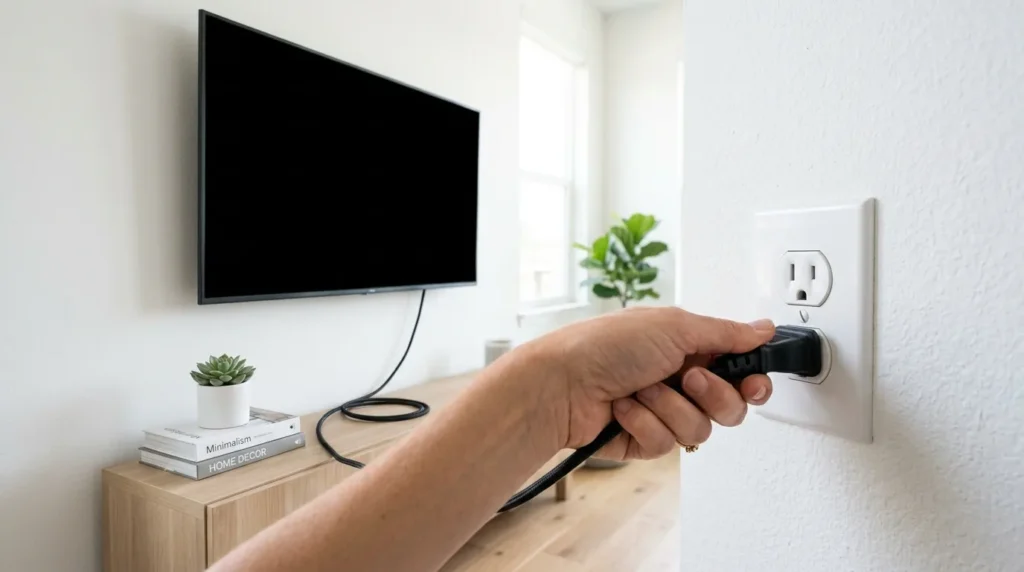
- Unplug the power cord directly from the wall outlet — not from the TV.
- Press and hold the physical power button on the TV for 60 full seconds.
- Release the button and wait. Do not plug anything back in yet.
- Wait at least 30 minutes before reconnecting.
- Plug the TV directly into a wall outlet — skip the surge protector for now.
- Press the power button.
Most guides say wait 1–2 minutes. That’s not enough. Onn TVs use capacitors on the power supply board that hold a charge for much longer. 30 minutes gives those capacitors enough time to fully discharge. A proper discharge is what actually resets the board — not just the wait itself.
If the TV turns on after this, you’re done. If it doesn’t, keep going.
Fix 2 — Test and Rule Out the Power Source
A bad power source mimics a broken TV almost perfectly. Rule this out completely before touching anything else.
Wall Outlet Test
Plug a lamp, phone charger, or any other working device into the same outlet. If that device doesn’t work either, the outlet is the problem — not the TV. Try a different wall outlet and test again.
Remove Surge Protectors and Power Strips
Surge protectors fail silently. They can stop passing power entirely while looking completely fine from the outside. Plug the Onn TV directly into a wall outlet with nothing in between. No power strip, no extension cord, no UPS.
Inspect the Power Cable End-to-End
Run your fingers along the full length of the power cord. Check both ends. Look for bends, kinks, fraying, or scorch marks near the plug. A damaged power cable can deliver just enough power to light the standby indicator but not enough to power the full startup sequence.
If you have a spare cable with the correct connector, swap it in.
Fix 3 — Reset and Rule Out the Remote
The remote is responsible for a surprising number of “TV won’t turn on” reports. The TV is fine. The signal is never reaching it.
Battery Replacement
Pull the batteries out completely. Replace with fresh Duracell or Energizer AA batteries — not cheap no-name batteries. Low-quality batteries often show a full charge on a battery tester but can’t deliver the burst current a remote needs to transmit. Put the new batteries in, check the polarity, and try again.
Remote Reset Procedure
- Remove both batteries from the remote.
- Press every button on the remote twice.
- Hold the power button on the remote for 20 seconds.
- Reinsert fresh batteries.
- Point the remote directly at the TV from 3 feet away and press power.
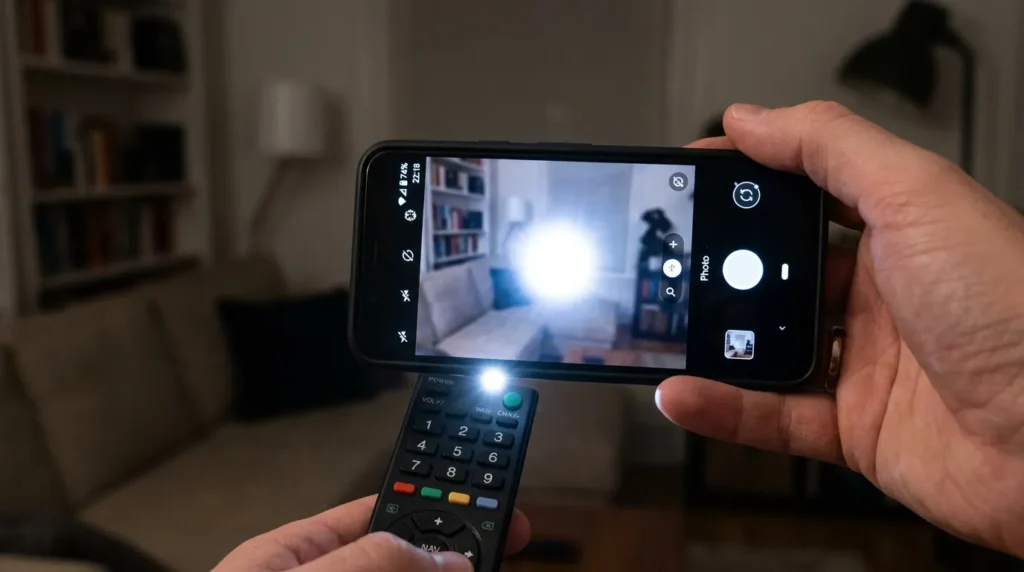
IR Sensor Test Using Your Phone Camera
Your phone camera can see infrared light that your eyes can’t.
- Open the camera app on your phone.
- Point the front of the Onn remote at the camera lens.
- Press the power button on the remote while watching the screen.
If the remote is working, you’ll see a white or purple flash from the IR emitter on your phone screen. No flash means the remote is faulty — not the TV.
Turn On With the Physical TV Button
Every Onn TV has a physical power button — usually on the bottom edge, back panel, or side. Find it and press it. If the TV turns on this way, your TV is fully functional and the remote is the only problem. If you’ve lost the remote entirely, the steps for turning on a Roku TV without a remote or power button cover your full options.
Fix 4 — Read the Red Light Blink Pattern
The blinking red standby light on an Onn TV is a diagnostic signal. Counting the blinks tells you exactly which system is failing.
| Blink Pattern | What It Indicates |
|---|---|
| 2 blinks | Power supply fault — board not delivering stable voltage |
| 5–6 blinks | Main board error — startup sequence not completing |
| 10+ blinks | Overcurrent protection triggered — short circuit or failed component |
| Solid red, no power-on | Startup signal received but TV is stuck in protection mode |
| No light at all | No power reaching the TV — outlet, cable, or blown fuse |
Write down the exact count. If you’re opening the TV for hardware inspection later, this tells you which board to check first. The same blink-code diagnostic logic applies to other brands — if you own multiple TVs, the guide on fixing a Sharp TV flashing red light uses the same methodology.
Fix 5 — Factory Reset Using the Pinhole Button
If the TV powers on but freezes at the Onn or Roku logo, or if the software is corrupted, a factory reset can clear it. This is different from a power cycle — it wipes the software configuration and restores factory defaults.
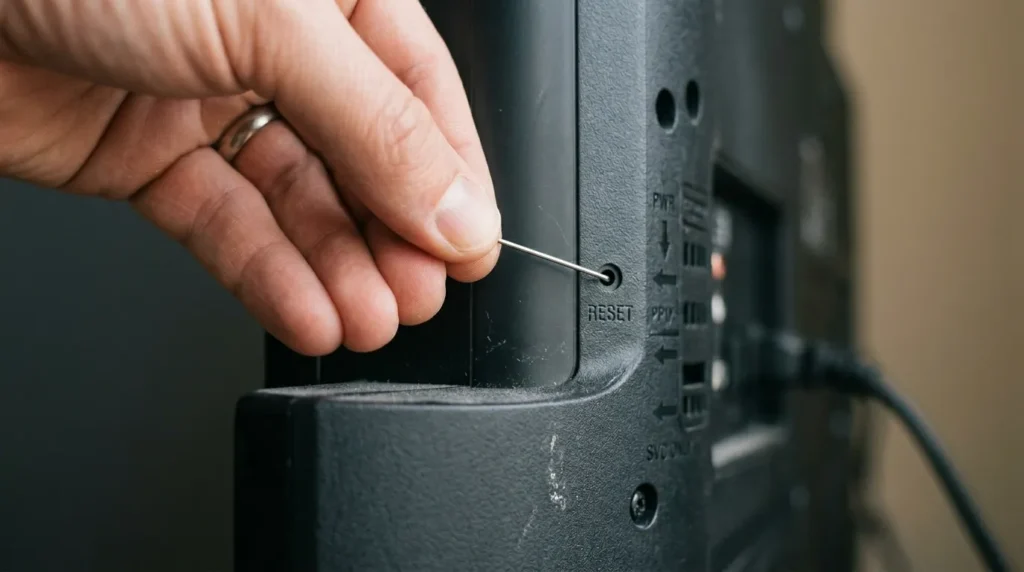
Finding the Reset Button on Onn TVs
Look for a small pinhole labeled RESET on the back panel of the TV. It’s usually near the input ports. On some models, it’s on the bottom edge.
Step-by-Step Factory Reset
- Make sure the TV is plugged in and in standby mode (red light showing).
- Unfold a paperclip and insert the straight end into the pinhole.
- Press and hold for 15–20 seconds.
- Release when the TV screen flashes or the Onn logo appears.
- Wait for the setup screen to load.
What Gets Erased
A factory reset removes all your app logins, Wi-Fi credentials, display settings, and Roku account pairing. It does not fix hardware faults — if the power supply board is bad, a reset changes nothing. Use this fix for software-related startup failures only. If you need a reference for how factory resets work across smart TV brands, the guide on performing a factory data reset on Samsung TV explains the broader process well.
Fix 6 — Use the Roku App If the Remote Is Dead
If your Onn Roku TV’s remote is broken or lost, the Roku mobile app works as a full replacement remote — as long as the TV is already connected to your Wi-Fi network.
Steps:
- Download the Roku app (iOS or Android) on your smartphone.
- Make sure your phone is on the same Wi-Fi network as the TV.
- Open the app and tap Devices at the bottom.
- Select your Onn TV from the list.
- Tap Remote to bring up the full control interface.
Important limitation: The Roku app only works if the TV is already on and connected to Wi-Fi. If the TV is completely dead and won’t boot, the app can’t reach it. If you run into connection issues with the app itself, the troubleshooting steps in fixing Roku app not finding device will help you resolve pairing failures.
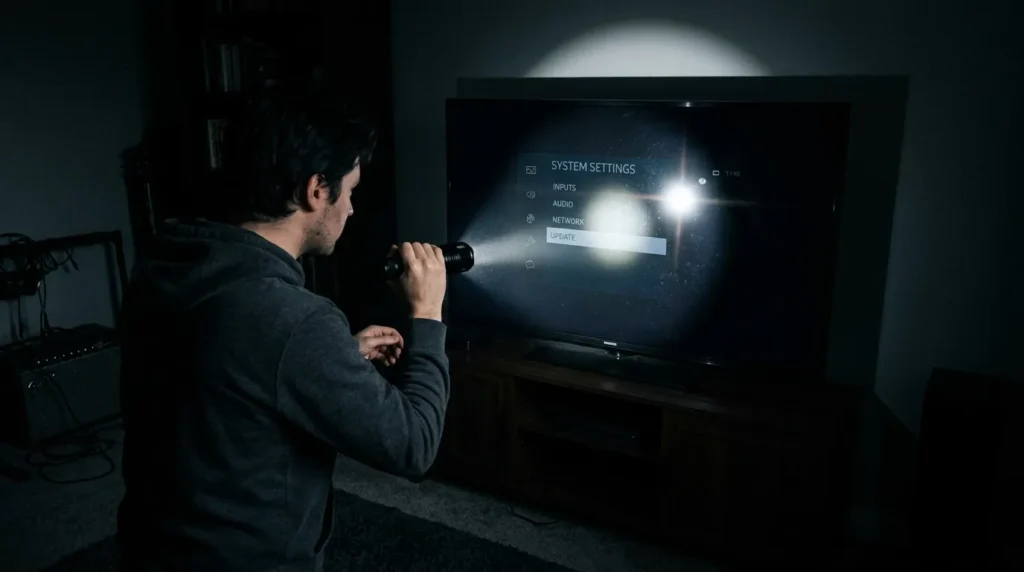
Fix 7 — Backlight Failure (The Flashlight Test)
An Onn TV can have a working picture signal with a completely failed backlight. From the outside it looks like the TV won’t turn on — but the TV is actually running. You just can’t see it.
How to Run the Flashlight Test
- Turn off all lights in the room.
- Power on the TV.
- Shine a bright flashlight directly at the screen from 2–3 inches away.
- Look very closely for any faint image — menu text, a logo, anything.
What a Faint Image Tells You
If you can see a dim image under the flashlight, the TV’s main board and software are working fine. The backlight system has failed. This is actually good news — it’s a cheaper, more fixable problem than a dead main board. The same flashlight test works identically on other brands. If you own an Element TV showing the same symptom, the Element TV black screen fix covers the backlight repair path in detail.
Backlight Inverter Board — Cost and Replacement
Onn TVs use LED backlights driven by a backlight inverter or LED driver board. These boards fail more often than any other component in budget TVs.
- A replacement LED driver board for most Onn models costs $10–$25 on parts sites.
- Replacement takes roughly 45–90 minutes if you’re comfortable opening the TV.
- Search the specific board number printed on the existing board to find the correct replacement.
If individual LED strips have failed (the more common fault), replacement LED strips run $8–$20 per set. You’ll need to disassemble the screen panel to reach them.
Fix 8 — Hardware Diagnosis (For DIY Repair)
If every software fix has failed, the fault is inside the TV. This section is for people willing to open the panel and inspect the hardware.
Safety Warnings Before Opening the TV
- Unplug the TV and wait at least 30 minutes before touching internal components.
- Capacitors on the power supply board retain charge even after unplugging. They can discharge dangerously.
- Work on a clean, flat, non-conductive surface.
- Do not touch any component you can’t identify.
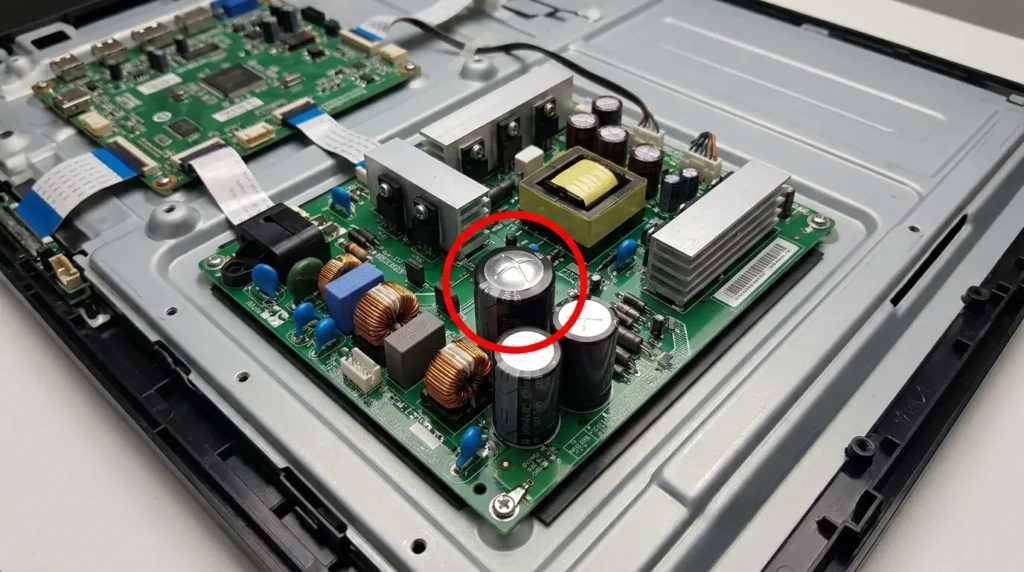
Identifying Swollen or Blown Capacitors
Capacitors on the power supply board look like small cylindrical canisters, usually blue or black. A healthy capacitor has a flat top. A failed capacitor has a domed, bulging, or cracked top — sometimes with brown residue around the base.
Swollen capacitors cause exactly the symptoms described in this article: the TV won’t power on, it shuts off immediately, or it blinks a fault code. This failure pattern is consistent across brands — it’s also the primary diagnosis in cases of TCL TV not turning on and JVC TV won’t turn on.
Replacement capacitors cost $0.50–$2.00 each and are sold on Amazon and Digi-Key by their capacitance rating (printed on the side). Soldering is required.
Blown Fuse on the Power Supply Board
The power supply board contains one or more glass or ceramic fuses. A blown fuse looks black or cloudy inside — the wire filament is visibly broken.
- Replacement fuses cost under $5 for a 10-pack.
- Match the amperage and voltage rating exactly to the blown fuse.
- Never replace a blown fuse with a higher-rated one.
Testing With a Voltmeter
A basic voltmeter (or multimeter set to DC voltage) can confirm whether the power supply board is actually outputting voltage to the main board.
- With the TV plugged in and in standby, measure the standby voltage at the power board output connector — typically 5V DC on the standby line.
- If the standby voltage reads zero, the power supply board has failed.
- If standby voltage is correct but the TV still won’t start, suspect the main board.
Main Board — Last Resort Replacement
If the power supply board tests fine and the backlight is intact, the main board has failed. Main board replacements for Onn TVs run $30–$80 online. You must match the exact part number on the existing board — Onn does not use universal boards across models.
Lightning and Power Surge Damage
Power surges are the most common cause of sudden, permanent Onn TV failure — especially in areas prone to storms or with unstable electrical supply.
How Surges Reach the TV
A surge doesn’t only travel through the power cord. It can enter through:
- Coaxial cable (antenna or cable TV input)
- Ethernet cable (if the TV is wired to a router)
- HDMI cables connected to devices that were themselves surge-damaged
Even if your surge protector saved the power input, a surge through the HDMI or coaxial port can still fry the main board or power supply.
Checking the Power Board for Burn Marks
Open the back panel and look at the power supply board under a flashlight. Burn marks, discoloration, or a smell of burnt plastic are definitive signs of surge damage. Surge-damaged boards are not repairable — they need full replacement.
Repair Cost vs. Buying a New TV
At some point, the repair cost stops making sense. Here’s how to run the numbers.
DIY Parts Cost Breakdown
| Component | Estimated Cost |
|---|---|
| Capacitor set | $2–$8 |
| Replacement fuse | $1–$5 |
| LED backlight strips | $8–$20 |
| Backlight inverter board | $10–$25 |
| Power supply board | $20–$60 |
| Main board | $30–$80 |
Total DIY cost rarely exceeds $100 if only one component has failed.
Professional Repair: $125–$350
A local TV repair shop will charge $50–$100 for diagnosis alone, then add parts and labor. A full power supply board replacement with labor typically runs $125–$200. A main board replacement with labor runs $200–$350.
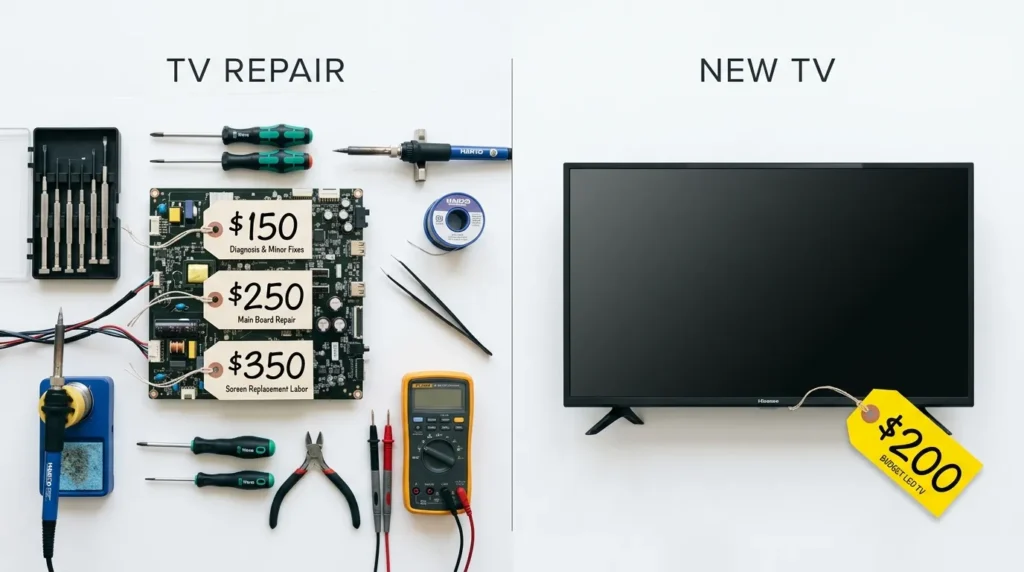
When Replacement Makes More Financial Sense
If the repair quote from a shop exceeds 50% of the cost of a comparable new TV, replacement is the smarter move. Onn 43–55″ TVs currently sell for $148–$298 at Walmart. A $200 repair bill on a TV that costs $200 new is not a good investment — especially on a budget brand without a strong parts availability track record.
If you’re looking at a replacement and want to evaluate similar budget models, the TV no picture fix guide covers what to check on any new purchase before assuming a fault.
Preventing This From Happening Again
Surge Protector vs. UPS
A basic surge protector blocks a single surge — after that, it offers no more protection and gives no indication it’s failed. A UPS (uninterruptible power supply) offers continuous protection and also filters power fluctuations that slowly degrade TV components over time.
For an Onn TV, a UPS with at least 300–500VA capacity is enough. It costs $35–$60 and will outlast three or four cheap surge protectors.
Also connect coaxial and ethernet cables through the surge protector’s coax/data ports — or use separate inline coax surge protectors on those lines.
A quality UPS like the APC BE600M1 UPS 600VA protects your TV from both surges and power fluctuations — the two most common causes of Onn TV power board failure.
Ventilation Clearance: 4 Inches Minimum
Onn TVs need at least 4 inches of clearance on the top and sides, and 2 inches at the back. Running the TV in an enclosed cabinet or pushed against a wall traps heat around the power supply board. Heat is the second-biggest cause of capacitor failure in budget TVs.
Firmware Updates
Onn Roku TVs receive firmware updates automatically over Wi-Fi. Don’t disable automatic updates. Firmware updates include stability patches that prevent boot failures and frozen startup sequences — exactly the kind of problem described in this article.
When to Contact Onn Support
Warranty Coverage: 1 Year
Onn TVs come with a 1-year limited warranty from the date of purchase. The warranty covers manufacturer defects in materials and workmanship. It does not cover physical damage, water damage, or surge damage from external sources.
To make a warranty claim:
- Keep your Walmart receipt or order confirmation email.
- Have the model number ready — it’s on the label on the back of the TV.
- Contact Onn support at 1-844-334-2355 or through Walmart’s return and warranty portal at walmart.com/help.
After Warranty Expires
Walmart’s Walmart Protection Plan (sold at point of purchase) extends coverage for 2–3 years and covers power surges. If you didn’t purchase one, Walmart’s standard return window is 30 days for electronics.
FAQ
Why is my Onn TV not turning on even when plugged in? The most common causes are a frozen startup sequence (fixed by power cycling), a failed power supply board, or dead remote batteries making the TV appear unresponsive. Start with a 30-minute power cycle before drawing any conclusions.
What does a blinking red light mean on an Onn Roku TV? A blinking red light is the TV’s fault code system. Two blinks indicates a power supply fault. Five to six blinks indicates a main board error. A solid red that won’t advance to power-on usually means the TV is stuck in protection mode from a detected hardware fault.
How do I factory reset an Onn TV without a remote? Use the pinhole reset button on the back of the TV. Insert a straightened paperclip, hold for 15–20 seconds, and release when the screen responds. Alternatively, use the Roku mobile app as a remote if the TV is connected to Wi-Fi.
Can a power surge permanently damage an Onn TV? Yes. A strong surge through the power cord, coaxial cable, HDMI, or ethernet port can permanently damage the power supply board or main board. Surge damage typically shows as burn marks or a burnt smell inside the TV. A damaged board needs full replacement — it can’t be repaired by a reset.
How long do Onn TVs last? Onn TVs typically last 5–7 years under normal use conditions. Heat, power fluctuations, and heavy daily use shorten that lifespan. TVs run in poorly ventilated cabinets or in rooms with unstable power frequently fail before the 3-year mark.
Is it worth repairing an Onn TV? It depends on what failed. A $15 capacitor replacement or a $20 LED strip swap is worth doing. A $250 shop repair bill on a TV that costs $200 new is not. Run the numbers against current replacement cost before committing to professional repair. For similar decisions on comparable brands, the Insignia TV won’t turn on fix and Toshiba TV won’t turn on guides apply the same cost logic.
Conclusion
Most Onn TVs that won’t turn on aren’t dead — they’re stuck. A 30-minute power cycle fixes the majority of cases. If that doesn’t work, the red light blink count narrows the fault to a specific board. The flashlight test tells you in 30 seconds whether the backlight or the main board is the issue. And if you’re weighing repair versus replacement, the math is simple: compare the repair cost against the current price of the TV before spending a dollar on parts or labor.
Work through the fixes in order. The most common problems sit at the top of this list, and the expensive hardware faults are at the bottom. If your Onn TV shares the same symptoms as other budget brands, the guides on fixing an LG TV black screen and fixing a Philips TV that won’t turn on follow the same diagnostic sequence and may offer additional context for your situation.