Home Blog Page 6

How to Turn On Hisense TV Without Remote: A Complete Guide

0
Hisense TV and smartphone with remote app
Turn on your Hisense TV without a remote using these methods.

Lost your Hisense TV remote? Don’t worry. You can still turn on your TV using several methods. Whether the remote is missing, broken, or out of batteries, this guide covers easy ways to power on your Hisense TV. We’ll explain how to use physical buttons, smartphone apps, and other devices. Each method is simple and works for most Hisense models as of 2025.

Why You Might Need to Turn On Your TV Without a Remote

Remotes get lost or stop working. Batteries die at inconvenient times. Sometimes, the remote is across the room, and you need a quick solution. Hisense TVs, especially smart models, offer multiple ways to turn on without the original remote. This guide provides step-by-step instructions to help you get your TV running again.

Method 1: Using Physical Buttons on the TV

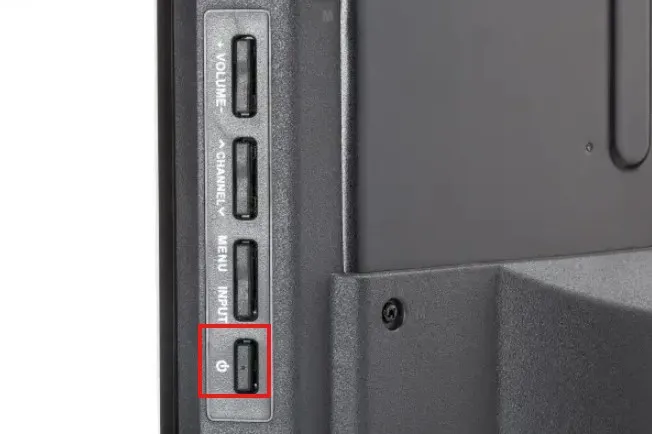
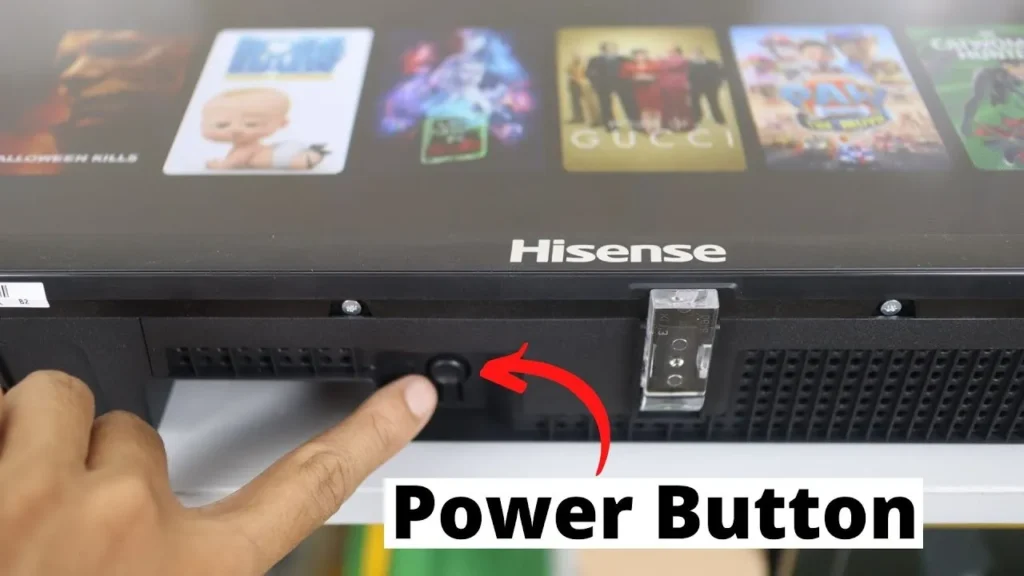
Every Hisense TV has a physical power button. It’s the easiest way to turn on your TV without a remote. The button is usually hidden but easy to find once you know where to look.

Steps to Use the Power Button

  1. Ensure your TV is plugged into a power outlet.
  2. Look for the power button. It’s typically under the TV in the center or on the left or right side.
  3. Press the button once. The TV should turn on, and the standby light may change from red to blue.

Tips

  • If you can’t find the button, check your TV’s user manual or look closely at the bottom or sides.
  • Some models have touch-sensitive buttons instead of physical ones.
  • If the button doesn’t work, it might be stuck or damaged. Try cleaning around it.
Hisense TV power button location
Location of the power button on a Hisense TV.

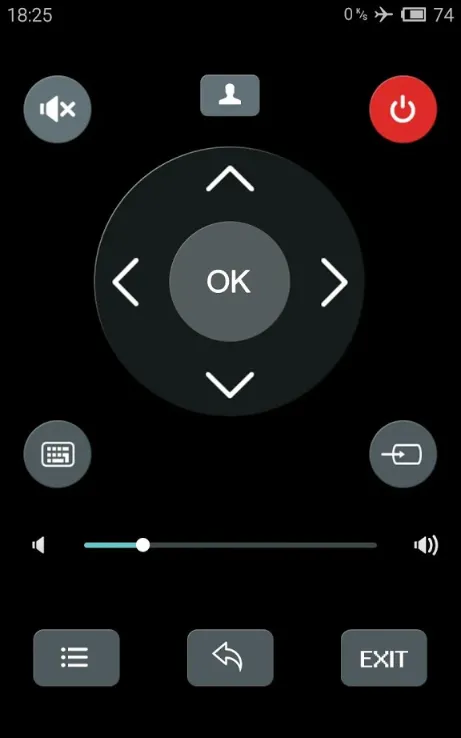
Method 2: Using Smartphone Apps

Smartphone apps can turn your phone into a remote for your Hisense TV. Depending on your TV’s operating system, you can use different apps. Most require your TV and phone to be on the same WiFi network. Some apps need initial pairing while the TV is on.

a. RemoteNow App

The RemoteNow app is Hisense’s official app for controlling smart TVs. It’s available for Android and iOS.

Compatibility

Works with many Hisense models from 2018 onwards, including:

  • 2018: P5, P6, P7, P8, P9
  • 2019: R4, R5, R6, R7, R8
  • 2020: S4, S5, SX, S8, Q7, Q9
  • 2021: A4G, A6G, A7G, U7G, U8G, U9G

Steps

  1. Download the RemoteNow app from the Google Play Store or Apple App Store.
  2. Connect your phone and TV to the same WiFi network.
  3. Open the app and select your Hisense TV from the list.
  4. Follow the on-screen instructions. You may need to enter a code shown on the TV.
  5. Once paired, tap the power button in the app to turn on the TV.

Notes

  • The TV must be on for initial pairing. Use the physical button if it’s off.
  • If the app doesn’t connect, ensure your TV’s firmware is updated via the settings menu.
RemoteNow app on smartphone
RemoteNow app interface for controlling Hisense TVs.

b. Roku App (for RokuOS Hisense TVs)

Some Hisense TVs use RokuOS. The Roku app can control these TVs.

Steps

  1. Download the Roku app from the Google Play Store or Apple App Store.
  2. Ensure your TV and phone are on the same WiFi network.
  3. Open the app and select your Hisense Roku TV.
  4. Use the app’s remote feature to press the power button.

Notes

  • Check if your TV runs RokuOS in the settings menu.
  • The app can turn on the TV from standby mode if previously paired.

c. Android TV Remote App (for Android OS Hisense TVs)

For Hisense TVs with Android OS, use the Android TV Remote app.

Steps

  1. Download the app from the Google Play Store or Apple App Store.
  2. Connect your phone and TV to the same WiFi network.
  3. Open the app and select your Hisense TV.
  4. Follow the prompts to pair the app.
  5. Use the app’s power button to turn on the TV.

Notes

  • Confirm your TV uses Android OS in the settings.
  • Pairing requires the TV to be on initially.

d. Universal Remote Apps

Apps like Universal TV Remote by Boostvision work with many TV brands, including Hisense.

Steps

  1. Download the Universal TV Remote app.
  2. Open the app and select “Hisense” from the TV brands.
  3. Follow the instructions to pair with your TV.
  4. Tap the power button to turn on the TV.

Notes

  • Some models may require a PIN displayed on the TV screen.
  • Ensure WiFi connectivity for pairing.

e. Infrared Apps (for Phones with IR Blasters)

If your phone has an infrared (IR) blaster, apps like MiRemote can control your TV.

Steps

  1. Verify your phone has an IR blaster (common in some Android phones, not iPhones).
  2. Download MiRemote from the Google Play Store.
  3. Open the app and select “Hisense TV.”
  4. Point your phone at the TV and press the power button in the app.

Notes

  • No WiFi is needed for IR apps.
  • Check your phone’s specs to confirm IR blaster support.

Method 3: Using Other Devices

a. HDMI-CEC Enabled Devices

HDMI-CEC lets devices like XBOX or PlayStation turn on your TV. Hisense TVs support this feature, as noted in the Hisense user manual.

Steps

  1. Check if HDMI-CEC is enabled in your TV’s settings (under “System” or “Inputs”).
  2. Connect an HDMI-CEC device to your TV via HDMI.
  3. Turn on the device. The TV should power on automatically.
  4. Alternatively, use the device’s controller to turn on the TV.

Notes

  • Not all devices support HDMI-CEC. Check your device’s manual.
  • Enable HDMI-CEC before losing your remote.

b. Universal Remote Controls

Universal remotes from brands like GE or RCA can be programmed for Hisense TVs.

Steps

  1. Buy a universal remote.
  2. Find Hisense TV codes in the remote’s manual or check Hisense TV Remote Codes.
  3. Follow the remote’s instructions to enter the code.
  4. Use the remote’s power button to turn on the TV.

Notes

  • Programming requires the TV to be on initially.
  • Keep codes handy for future use.

Additional Tips

  • Set Up Apps Early: Pair apps like RemoteNow or Roku when your TV is on to avoid issues later.
  • Update Firmware: Check for firmware updates in your TV’s settings to ensure app compatibility.
  • Use a USB Mouse: If your TV has a USB port, a mouse can navigate menus to turn it on, though this is model-dependent.
  • Check Model Number: Find your TV’s model number (on the back or in settings) to confirm app compatibility. Learn more in our guide on finding your TV’s serial number.

Frequently Asked Questions

Where is the power button on my Hisense TV?

It’s usually under the TV in the center or on the sides. Check the manual for your model.

Can I use my iPhone to control my Hisense TV?

Yes, use the RemoteNow or Roku app. iPhones lack IR blasters, so infrared apps won’t work.

Do I need WiFi for remote apps?

Most apps require WiFi for pairing and control. Infrared apps don’t need WiFi.

How do I pair the RemoteNow app?

Turn on the TV, connect it to WiFi, open the app, select your TV, and enter the displayed code.

What if the power button doesn’t work?

Try cleaning around the button. If it’s broken, use an IR app or universal remote.

Conclusion

You don’t need the original remote to turn on your Hisense TV. Use the physical power button for a quick fix. Smartphone apps like RemoteNow or Roku offer convenient control. HDMI-CEC devices or universal remotes are great alternatives. Set up these methods when your TV is on to be prepared. Try these solutions and find what works best for your Hisense TV.

6 Ways to Turn On Your Element TV Without Remote

0
Element TV control without remote thumbnail
6 Ways to Turn On Element TV Without Remote

Lost your Element TV remote or it’s broken? Don’t worry! You can still turn on and control your Element TV without the original remote. This guide covers six practical methods to power on your TV and perform basic functions like changing inputs or adjusting volume. Whether you have a smart TV or a basic model, these solutions will help you get back to watching your favorite shows. Always check your TV’s model for specific features, as button layouts and capabilities vary.

Method 1: Using the Physical Power Button

Most Element TVs have a physical power button to turn the TV on or off. Here’s how to use it:

  1. Find the power button: Check the bottom, back, or side of your TV. It’s often under the Element logo or on a side panel. Look for a button labeled “Power” or with a power symbol.
  2. Press the button: Press and hold the power button for a few seconds to turn on the TV. If it’s in standby mode, the button should activate it.
  3. Check the power source: Ensure the TV is plugged into a working outlet. If the standby light is off, the TV may not be receiving power.

Note: If you can’t find the power button, consult your TV’s user manual or check the Element Electronics support page.

Element TV power button location
Location of the power button on an Element TV.

Method 2: Using Manual Controls on the TV

Some Element TVs have additional buttons for basic functions like volume, channels, or input selection. These can help you control the TV without a remote.

  1. Locate the buttons: Look near the power button or on the side of the TV. Common buttons include volume up/down, channel up/down, and input/source.
  2. Use the buttons: Press the volume buttons to adjust sound, channel buttons to switch channels, or the input button to cycle through sources like HDMI or VGA.
  3. Confirm input selection: On some models, like the ELEFW195, you may need to press channel up and volume up together to select an input, as there’s no “OK” button.

Tip: Button availability varies by model. For example, the E4SFT5017 model may lack an input button, limiting manual control. Check your TV’s manual for details.

Related: If your TV has other issues, see our guide on fixing Element TV black screen.

Method 3: Using a Universal Remote Control

A universal remote can control your Element TV if programmed with the right codes. Here’s how to set it up:

  1. Find Element TV codes: Check your universal remote’s manual for codes. Common codes include:
    • Cox: 1687, 1886, 2183
    • Verizon: 0293, 1283, 3264, 1927, 1736, 0827
    • RCA 3 in 1: 11687, 11886, 12183, 12964, 13559
    • Comcast Xfinity: 10178, 11864, 12964, 118886, 12183, 13907, 13559, 11687, 12260
    • DirecTV: 10178, 11687, 12183, 13907
    • New 5-digit codes: 10178, 11687, 11886, 12183
  2. Program the remote: Follow your remote’s instructions to enter the code. This usually involves pressing a setup button and entering the code.
  3. Test the remote: Use the remote to turn on the TV, change channels, or adjust volume to confirm it works.

If you don’t have a universal remote, you can buy one online or at electronics stores. Ensure it’s compatible with Element TVs.

Related: For other TV control issues, check out how to access TCL TV settings without remote.

Method 4: Using Smartphone Apps

Your smartphone can act as a remote for your Element TV using specific apps. This is ideal for smart TVs with Wi-Fi.

  1. Download an app: Get the Element TV Remote app from the Google Play Store. Alternatively, try a universal app like SURE Universal Smart TV Remote.
  2. Connect to Wi-Fi: Ensure your phone and TV are on the same Wi-Fi network.
  3. Pair the app: Open the app and follow the on-screen instructions to connect to your TV.
  4. Control the TV: Use the app to turn on the TV, change inputs, adjust volume, or navigate menus.

Note: Some apps require a smart TV with Wi-Fi. If your TV isn’t smart, this method may not work.

Smartphone with Element TV Remote App
Element TV Remote App on a smartphone.

Method 5: Using Voice Commands

If you have a smart assistant like Google Assistant or Amazon Alexa, you can use voice commands to control a smart Element TV.

  1. Set up your assistant: Ensure your smart assistant device is set up and connected to the same Wi-Fi as your TV.
  2. Link your TV: In the Google Home or Alexa app, add your Element TV as a device. You may need to enable a specific skill or follow setup prompts.
  3. Use voice commands: Say, “Hey Google, turn on my Element TV” or “Alexa, turn on the TV” to power it on. You can also control volume or inputs if supported.

Note: This method requires a smart TV compatible with your assistant. Check your TV’s manual or the Element support site for compatibility.

Method 6: Using HDMI-CEC

HDMI-CEC (Consumer Electronics Control) lets you control your TV using a connected device’s remote, like a Roku, Firestick, or gaming console.

  1. Enable HDMI-CEC: Go to your TV’s settings menu (using manual buttons if needed) and turn on HDMI-CEC. It may be called “CEC,” “Anynet+,” or similar.
  2. Connect a device: Plug in a device like a Roku or Firestick via HDMI.
  3. Use the device’s remote: Turn on the device, and the TV should power on automatically. Use the device’s remote to control inputs or basic functions.

Example: With a Roku connected, the Roku remote can turn on the TV and switch to the correct HDMI input.

Note: HDMI-CEC support depends on your TV and device. Not all models support full control.

Frequently Asked Questions

Where is the power button on my Element TV?

It’s usually on the bottom, back, or side of the TV, often under the Element logo. Check your user manual for your model’s exact location.

Can I change the input without a remote?

Yes, if your TV has an input or source button, press it to cycle through options. Some models require pressing channel up and volume up together to confirm.

What if my TV has no manual controls?

If your model lacks buttons (like the E4SFT5017), use a universal remote, smartphone app, or HDMI-CEC to control it.

Is there an official Element TV remote app?

Yes, the Element TV Remote app is available on the Google Play Store.

Can I use a universal remote with any Element TV?

Most Element TVs work with universal remotes using the codes listed above. Check your remote’s manual for setup instructions.

Related: For more TV troubleshooting, see how to reset Element TV.

Conclusion

You can turn on and control your Element TV without the original remote using several methods. The simplest is pressing the physical power button, while smartphone apps and universal remotes offer more control. Voice commands and HDMI-CEC are great for smart TVs. Check your TV’s model and features to find the best solution. If you’re facing other TV issues, visit our guides on fixing Element TV keeps turning off or how to connect Vizio TV to Wi-Fi.

How to Update Netflix on Vizio TV: A Complete Guide

0
Vizio Smart TV with Netflix app and remote control
Updating Netflix on Vizio TV

Keeping your Netflix app updated on your Vizio Smart TV ensures you enjoy the latest features, improved video quality, and bug fixes. Whether you have a newer SmartCast TV or an older VIA/VIA Plus model, this guide provides step-by-step instructions to update the Netflix app. We also cover troubleshooting tips for common issues and address whether older TVs support Netflix.

Why Update the Netflix App?

Updating the Netflix app on your Vizio TV is important for several reasons:

  • Access New Features: Updates bring better video quality, new interfaces, and personalization options.
  • Fix Bugs: Updates resolve common issues, such as app crashes or error codes.
  • Improve Security: Newer versions include security patches to protect your streaming experience.

Regular updates keep your streaming smooth and ensure compatibility with your TV.

Determine Your Vizio TV Type

Before updating, identify your Vizio TV’s platform, as the process differs:

  • SmartCast TVs: Newer models (2016 and later) use the SmartCast platform, which updates apps automatically with firmware updates.
  • VIA and VIA Plus TVs: Older models use Vizio Internet Apps (VIA) or VIA Plus, requiring manual app updates.

To check your TV type:

  1. Look at your user manual or the TV’s packaging.
  2. Navigate to the settings menu on your TV and check for “SmartCast” or “VIA” in the interface.
  3. Check the model number on the back of your TV or in the settings under “System Information.”
Vizio TV settings menu displaying system information.
Checking the Vizio TV model in the settings menu.

Updating Netflix on SmartCast TVs

SmartCast TVs update apps, including Netflix, automatically when the TV’s firmware is updated. Follow these steps to check for and install firmware updates:

  1. Connect to the Internet: Ensure your TV is connected to Wi-Fi or Ethernet. Check the connection in the “Network” settings. For help, see Vizio TV not connecting to WiFi fixes.
  2. Open the Menu: Press the Menu button on your Vizio remote.
  3. Navigate to System: Use the arrow keys to select “System” and press OK.
  4. Check for Updates: Select “Check for Updates.” If an update is available, follow the on-screen prompts to download and install it.
  5. Restart the TV: The TV will restart automatically to apply the update, which includes the latest Netflix app version.

After the update, open Netflix to confirm it’s running the latest version. SmartCast TVs typically receive updates periodically, so check for firmware updates every few months.

Updating Netflix on VIA and VIA Plus TVs

For VIA or VIA Plus TVs, you may need to update the Netflix app manually. Here’s how:

  1. Open the VIA Dock: Press the V button on your remote to open the VIA dock.
  2. Select Netflix: Use the arrow keys to highlight the Netflix app.
  3. Press the Yellow Button: Press the yellow button on your remote.
  4. Choose Update: If an update is available, select “Update” and press OK.
  5. Delete and Reinstall (if needed): If no update option appears, select “Delete App” and confirm. Then:
    • Go to the Vizio App Store.
    • Search for Netflix.
    • Install the app to get the latest version.

For more on managing apps, see how to add apps to Vizio Smart TV.

Troubleshooting Common Issues

If you encounter problems while updating or using Netflix, try these solutions:

Netflix Not Working After Update

  • Check Internet Connection: Ensure your TV is online. A weak connection can cause errors.
  • Restart the TV: Unplug the TV for 2-3 minutes, then plug it back in and turn it on.
  • Reinstall Netflix: Delete and reinstall the app as described above.
  • Reset the TV: If issues persist, reset your TV to factory settings. See how to reset Vizio TV for instructions.

App Not Updating

  • Check Firmware: Ensure your TV’s firmware is up-to-date, especially for SmartCast TVs.
  • Manual Reinstallation: For VIA/VIA Plus TVs, delete and reinstall the app.
  • Contact Support: If the app still doesn’t update, visit Vizio Support for help.

TV Not Finding Updates

  • Verify Internet: Confirm your TV is connected to the internet.
  • Manual Firmware Update: For older models, download firmware from Vizio’s firmware page and update via USB. Follow the instructions there carefully.
  • Check Compatibility: Some older TVs may not receive updates. See the next section for details.

Older Vizio TVs and Netflix Compatibility

Vizio TVs older than 2013 may not support the Netflix app due to discontinued support as of December 1, 2019. If your TV is affected:

  • Use an external streaming device like a Roku, Amazon Fire Stick, or Chromecast to access Netflix.
  • Check your TV’s model number to confirm its age. Models from 2013 or earlier may not work with the Netflix app.

For more on using streaming devices, consider adding a device to your setup for continued Netflix access.

Vizio TV Platforms and Netflix Update Methods

PlatformUpdate MethodNotes
SmartCastAutomatic via firmware update: Menu > System > Check for UpdatesRequires internet connection; updates all apps, including Netflix.
VIA/VIA PlusManual: Press V button, select Netflix, press yellow button, choose Update or Delete/ReinstallIf no update option, reinstall from Vizio App Store.
Older Models (pre-2013)Not supported; use external streaming deviceNetflix support ended December 1, 2019, for these models.

Conclusion

Updating the Netflix app on your Vizio Smart TV is simple once you know your TV’s platform. SmartCast TVs update apps automatically with firmware updates, while VIA and VIA Plus TVs may require manual updates or reinstallation. If you face issues, check your internet connection, reinstall the app, or reset your TV. For older TVs, consider using a streaming device to continue enjoying Netflix.

For additional help, explore these related guides:

How to Update Vizio TV Firmware: A Step-by-Step Guide

0
Vizio TV screen showing firmware update process.
How to Update Vizio TV Firmware: A Step-by-Step Guide

Keeping your Vizio TV’s firmware updated ensures you enjoy the latest features, improved performance, and enhanced security. Firmware updates can fix bugs, improve picture quality, and add support for new apps or smart home devices. This guide explains two methods to update your Vizio TV firmware: automatically via the internet and manually using a USB drive. We also cover troubleshooting tips and answer common questions to make the process simple.

Why Update Your Vizio TV Firmware?

Firmware is the software that runs your Vizio TV, controlling how it operates and interacts with apps. Regular updates bring new features, such as improved SmartCast functionality, better app performance, or compatibility with devices like Google Assistant or Amazon Alexa. They also address security vulnerabilities and fix issues like app crashes or slow performance. For example, a 2023 update introduced the Vizio Home Screen feature for many Vizio TVs, enhancing the user interface .

Method 1: Automatic Update via Internet

Most Vizio SmartCast TVs, especially models from 2018 and later, update automatically when connected to the internet. However, you can manually check for updates to ensure you have the latest firmware. Follow these steps:

Step 1: Connect to the Internet

Your TV must be online to check for updates. To connect:

  • Press the Menu button on your Vizio remote.
  • Navigate to Network using the arrow buttons.
  • Select Wi-Fi or Ethernet.
  • Choose your network and enter the password if prompted.
  • Test the connection to confirm it’s working.

If you’re having trouble connecting, check our guide on Vizio TV Wi-Fi issues.

Step 2: Access the System Menu

Once connected:

  • Press the Menu button again.
  • Scroll to System and press OK.

Step 3: Check for Updates

In the System menu:

  • Select Check for Updates.
  • The TV will search for available firmware updates.
  • If an update is found, a prompt will appear asking you to confirm.

Step 4: Install the Update

If an update is available:

  • Confirm the installation by following the on-screen instructions.
  • The TV will download the update, restart, install it, and restart again.
  • Do not turn off the TV during this process, as it may take several minutes.

After the update, you can verify the firmware version by going to System > System Information to ensure it matches the latest version listed on Vizio’s support page.

Method 2: Manual Update via USB

If your TV isn’t connected to the internet or is an older model, you can update the firmware using a USB drive. This method requires downloading the firmware from Vizio’s website and preparing a USB drive.

Step 1: Find Your TV’s Serial Number

You’ll need the serial number to download the correct firmware. Find it in one of these places:

  • On the TV: Check the sticker on the back of the TV.
  • In the Menu: Go to Settings > All Settings > Help > Admin & Privacy > System Information > TV Information.
  • In the Vizio App: Open the app, tap the arrow next to your TV’s name, tap the info icon, and note the serial number.

If you need help locating the serial number, see our guide on finding your TV’s serial number.

Step 2: Download the Firmware

Visit Vizio’s Firmware Search page:

  • Enter your TV’s serial number and click Get Firmware Data.
  • If an update is available, click the link to the firmware download page.
  • Download the firmware file, which is typically a ZIP file.

Step 3: Prepare the USB Drive

To prepare the USB drive:

  • Use a USB drive with at least 2GB of storage, formatted in FAT32.
  • On a computer, extract the ZIP file.
    • Windows: Right-click the ZIP file, select Extract All, choose the USB drive, and click Extract.
    • Mac: Double-click the ZIP file and drag the extracted files to the USB drive.
  • Ensure the firmware files are in the root directory of the USB drive, not inside a folder.

Step 4: Reset the TV to Factory Settings

Before installing the firmware, reset your TV to avoid conflicts:

  • Press the Menu button.
  • Navigate to Admin & Privacy > Reset to Factory Settings.
  • For older models, you may need to go to System or All Settings first.

Note: Resetting erases custom settings, so consider backing them up. Check our guide on resetting a Vizio TV for more details.

Step 5: Install the Firmware from USB

To install the update:

  • Turn on the TV and plug the USB drive into the TV’s USB port.
  • A banner should appear indicating the TV is installing the software.
  • The TV will show a progress bar, turn off, and restart when complete.
  • Do not remove the USB drive or turn off the TV during this process.

Step 6: Verify the Update

After the TV restarts:

  • Go to System > System Information.
  • Check the version number to confirm it matches the downloaded firmware.

If no update is available, your TV may be too old to support new firmware. In such cases, consider using a streaming device like Roku or Fire Stick.

Troubleshooting Common Issues

If you encounter problems during the update, try these solutions:

TV Not Connecting to the Internet

  • Ensure your Wi-Fi password is correct.
  • Restart your router and TV.
  • Move the TV closer to the router or use an Ethernet cable.
  • See our guide on fixing Vizio TV Wi-Fi issues.

Update Fails or Gets Stuck

  • Ensure the TV remains powered on during the update.
  • Check for a stable internet connection or reformat the USB drive to FAT32.
  • Restart the TV and try again.
  • If the issue persists, contact Vizio Support.

No Update Available

  • Verify the firmware version in System > System Information.
  • If no update is found, your TV may already have the latest firmware or be an older model that no longer receives updates .

For other issues, such as power light blinking, check our guide on Vizio TV power light blinking fixes.

Frequently Asked Questions

How Do I Know If My Vizio TV Needs an Update?

Check the firmware version in System > System Information and compare it to the latest version on Vizio’s Firmware Search page. If they don’t match, an update is available.

Can I Update My Vizio TV Without Internet?

Yes, use the USB method described above. Download the firmware from Vizio’s website and install it via a USB drive.

What Is the Latest Firmware Version for Vizio TV?

The latest firmware version depends on your TV model. Check Vizio’s Firmware Search page by entering your TV’s serial number.

Why Is My Vizio TV Not Updating?

Common reasons include a weak internet connection, an outdated model, or a corrupted USB drive. Ensure a stable connection, reformat the USB drive, or contact Vizio Support.

How Long Does It Take to Update Vizio TV Firmware?

Automatic updates typically take 10-20 minutes, including download and installation. USB updates may take slightly longer due to the reset and installation process.

Conclusion

Updating your Vizio TV firmware keeps your TV running smoothly with the latest features and security patches. Whether you use the automatic internet method or a manual USB update, the process is straightforward. Follow the steps above, troubleshoot any issues, and check Vizio’s support page for the latest information. For more TV tips, visit our guides on fixing a slow Vizio TV or adding apps to your Vizio TV.

How to Reset Your Panasonic TV: Step-by-Step Guide

0
Panasonic TV and remote with reset icon
Step-by-step guide to resetting your Panasonic TV

Resetting your Panasonic TV can solve many common issues, such as slow performance, app glitches, or connectivity problems. Whether you’re dealing with a frozen screen or preparing to sell your TV, a reset can help. This guide provides clear, step-by-step instructions to perform a soft or factory reset on various Panasonic TV models, including standard, Android, and Google TV versions. We’ll also cover how to reset without a remote and troubleshoot specific issues like a black screen or power outages.

Understanding Reset Types

Before resetting, it’s important to know the difference between a soft reset and a factory reset.

Soft Reset

A soft reset is like rebooting your TV. It refreshes the system without erasing your settings or apps. It’s a good first step for minor issues like freezing or slow response.

  • Steps:
    1. Press and hold the power button on your remote or TV until the TV turns off.
    2. Unplug the TV from the power outlet.
    3. Wait for 1 minute.
    4. Plug the TV back in and turn it on.

This process usually takes a few minutes and can fix temporary glitches.

Factory Reset

A factory reset returns your TV to its original settings, erasing all apps, network settings, and personal preferences. Use this for persistent issues or when selling your TV.

  • Important Notes:
    • Write down your current settings, as they’ll be lost.
    • You may need to reinstall apps or update firmware after the reset.
    • Some models require a PIN (default is “0000” unless you set a custom one).

Resetting Panasonic TV with Remote

The reset process varies depending on your TV’s operating system. Below are instructions for different Panasonic TV types.

For Standard Panasonic TVs

Most standard Panasonic TVs (non-Android or Google TV models) follow a similar reset process through the menu.

  • Steps:
    1. Press the Menu button on your remote (usually top-left).
    2. Navigate to Setup and select it.
    3. Scroll to System and select it.
    4. Choose Factory Defaults or Reset to Defaults.
    5. Select Yes to confirm.

The TV will restart and begin the initial setup process.

Panasonic TV remote control highlighting the Menu button
Panasonic TV remote with Menu button

For Panasonic Android TVs

Panasonic Android TVs have a different menu structure. Follow these steps:

  • Steps:
    1. Press the Home button on your remote.
    2. Select the Settings gear icon.
    3. Go to Device Preferences and select Reset.
    4. Choose Erase Everything and confirm.

Alternatively, some models place the reset option under:

  • Settings > About > Reset.

For Panasonic Google TVs

Newer Panasonic TVs running Google TV have a unique reset path.

  • Steps:
    1. Press the Settings button on your remote.
    2. Navigate to System.
    3. Select About.
    4. Choose Reset.
    5. Select Factory Reset and then Erase Everything.

The TV will reset and restart, prompting you to set it up as new.

Resetting Panasonic TV without Remote

If you’ve lost your remote, some Panasonic TVs have a physical reset button. Not all models support this, so check your TV first.

  • Steps:
    1. Locate the reset button on the back or side of the TV.
    2. Use a small object (e.g., a paper clip) to press and hold the button for 10 seconds.
    3. Release and wait for the TV to reset.

If your TV lacks a reset button, you may need a replacement remote. Visit Panasonic Support for help or consider a universal remote.

Specific Reset Methods for Older Models (2013-2019)

Some Panasonic TVs from 2013 to 2019 use a button combination for resetting.

  • Steps:
    1. Turn on the TV.
    2. Press and hold the Volume Down button on the TV.
    3. While holding, press and hold the Menu button on the remote for 5-10 seconds.
    4. Wait for a reset message or for the TV to restart.

This method applies to series like TC-PxxST60 or TC-xxCX400. Check your model number and refer to your manual for confirmation.

Troubleshooting Common Issues

Resetting can fix specific problems. Here are solutions for common issues.

TV Not Turning On

If your TV won’t power on, try a soft reset first:

  • Steps:
    1. Unplug the TV from the power outlet.
    2. Press and hold the power button on the TV for 30 seconds.
    3. Plug the TV back in and turn it on.

If this fails, a factory reset may help, or contact Panasonic Support. For similar issues with other brands, see our guide on Fix Vizio TV Won’t Turn On.

Black Screen

A black screen may result from incorrect input or software issues.

  • Steps:
    1. Unplug the TV and wait 1 minute.
    2. Plug it back in and turn it on.
    3. Check the input source (e.g., HDMI, TV).

If the screen remains black, perform a factory reset. Persistent issues may require professional repair.

After Power Outage

Power outages can disrupt TV functionality.

  • Steps:
    1. Unplug all cables from the TV.
    2. Verify the power socket works.
    3. Press and hold the TV’s power button for 1 minute.
    4. Plug the TV back in and turn it on.

If problems persist, try a factory reset or seek professional help.

Frequently Asked Questions

Will a factory reset delete my installed apps?

Yes, a factory reset removes all apps and settings. You’ll need to reinstall apps afterward.

Do I need a password to reset my Panasonic TV?

Some models require a PIN. The default is “0000” unless you set a custom one.

Can I reset my TV without a remote?

If your TV has a reset button, yes. Otherwise, you’ll need a remote or contact support.

How long does a factory reset take?

It typically takes a few minutes. Do not unplug the TV during the process.

What if the reset doesn’t fix my issue?

Contact Panasonic Support or a technician, as it may be a hardware issue. Check our guide on Fix TV No Picture for more tips.

Conclusion

Resetting your Panasonic TV is a straightforward way to fix many issues, from slow performance to connectivity problems. Whether you use a soft reset for quick fixes or a factory reset for deeper issues, this guide covers all major Panasonic TV types. Always check your model’s manual for specific instructions, and don’t hesitate to reach out to Panasonic Support for further assistance. For other TV brands, explore our guides on How to Reset Toshiba TV or How to Factory Reset Westinghouse TV.

How to Reset Onn Roku TV: Easy Step-by-Step Guide

0
Onn Roku TV reset thumbnail with remote.
Resetting Onn Roku TV guide.

Resetting your Onn Roku TV can solve many issues, such as freezing, slow performance, or connectivity problems. Whether your TV is unresponsive or you want to start fresh, this guide covers all the ways to reset your Onn Roku TV. We’ll explain how to use the remote, reset without a remote, and handle a black screen. Follow these simple steps to get your TV back to normal.

Why Reset Your Onn Roku TV?

A reset can fix common problems like lagging, error messages, or a black screen. It’s also useful if you’re selling your TV or giving it away. Before resetting, note that a factory reset will erase all your apps, settings, and data. Always try a system restart or network reset for minor issues before doing a full factory reset.

Types of Resets for Onn Roku TV

There are three main types of resets for your Onn Roku TV:

  • System Restart: This reboots the TV without deleting apps or settings. It’s ideal for fixing small glitches, like a frozen screen.
  • Network Reset: This clears Wi-Fi settings to resolve internet connection issues.
  • Factory Reset: This restores the TV to its original state, removing all data, apps, and custom settings. Use this for serious issues or when preparing to sell the TV.

How to Perform a System Restart

A system restart is a quick way to fix minor issues without losing data. Here’s how to do it:

  1. Press the Home button on your remote to open the main menu.
  2. Navigate to Settings using the arrow keys.
  3. Select System.
  4. Choose System restart.
  5. Confirm by selecting Restart.

Your TV will reboot and should work better. If the issue persists, try a network reset or factory reset.

How to Perform a Network Reset

If your TV has trouble connecting to Wi-Fi, a network reset can help:

  1. Press the Home button on your remote.
  2. Go to Settings > System > Advanced system settings.
  3. Select Network connection reset.
  4. Confirm the reset.

After the reset, reconnect to your Wi-Fi network. For help setting up Wi-Fi, see our guide on connecting Vizio TV to Wi-Fi.

How to Factory Reset Onn Roku TV Using the Remote

If your TV is responsive and you have the remote, a factory reset is straightforward. Follow these steps:

  1. Press the Home button on your remote to access the main menu.
  2. Navigate to Settings using the arrow keys.
  3. Select System.
  4. Choose Advanced system settings.
  5. Select Factory reset.
  6. Choose Factory reset everything.
  7. Enter the 4-digit code displayed on the screen.
  8. Press OK to confirm.

Your TV will reset and restart, returning to its original settings. This process may take a few minutes.

Roku TV settings menu with 'System' selected.
Navigate to the ‘System’ menu to access reset options.

How to Reset Onn Roku TV Without the Remote

If you don’t have a remote or it’s not working, you can use the reset button on the TV:

  1. Turn off the TV and unplug it from the power outlet.
  2. Locate the reset button, usually a small pinhole on the back or bottom of the TV.
  3. Use a pin or paper clip to press and hold the reset button for about 5 seconds.
  4. Look for a “Reset” message on the screen (if the screen is visible).
  5. Plug in and turn on the TV.

The reset button’s location varies by model. Check your user manual or visit Onn TV Support for model-specific details.

Pressing the reset button on the Onn TV

How to Reset Onn Roku TV with a Black Screen

If your TV shows a black screen and doesn’t respond, try this method:

  1. Unplug the TV from the power outlet.
  2. Wait for two minutes to let the TV discharge.
  3. Press and hold the power button on the TV (not the remote) for 10-15 seconds.
  4. Plug the TV back in and turn it on.

This should reset the TV and fix the black screen. For more black screen fixes, check our guide on fixing Onn TV won’t turn on.

Using Recovery Mode as a Last Resort

If the above methods don’t work, Recovery Mode can reinstall the Roku operating system:

  1. Locate the pinhole reset button on the back of the TV, near the HDMI or antenna ports.
  2. Press and hold the reset button with a paperclip for at least 20 seconds.
  3. The TV will restart and show the Recovery Mode screen.
  4. Use the remote to select your language and press OK.
  5. Follow on-screen instructions to connect to the internet or use a USB drive for updates.

Recovery Mode erases all data, so you’ll need to set up the TV again. For more details, visit Roku Support.

Additional Tips

  • Check for Software Updates: Before resetting, ensure your TV’s software is up-to-date. Go to Settings > System > System update.
  • Reset the Remote: If the remote isn’t working, remove the batteries, wait 5 seconds, and reinsert them. For more remote fixes, see Roku remote troubleshooting.
  • Backup Data: A factory reset deletes all apps and settings. Note down important account details before resetting.
  • Model Variations: Reset steps may vary slightly by model (e.g., 24″ 720p or 32″ 1080p Onn Roku TVs). Check your user manual for specifics.

Conclusion

Resetting your Onn Roku TV is a simple way to fix issues like freezing, slow performance, or a black screen. Start with a system restart for minor problems, try a network reset for Wi-Fi issues, or use a factory reset for more serious glitches. If you lack a remote or face a black screen, the reset button or power cycle method can help. For persistent issues, Recovery Mode or contacting Onn TV Support is the next step. For similar troubleshooting, see our guide on resetting a JVC Roku TV.

How to Change Language on a Vizio TV: A Complete Guide

0
Vizio TV screen with language menu and remote.
Vizio TV and remote for language change guide.

Changing the language on your Vizio TV is a straightforward task, whether you’re setting it up for the first time or adjusting it later. This guide provides clear, step-by-step instructions to help you switch the menu language to your preference, such as English, French, or Spanish. We also cover troubleshooting tips for common issues, like being stuck on the language selection screen or not having a remote, and explain how to use the Vizio SmartCast app. Written in simple English, this post aims to make the process easy for everyone.

Why Change the Language on Your Vizio TV?

You might need to change the language on your Vizio TV if the menus are in a language you don’t understand, perhaps due to a factory reset, a purchase from another region, or an accidental setting change. Switching to a familiar language makes navigating menus, apps, and settings much easier. This guide addresses common scenarios and questions, ensuring you can use your TV comfortably.

Changing Language During First-Time Setup

When you turn on your Vizio TV for the first time, it prompts you to select a language as part of the setup process. Follow these steps:

  1. Power On the TV: Press the power button on the TV or remote to start.
  2. Choose a Language: The first screen shows a list of languages. Use the up/down arrow buttons on the remote to highlight your preferred language (e.g., English, French, or Spanish).
  3. Confirm Selection: Press the OK button on the remote to select the language.
  4. Complete Setup: Follow the remaining on-screen instructions to finish the initial setup.
Vizio TV screen showing language options during setup.
Vizio TV language selection screen during initial setup.

Changing Language After Setup

If your TV is already set up and you want to change the language, you can do so through the settings menu. Here’s how:

  1. Open the Menu: Press the Menu button on your Vizio remote. This displays the on-screen menu.
  2. Go to Settings: Use the arrow buttons to highlight the Settings icon and press OK.
  3. Select Menu Language: Navigate to Menu Language in the Settings menu and press OK.
  4. Pick Your Language: Scroll through the list of languages using the arrow buttons, select your preferred language, and press OK.
  5. Exit the Menu: Press the Exit button on the remote to close the menu.
Vizio TV remote with Menu button circled.
Vizio remote with Menu button highlighted.

For more tips on managing your Vizio TV settings, check out How to Reset Vizio TV.

Troubleshooting Common Language Change Issues

Sometimes, you may face issues when trying to change the language. Below are solutions to common problems, based on user experiences and expert advice.

Stuck on Language Selection Screen

If your TV is stuck on the language selection screen and you can’t move forward, try these steps:

  • Reset the TV: Unplug the TV from the power outlet for 5 minutes, then plug it back in and turn it on. This can clear temporary glitches.
  • Use a Universal Remote: If you have a universal remote, program it to work with your Vizio TV to navigate the menus.
  • Hard Reset: Unplug the TV, press and hold the power button on the TV for 10 seconds, then release and plug it back in.

For additional reset methods, see How to Get Vizio TV Out of Setup Demo Mode.

No Remote Available

If you don’t have a remote, you can still change the language using alternative methods:

  • Use TV Buttons: On some Vizio models, like the E421VA, you can use the volume and channel buttons on the TV to navigate and select options. Press the Source or Menu button to confirm selections.
  • Vizio SmartCast App: Download the Vizio SmartCast app to control your TV (see the next section for details).
  • Universal Remote: Purchase or borrow a universal remote compatible with Vizio TVs.

Language Change Not Applying

If the language doesn’t change after selecting a new one, try these steps:

  • Restart the TV: Turn off the TV using the power button, wait a few seconds, and turn it back on.
  • Check for Firmware Updates: Go to Settings > System > Check for Updates to ensure your TV’s software is current. An outdated firmware can cause issues.
  • Factory Reset: As a last resort, perform a factory reset to restore default settings. Be aware this will erase all custom settings. Learn more at How to Reset Vizio TV.

If your TV has connectivity issues that might affect updates, refer to Vizio TV Not Connecting to WiFi: Fixes.

Table: Common Language Change Issues and Solutions

IssueSolution
Stuck on language screenUnplug TV for 5 minutes, use universal remote, or perform a hard reset.
No remote availableUse TV buttons, Vizio SmartCast app, or a universal remote.
Language not changingRestart TV, check for firmware updates, or perform a factory reset.

Using the Vizio SmartCast App to Change Language

The Vizio SmartCast app is a handy tool for controlling your TV, especially if you don’t have a remote. Here’s how to use it to change the language:

  1. Download the App: Install the Vizio SmartCast app from the App Store or Google Play Store.
  2. Connect to Your TV: Ensure your smartphone and TV are on the same Wi-Fi network. Open the app and follow the prompts to pair it with your TV.
  3. Access Settings: Use the app’s interface to navigate to the Settings menu, then select Menu Language and choose your preferred language.
  4. Confirm Changes: Follow the on-screen instructions to save your selection.

The app also lets you launch apps, adjust volume, and more, making it a versatile alternative to a physical remote.

Available Languages on Vizio TVs

Most Vizio TVs support the following languages for the on-screen menu:

  • English
  • French
  • Spanish

The available languages may vary depending on your TV model and region. If your preferred language isn’t listed, select the closest option you understand. For example, if you need Portuguese, you might need to use English or Spanish instead.

Conclusion

Switching the language on your Vizio TV is a quick process, whether you’re doing it during the initial setup or later through the settings menu. If you run into issues like a stuck language screen or a missing remote, the troubleshooting steps above should help. The Vizio SmartCast app offers a convenient solution for remote-less control, and checking for firmware updates can prevent future problems. For more Vizio TV tips, visit Vizio Support or explore related guides on Soft4led.

How to Find the MAC Address on Your Samsung TV

0
Thumbnail for blog post on locating Samsung TV MAC address
Guide to Finding MAC Address on Samsung TV

Every Samsung Smart TV has a unique identifier called a MAC address, which stands for Media Access Control address. This code is crucial for connecting your TV to the internet, whether through Wi-Fi or an Ethernet cable. Knowing how to find your TV’s MAC address can help you set up your network, manage parental controls, troubleshoot connectivity issues, or register your TV for support. This guide provides clear, step-by-step instructions to locate the MAC address on your Samsung TV, along with alternative methods and tips for using it effectively.

Samsung TV remote control highlighting the Home button
Samsung TV remote with Home button

What is a MAC Address?

A MAC address is a 12-digit hexadecimal code (e.g., 00:1A:2B:3C:4D:5E) unique to each network-enabled device, including your Samsung TV. It identifies your TV on a network, enabling communication with routers and other devices. Unlike an IP address, which can change, the MAC address is permanent. It’s used for network setup, security measures like MAC address filtering, and troubleshooting connectivity issues. For more details, visit Wikipedia’s MAC address page.

Why You Need the MAC Address

You may need your Samsung TV’s MAC address for several reasons:

  • Network Setup: To connect your TV to Wi-Fi or Ethernet, especially in restricted networks like those in dorms or offices.
  • Security: To set up MAC address filtering, allowing only specific devices to access your network.
  • Parental Controls: To restrict internet access or manage screen time.
  • Troubleshooting: To diagnose and fix network issues, such as buffering or disconnections.
  • Device Registration: To register your TV with Samsung for warranty or support.
  • Smart Features: To integrate with apps like SmartThings or set up VPNs for privacy.

Methods to Find the MAC Address

The steps to locate the MAC address may vary slightly depending on your Samsung TV’s model and operating system (Tizen OS for 2015+ models or Orsay OS for 2014 and earlier). Below are the most common methods. If one method doesn’t work, try another or consult your TV’s user manual.

Method 1: Through the Support Menu

This method is widely used across Samsung TV models, particularly those running Tizen OS.

  1. Press the Home button on your remote control to open the Smart Hub.
  2. Navigate to Settings using the directional pad.
  3. Select Support.
  4. Choose About this TV or Contact Samsung.
  5. Scroll down to find the MAC address, labeled as “MAC Address,” “Wireless MAC,” or “Ethernet MAC.”

Method 2: Through Network Settings

This method is useful for finding both wired and wireless MAC addresses, especially if you’re troubleshooting network issues.

  1. Press the Home button on your remote control.
  2. Select Settings.
  3. Choose General (if available on your model).
  4. Select Network.
  5. Choose Network Status or Network Settings.
  6. Select Wired or Wireless, then choose Network Test (if prompted).
  7. The MAC address will be displayed, labeled as “Ethernet Address” or “Wired MAC Address” for wired connections, or “Wi-Fi Address” for wireless.

Method 3: Using the Info Button

Some Samsung TV models offer a shortcut to access system information.

  1. Press and hold the Info button on your remote for a few seconds.
  2. A system information screen will appear.
  3. Look for “Wireless MAC Address” or “Ethernet MAC Address,” depending on your connection type.

Alternative Methods

If you can’t access the MAC address through the TV’s menu, try these options:

  • Check the TV’s Physical Label: Look for a sticker on the back or bottom of your TV. The MAC address may be listed, often starting with “00:”.
  • Check the TV’s Box or Packaging: The MAC address may be printed on the box or included in the user manual.
  • Use Your Router’s Connected Devices List: If your TV is connected to your network, log into your router’s admin page (often at 192.168.1.1 or 192.168.0.1) using a web browser. Find the list of connected devices or DHCP clients, and locate your TV’s name or IP address. The MAC address will be listed alongside.

Using the MAC Address

Once you have the MAC address, you can use it for various purposes:

  • Network Setup: Enter the MAC address when configuring restricted networks, such as in schools or offices.
  • MAC Address Filtering: Add the MAC address to your router’s allow list to enhance network security.
  • Parental Controls: Use the MAC address to restrict internet access or manage screen time.
  • Troubleshooting: Share the MAC address with technical support to diagnose connectivity issues. For more help, see our guides on fixing Samsung TV turning on and off or resolving black screen issues.
  • Smart Features: Use the MAC address for SmartThings app integration or VPN setup.

Troubleshooting

If you’re having trouble finding the MAC address, try these steps:

  • Verify Menu Options: Ensure you’re following the correct menu path for your TV model. Check your user manual for model-specific instructions.
  • Reset to Factory Settings: If the MAC address isn’t displayed, a factory reset may help, but note that this will erase all settings. See our guide on how to reset a Samsung TV for steps.
  • Contact Samsung Support: If all else fails, reach out to Samsung Support for assistance.
  • Check Connectivity: If using the router method, ensure your TV is connected to the network.

FAQs

What is a MAC address?

A MAC address is a unique 12-digit code identifying your TV’s network interface for Wi-Fi or Ethernet connections.

Why do I need the MAC address for my Samsung TV?

It’s needed for network setup, security settings, parental controls, troubleshooting, or registering your TV with Samsung.

Is the MAC address the same for wired and wireless connections?

No, your TV has separate MAC addresses for Ethernet (wired) and Wi-Fi (wireless) connections.

Can I find the MAC address without turning on the TV?

Yes, check the physical label on the TV or the box it came in, if available.

What if the MAC address is not displayed in the settings?

Try alternative methods like checking the physical label or router’s connected devices list. If still not found, contact Samsung Support.

Can I change my TV’s MAC address?

No, the MAC address is permanent and unique to each device.

Is it safe to share my TV’s MAC address?

Share it only with trusted parties, like your network admin or Samsung support, to avoid potential security risks.

Conclusion

Locating the MAC address on your Samsung TV is a simple process with multiple methods to suit different models and situations. Whether you use the Support menu, Network settings, or check the physical label, this guide ensures you can find the MAC address quickly. Use it to set up your network, enhance security, or troubleshoot issues. For model-specific guidance, refer to your TV’s user manual or visit Samsung’s support page.

How to Reset Your Emerson TV: Step-by-Step Guide

0
Emerson TV with reset button and text overlay
Emerson TV reset guide

Is your Emerson TV not working right? It might freeze, ignore the remote, or have settings you want to clear. Resetting your TV can fix these issues. This guide covers how to reset any Emerson TV model, with or without a remote. We’ll explain soft resets and factory resets, provide clear steps, and answer common questions.

Why Reset Your Emerson TV?

A reset can solve many TV problems, such as:

  • Screen freezing or lagging.
  • Remote not responding.
  • Apps not working properly.
  • Preparing the TV for sale or gifting.

There are two types of resets:

  • Soft Reset: Restarts the TV without deleting data. It fixes minor glitches.
  • Factory Reset: Restores the TV to its original settings, erasing all customizations and apps.

Note: Always try a soft reset first. If it doesn’t work, move to a factory reset. Check your TV’s manual for model-specific details, as steps may vary.

Soft Reset: A Quick Fix

A soft reset is simple and safe. It doesn’t erase your settings or apps. It’s like restarting your phone to clear a glitch. Follow these steps:

  1. Unplug the TV: Disconnect the power cord from the wall outlet or the TV.
  2. Wait 60 Seconds: Let the TV sit unplugged to discharge stored power.
  3. Press the Power Button: Hold the power button on the TV (not the remote) for 20-30 seconds.
  4. Plug it Back In: Reconnect the power cord and turn on the TV.

This should fix minor issues like a frozen screen or slow response.

If the soft reset doesn’t help, try a factory reset.

Factory Reset with Remote

A factory reset wipes all settings, apps, and personal data, returning the TV to its original state. Use this if the soft reset fails or you want a fresh start. Here’s how to do it with a remote:

  1. Turn on the TV: Ensure the TV is powered on.
  2. Press Menu: Press the “Menu” button on your remote.
  3. Go to Settings: Use the arrow keys to select “Settings” or “System,” then press “OK.”
  4. Find Factory Reset: Look for “Factory Reset,” “Reset Defaults,” or “Advanced Settings.” Select it and press “OK.”
  5. Confirm the Reset: Follow the on-screen prompts. The TV will restart and show the setup screen.
Emerson TV screen showing Factory Reset option
Selecting Factory Reset on Emerson TV menu

Warning: A factory reset deletes everything. Back up any important settings if possible.

Factory Reset without Remote

Lost your remote? You can still reset your TV using a reset button or button combinations.

Using the Reset Button

Some Emerson TVs have a pinhole reset button on the back or side. Here’s how to use it:

  1. Locate the Reset Button: Check the back or side of the TV for a small hole labeled “Reset.”
  2. Turn on the TV: Ensure the TV is powered on.
  3. Press and Hold: Use a paper clip or pin to press and hold the reset button for 10-15 seconds.
  4. Wait for Restart: Release the button when the Emerson logo appears. The TV will reboot and show the setup screen.
TV reset button location
Locating the reset button on a TV.

Using Button Combinations

If your TV lacks a reset button, try these button combinations on the TV itself:

  • Combination 1: Hold “Volume Up” and “Volume Down,” then press “Menu.”
  • Combination 2: Hold “Channel Up” and “Channel Down,” then press “Power.”
  • Combination 3: Hold “Menu,” then press “Standby-On.”

Hold each combination for 10-15 seconds. If one doesn’t work, try another. Once the menu appears, use volume or channel buttons to select “Factory Reset.”

Note: Button combinations vary by model. Check your manual or try multiple combinations.

Troubleshooting Common Issues

If the reset doesn’t solve your problem, try these steps:

  • Check the Power Source: Ensure the power cord is secure and the outlet works.
  • Review the Manual: Find your model’s manual at Emerson Manuals for specific instructions.
  • Contact Support: Reach out to Emerson Support for help.
  • Seek Professional Help: If the TV still doesn’t work, a technician may be needed.

For related issues, see our guides on fixing a TV that won’t turn on or resetting other TV brands.

Frequently Asked Questions

Where is the reset button on my Emerson TV?

It’s usually a pinhole on the back or side of the TV, labeled “Reset.” Use a paper clip to press it.

Can I reset my Emerson TV without a remote?

Yes, use the reset button or button combinations like “Volume Up,” “Volume Down,” and “Menu.”

What does a factory reset do?

It erases all settings, apps, and data, restoring the TV to its original factory state.

My TV won’t turn on. Will a reset help?

Try a soft reset first. If it doesn’t work, check the power cord and outlet. If the issue persists, contact Emerson Support.

Can I use a remote app to reset my TV?

No, remote apps like Emerson Remote don’t support factory resets due to security restrictions.

Conclusion

Resetting your Emerson TV is a straightforward way to fix common issues like freezing or remote problems. Start with a soft reset to avoid losing data. If that doesn’t work, a factory reset will restore the TV to its original settings. Use the remote, reset button, or button combinations based on your model. Always check your manual for specific instructions. For more help, visit Emerson Support or explore our related guides on Soft4led.

How to Uninstall Apps on Vizio TV: Step-by-Step Guide

0

Vizio smart TVs offer a variety of apps for streaming and entertainment. Sometimes, you may want to remove apps to declutter your screen or free up space. The process depends on your TV’s platform: VIA, VIA Plus, or SmartCast. This guide provides clear steps to uninstall apps on Vizio TVs, explains how to manage apps on SmartCast models, and addresses common issues. Written in simple English, this post is designed to help you manage your Vizio TV apps easily.

Why Uninstall Apps on Your Vizio TV?

Removing unused apps can make your TV’s interface cleaner and easier to use. On older Vizio TVs (VIA or VIA Plus), you can delete apps directly. On newer SmartCast TVs, apps are preinstalled, so you can only rearrange them or cast from a mobile device. Knowing your TV’s platform is the first step to managing apps effectively.

Step 1: Identify Your Vizio TV Platform

Vizio TVs use three platforms, and each handles apps differently. Here’s how to identify your platform:

PlatformYearsApp Management Features
VIA2009–2013Add and delete apps via Connected TV Store
VIA Plus2013–2017Add and delete apps via Connected TV Store
SmartCast2016–presentPreinstalled apps; no deletion, only rearrange or cast

How to Check Your Platform

  • Model Number: Find the model number on the back of your TV or in the settings menu (Settings > System > System Information). Check the model on the Vizio website to confirm the platform.
  • User Interface: Turn on your TV and press the “V” or “Home” button. If you see an app store, it’s likely VIA or VIA Plus. If you see a home screen with an app row, it’s SmartCast.
  • Model Year: TVs from 2009–2013 use VIA, 2013–2017 use VIA Plus, and 2016 onward use SmartCast (including 4K UHD models from 2016–2017).

If you’re unsure, refer to your user manual or contact Vizio support for help.

Photo showing the model number label on the back of a Vizio TV.
Locating the model number on a Vizio TV.

Step 2: Uninstall Apps on VIA or VIA Plus TVs

If your Vizio TV uses the VIA or VIA Plus platform, you can delete apps directly from the TV. Follow these steps:

  1. Turn On Your TV: Press the power button on your remote.
  2. Open the App Menu: Press the “V” button on your Vizio remote to access the app menu.
  3. Select the App: Use the arrow keys to highlight the app you want to remove.
  4. Delete the App:
    • For VIA: Press the yellow button on the remote, select “Delete App,” and press “OK.”
    • For VIA Plus: Press “OK” to open the app options, select “Delete,” and press “OK.”
  5. Confirm Deletion: Follow any on-screen prompts to confirm. You may need to enter a PIN.
  6. Repeat as Needed: Repeat the process for other apps you want to remove.
  7. Optional Restart: Turn off your TV for a few seconds and turn it back on to ensure changes take effect.

Step 3: Manage Apps on SmartCast TVs

SmartCast TVs, used in Vizio models from 2016 onward, have preinstalled apps that cannot be deleted. This is because apps are cloud-based HTML5 interfaces, not traditional apps stored on the TV. However, you can manage the app row or cast from a mobile device.

Rearrange the App Row

To make your SmartCast home screen easier to use, rearrange apps to prioritize your favorites:

  1. Press the “Home” button on your Vizio remote to open the SmartCast home screen.
  2. Scroll to the app row using the arrow keys.
  3. Select the “Customize App Row” or “Sort App Row” icon, usually at the end of the row.
  4. Highlight an app and use the left or right arrow keys to move it.
  5. Press “OK” to confirm the new position.
  6. Select “Done” to save changes.

Cast Apps from Your Mobile Device

If you want to use apps not preinstalled on your SmartCast TV, you can cast from your phone or tablet:

  1. Connect your phone and TV to the same Wi-Fi network.
  2. Download a Chromecast-enabled app (e.g., Netflix, YouTube) or AirPlay-compatible app on your phone.
  3. Open the app and tap the Cast or AirPlay icon.
  4. Select your Vizio TV from the list of devices.
  5. Stream content directly to your TV.

This method lets you access a wider range of apps without cluttering your TV’s interface.

Step 4: Troubleshoot Common App Issues

Some users face challenges when managing apps on Vizio TVs. Here are solutions to common problems:

  • App Won’t Delete on VIA/VIA Plus: Ensure you’re using the correct button (yellow for VIA, “OK” for VIA Plus). If the app doesn’t delete, restart your TV and try again. Check for firmware updates in Settings > System > Check for Updates.
  • SmartCast App Not Working: If an app crashes or freezes, cast it from your phone instead. Alternatively, update your TV’s firmware or perform a factory reset.
  • Slow Interface on SmartCast: Rearranging the app row to prioritize frequently used apps can improve navigation. Some users report slow performance due to preinstalled apps.
  • App Disappears: On SmartCast, apps may disappear due to updates. Unplug your TV for 15 seconds, plug it back in, and check if the app reappears.

Conclusion

Managing apps on your Vizio TV depends on its platform. For VIA and VIA Plus TVs (2009–2017), you can delete apps directly using the “V” button and the delete option. For SmartCast TVs (2016–present), apps are preinstalled and cannot be removed, but you can rearrange the app row or cast from a mobile device. Always check your TV’s platform by reviewing the model number or user interface. For more help, visit the Vizio support page or explore related guides on Soft4led, such as How to Add Apps to Vizio Smart TV or Fix Vizio TV Slow Performance.