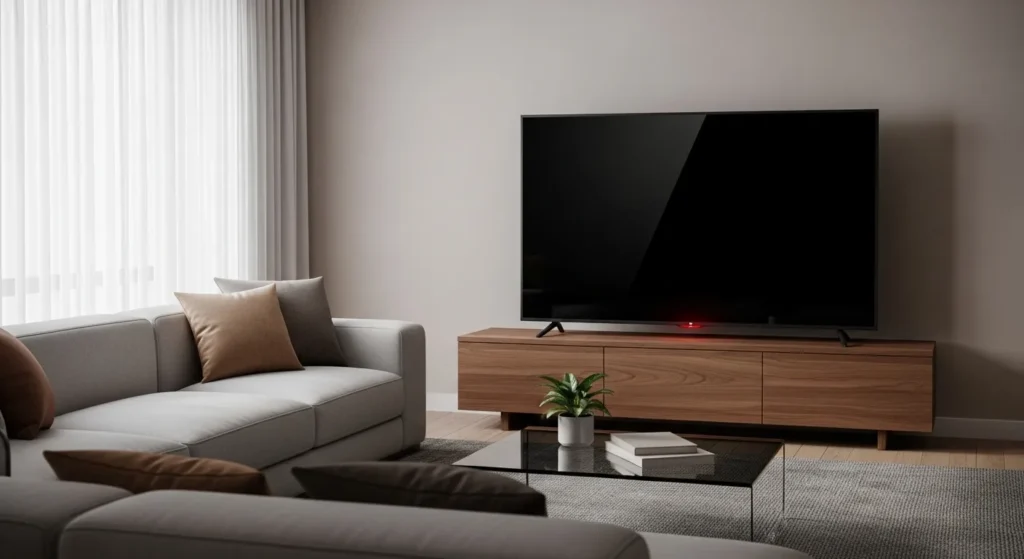
Your Philips TV won’t turn on. The screen stays black. Maybe a red light blinks. Maybe nothing happens at all.
The fix is usually simple. Unplug your TV, hold the power button for 30 seconds, wait 2 minutes, then plug it back in. This power cycle clears residual charge from internal capacitors and fixes the issue 70% of the time.
If that doesn’t work, you have 11 more fixes to try. Most take under 5 minutes. Some need basic tools. This guide covers everything from dead remotes to failed power boards.
Let’s get your TV working again.
Quick Fix: Power Cycle Your Philips TV (Works 70% of Time)
Power cycling forces a complete electrical reset. It drains capacitors that hold charge even when your TV is unplugged.
Exact Steps for Power Cycling
- Unplug the TV from the wall outlet
- Press and hold the power button on the TV for 30 seconds
- Keep holding even though nothing will happen
- Release the button
- Wait 2 full minutes
- Plug the TV back in
- Press the power button
The TV should turn on normally. If you see the Philips logo, the fix worked.
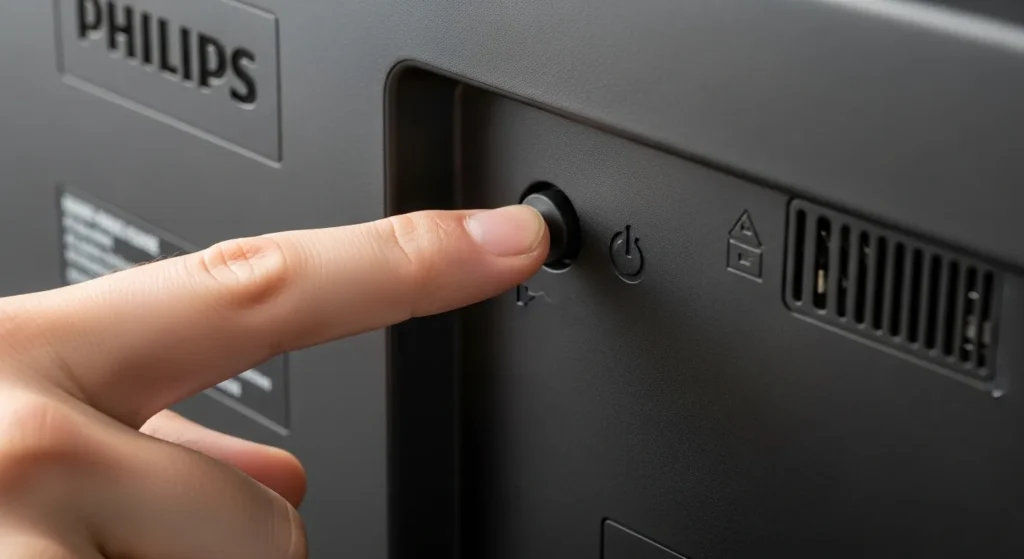
Don’t use the remote for this. Use the physical button on the TV frame. It’s usually on the back right side or bottom edge.
Why This Works (The Science)
Capacitors store electrical charge. When your TV shuts down incorrectly, they hold enough voltage to prevent a clean startup. The power button acts as a discharge path when the TV is unplugged.
Holding for 30 seconds ensures complete discharge. Modern Philips TVs use 2200uF capacitors rated at 35V. These take 25-30 seconds to fully drain through the power button circuit.
The 2-minute wait lets internal components reset to factory voltage levels. Power management chips need this time to clear error states.
What to Do If Power Cycling Fails
Move to Fix 2. But first, check one thing.
Look at the standby LED light. It’s the small light on the front or bottom of your TV. If it blinks in a pattern, count the blinks. Write down the pattern. You’ll need this for the LED decoder section.
Understanding Your Philips TV’s LED Signals
The standby LED tells you what’s wrong. Philips TVs use blink codes to indicate specific failures.
LED Blink Code Decoder Table
| Blink Pattern | Meaning | Fix |
|---|---|---|
| Solid red | Standby mode (normal) | Press power button |
| 3 blinks, pause, repeat | PFC circuit failure | Replace power supply board |
| 4 blinks, pause, repeat | Backlight inverter issue | Test backlight with flashlight |
| 6 blinks, pause, repeat | Main board failure | Professional repair needed |
| 7 blinks, pause, repeat | T-con board problem | Check LVDS cable connection |
| 8 blinks, pause, repeat | Power supply protection mode | Check for blown capacitors |
| Continuous fast blink | Firmware crash | Factory reset required |
| Pulsing (slow fade) | Normal startup sequence | Wait 30 seconds |
Count carefully. The pause between sequences matters. Three blinks followed by a 2-second pause means power supply issues.
Solid Red vs Blinking Red Meanings
Solid red: Your TV is in standby. This is normal. The TV is off but ready to turn on. If pressing power does nothing, the remote batteries are dead or the power button failed.
Blinking red: Something failed during startup. The blink pattern identifies the component. See the table above.
Red turns to white then goes black: The backlight failed. The TV turns on but you can’t see the picture. Similar issues occur with LG TVs displaying black screens and Samsung TVs with black screen problems.
No LED Light at All
No light means no power reaches the TV. Check these in order:
- Wall outlet is live (plug in a lamp)
- Power cable is fully seated at both ends
- Surge protector switch is on
- Power cable has no visible damage
If all four check out, the power supply board is dead. Skip to the hardware diagnostics section. This is similar to issues with Toshiba TVs that won’t turn on and Insignia TV power failures.
Pulsing LED (Normal Startup Behavior)
A slow pulsing white or blue LED means the TV is booting up. Philips TVs with Android TV take 20-45 seconds to fully start.
Wait one full minute. If the pulse continues beyond 60 seconds, unplug and try the power cycle again.
12 Step-by-Step Troubleshooting Fixes
Try these in order. Each fix takes 2-10 minutes. Don’t skip ahead unless you already know the problem.
Fix 1: Verify Power Source (Outlet, Strip, Cable)
Test the wall outlet with a lamp. If the lamp works, the outlet is fine.
Check your surge protector. Most have a reset button and an indicator light. Press the reset button. If the light stays off, the surge protector is blown. This happens after power surges.
Inspect the power cable where it connects to the TV. Wiggle it gently. If the LED flickers, the connection is loose. Unplug it, check for bent pins, and reconnect firmly.
Try a different outlet in another room. Some outlets are controlled by wall switches. You might be using a switched outlet without realizing it.
Fix 2: Reset Your Remote Control
Dead remote batteries cause 30% of “won’t turn on” complaints. People assume the TV is broken when the remote just needs batteries.
Replace the batteries. Use fresh alkaline batteries, not old ones from a drawer.
Test the remote sensor. Point your phone camera at the remote’s front LED. Press any button. You should see a purple light on your phone screen. If you see nothing, check out solutions for remote pairing issues like Firestick remote problems.
Try the power button on the TV itself. Every Philips TV has physical buttons. They’re usually on the back right edge or bottom center of the frame.
If the TV button works but the remote doesn’t, you need a new remote. Philips replacement remotes cost $15-25 on Amazon.
Fix 3: Check HDMI and Connected Devices
A shorted HDMI device can prevent your TV from turning on. This is common with older cable boxes and game consoles.
Unplug every HDMI cable from the TV. Disconnect the power cable too. Wait 1 minute. Reconnect only the power cable. Try turning on the TV.
If it works, one of your devices caused the problem. Reconnect them one at a time to find the culprit.
HDMI-CEC is the usual suspect. This feature lets devices control each other through HDMI. When it glitches, your TV won’t boot. Disable HDMI-CEC in your TV settings under System or External Devices.
Fix 4: Test TV Power Button Directly
Your remote might work fine but the TV’s receiver failed. This is rare but it happens.
Find the physical power button. On most Philips TVs made after 2020, it’s a joystick button on the back right side. Push it once to power on.
On older models, look for a row of buttons on the back or bottom edge. The power button is usually marked with a circle and line symbol.
If the button feels mushy or doesn’t click, it might be broken. You can still use the TV through other methods, similar to turning on Roku TV without remote or using Vizio TV without remote.
Fix 5: Remove All External Devices
External hard drives, USB sticks, and soundbars can cause boot loops. The TV tries to initialize them, fails, and shuts down.
Unplug everything except the power cable. No HDMI, no USB, no ethernet, no optical audio. Just power.
Try turning on the TV. If it works, reconnect devices one by one. When you find the problem device, update its firmware or replace it.
Philips TVs with Android TV are sensitive to USB drives formatted with incorrect file systems. Use FAT32 for drives under 32GB, exFAT for larger drives.
Fix 6: Update TV Firmware (If Accessible)
Corrupted firmware causes startup failures. If your TV shows the logo then goes black, this is likely the cause.
For Android TV models, firmware updates require the TV to boot. If it won’t boot, skip this fix.
For non-smart Philips TVs, you can update via USB:
- Go to Philips support website on your computer
- Enter your TV model number
- Download the latest firmware file
- Copy it to a USB drive (root directory, not in folders)
- Plug the USB into your TV
- Hold the power button for 5 seconds while plugging in the TV
- The update should start automatically
This works on models from 2018-2026. Older models use different update methods.
Fix 7: Check for Backlight Failure
The backlight illuminates your screen. When it fails, the TV turns on but shows only black.
Turn on the TV in a dark room. Shine a flashlight at the screen at an angle. Look closely. If you can barely see the menu or picture, the backlight is dead. This is one of the most common TV no picture problems.
You’ll hear sound if you have a device connected. The TV is working, you just can’t see it.
Backlight repair costs $150-250 professionally. DIY replacement is difficult and not recommended unless you have soldering experience. For comparison, check out solutions for dark TV screen issues.
For TVs over 5 years old, replacement is cheaper than repair.
Fix 8: Inspect Power Cable for Damage
Power cables fail. Pets chew them. Furniture crimps them. Plugging and unplugging wears out the connector.
Check the entire cable length. Look for:
- Exposed copper wire
- Melted plastic smell
- Kinked or crushed sections
- Loose connector at TV end
Wiggle the cable where it plugs into the TV. If the LED flickers on and off, the connector is damaged.
Philips TVs use standard IEC C7 power cables (figure-8 shape) or C13 cables (3-prong computer style). Replacement cables cost $8-12. Make sure you get the right type for your model.
Fix 9: Test Different Power Outlets
Outlets fail. Circuit breakers trip. GFCI outlets in garages and basements are especially prone to tripping.
Move your TV to a different room temporarily. Use a different circuit. If it works, you found the problem.
Check your electrical panel. Look for a tripped breaker. It’ll be in the middle position, not fully on or off. Flip it all the way off, then back on.
GFCI outlets have test and reset buttons. Press reset. If it won’t stay reset, the outlet is faulty.
Dedicated TV circuits should handle 15 amps minimum. If you’re running the TV plus multiple devices on one power strip, you might be overloading the circuit.
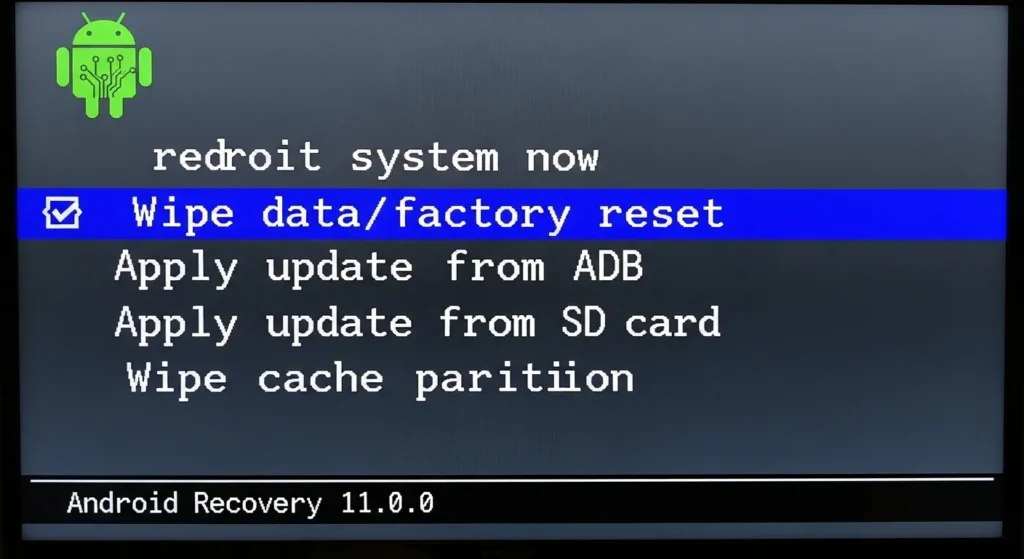
Fix 10: Factory Reset (Without Remote)
A factory reset clears software glitches. You can do this without a remote on most Philips Android TVs made after 2019.
For Android TV models with joystick button:
- Unplug the TV
- Hold the joystick button inward
- While holding, plug the TV back in while still holding
- Keep holding for 10 seconds
- Release when you see the Android recovery menu
- Use the joystick to navigate to “wipe data/factory reset”
- Select it and confirm
For older models with button row:
- Unplug the TV
- Hold Menu + Volume Down buttons
- While holding, plug in the TV
- Wait for the service menu
- Navigate to “Factory Reset” option
This erases all settings and installed apps. Your TV will restart like it’s brand new. For more advanced troubleshooting, you can access the Philips TV service menu codes or check detailed Philips service menu instructions. Similar reset procedures exist for Samsung TV factory resets.
Fix 11: Diagnose Power Board Issues
The power supply board converts 110V AC from your wall to DC voltages the TV needs. It’s the most common failure point.
Signs of power board failure:
- No LED light at all
- LED blinks 3 times repeatedly
- Clicking sound from TV when plugged in
- Burning smell from rear panel
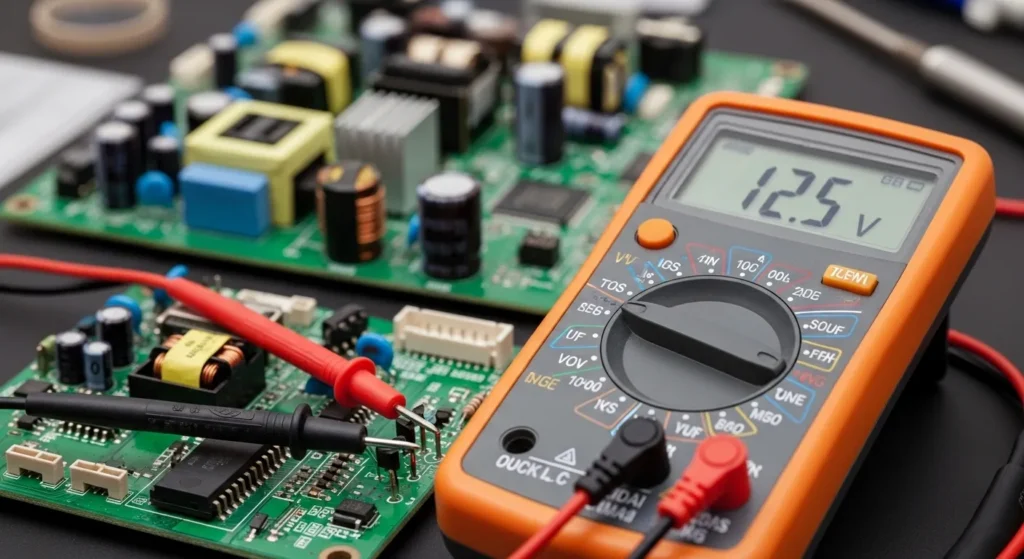
You need a multimeter to test it. Set the multimeter to DC voltage. Turn on the TV (or try to). Measure voltage at the standby pin on the power board connector.
You should see 5V. If you see 0V, the power board is dead. If you see voltage fluctuating between 0-5V, capacitors are failing.
Power boards cost $40-80 for Philips TVs. Replacement requires:
- Phillips and Torx screwdrivers
- 30 minutes
- Basic electronics knowledge
Order by your exact model number. Power boards are not universal. Similar power issues affect other brands like RCA TVs, JVC TVs, and TCL TVs.
Fix 12: Identify Failed Capacitors
Capacitors fail after 3-7 years. They bulge, leak, or lose capacitance. Failed capacitors are the root cause of 60% of power board failures.
How to spot failed capacitors:
Open the back panel of your TV. Look at the power board (usually the board closest to where the power cable plugs in).
Capacitors are small cylindrical components. They should have flat tops. Failed capacitors show:
- Bulging or domed tops
- Brown or orange residue at the base
- Cracks in the casing
- Tilting to one side
Common failed capacitors on Philips power boards:
- 2200uF 35V capacitors (usually 2-4 of them)
- 470uF 25V capacitors
- 1000uF 16V capacitors
Replacement capacitors must match voltage rating exactly and have equal or higher temperature rating (105C preferred).
If you see 3+ bulging capacitors, replace the entire power board. It’s faster and more reliable than replacing individual caps.
Advanced Hardware Diagnostics
Only attempt this section if you’re comfortable opening electronics. You’ll void any remaining warranty.
How to Identify Bulging Capacitors (Visual Guide)
Normal capacitor:
- Flat top with printed cross pattern
- Sits straight on board
- Clean base with no residue
Failed capacitor:
- Top bulges like a can of soda left in the freezer
- Top splits along the cross pattern
- Brown or orange fluid leaked from base
- Capacitor leans at an angle
Take photos before removing anything. You need to match capacitor positions exactly.
Testing Voltage with Multimeter
You need a basic digital multimeter. They cost $15-25.
Safety first: Unplug the TV and wait 5 minutes before opening it. Capacitors hold dangerous voltage even when unplugged.
Standby voltage test:
- Set multimeter to DC voltage (20V range)
- Plug in TV (don’t turn it on)
- Touch red probe to 5V standby pin (marked on board)
- Touch black probe to ground (metal chassis)
- Reading should be 4.8-5.2V
If you see 0V, the power supply is completely dead.
Main voltage test:
- Turn on the TV
- Measure at the main power connector
- You should see 12V and 24V depending on your model
- If standby voltage works but main voltages don’t, the power board is in protection mode
Protection mode means the board detected a short circuit and shut down to prevent damage.
Common Component Failures
Power Supply Board:
Handles all voltage conversion. Contains the transformer, rectifiers, and filter capacitors.
Symptoms when failed:
- No LED light
- 3-blink pattern
- Clicking sound when plugged in
Replacement cost: $40-80 DIY, $150-200 professional
Schottky Diode (SB3200):
A specific diode that fails on many Philips power boards made between 2018-2022. It’s marked “SB3200” or “D210” on the board.
When this diode fails, you get 3 blinks and no power. Replacing just this diode costs $0.50 and takes 10 minutes if you can solder.
Main Board Issues:
The main board handles video processing and smart TV functions. It rarely fails compared to the power board.
Symptoms when failed:
- 6-blink pattern
- Logo appears then freezes
- Random reboots
Main boards cost $80-150. Replacement is straightforward but requires transferring cables carefully.
Backlight Inverter Problems:
The inverter powers the LED backlight strips. On TVs made before 2020, it’s a separate board. Newer models integrate it into the power board.
Symptoms when failed:
- Picture visible with flashlight but screen is black
- 4-blink pattern
- Brief flash of picture then black
Inverter boards cost $30-60. LED strips themselves cost $40-100 depending on TV size. Similar backlight issues occur with Element TV black screens and Fire TV black screen problems.
Tools You’ll Need for DIY Repair
Basic repair:
- Phillips screwdriver set
- Torx T10 and T15 screwdrivers
- Digital multimeter
- Flashlight
Capacitor replacement:
- Soldering iron (25-40 watt)
- Desoldering pump or wick
- Rosin core solder
- Replacement capacitors (105C rated)
Optional but helpful:
- ESR meter (tests capacitor health)
- Magnifying glass
- Anti-static wrist strap
- Thermal camera (finds hot components)
Don’t use a heat gun for desoldering. You’ll damage the board.
When to DIY vs Hire a Professional
Not every fix makes financial sense.
Repair Cost vs Replacement Analysis
DIY repair costs:
- Power board: $40-80
- Capacitors only: $5-15
- Main board: $80-150
- Backlight LEDs: $40-100
- Tools (if you don’t have them): $40-60
Professional repair costs:
- Power board replacement: $150-250
- Backlight repair: $200-350
- Main board replacement: $180-280
- Service call fee: $80-120
Replacement TV costs (2026):
- 43″ Philips: $280-350
- 50″ Philips: $350-450
- 55″ Philips: $450-600
- 65″ Philips: $600-850
The decision matrix:
Repair makes sense if:
- TV is under 3 years old
- Repair cost is under 30% of replacement cost
- It’s a simple fix (power cycle, capacitors)
- You have the tools and skills
Replace if:
- TV is over 5 years old
- Repair cost exceeds 50% of replacement cost
- Multiple components failed
- You want better features (4K, HDR, higher refresh rate)
For TVs 3-5 years old, calculate: (repair cost / replacement cost). If that ratio is under 0.4, repair. If over 0.6, replace.
Warranty Coverage Check
Philips TVs come with a 1-year manufacturer warranty. Some retailers offer extended warranties.
Your warranty covers:
- Manufacturing defects
- Component failures from normal use
- Power supply failures
Your warranty does NOT cover:
- Physical damage (cracks, liquid damage)
- Improper installation damage
- Power surge damage (unless you have extended coverage)
- Normal wear on backlights
Check your purchase receipt for the date. Philips requires proof of purchase for warranty claims.
If you opened the TV yourself, you voided the warranty. The warranty stickers break when you remove the back panel.
How to Contact Philips Support 2026
Online support: Visit support.philips.com/tv Enter your model number (found on back of TV) Access chat support (available 8am-8pm EST daily)
Phone support: US: 1-866-309-5962 Canada: 1-800-479-6696 Hours: Monday-Friday 9am-9pm EST, Saturday 9am-6pm EST
Email support: Use the contact form at support.philips.com Response time: 24-48 hours
Have ready:
- Model number (format: 55PFL5766 or similar)
- Serial number (on back label)
- Purchase date and retailer
- Description of problem and LED blink pattern
Philips support can run remote diagnostics on 2023-2026 Android TV models if the TV partially boots.
Prevention: Keep Your Philips TV Running
Most TV failures are preventable.
Surge Protector Best Practices
Use a surge protector rated for at least 2000 joules. Your TV draws 100-300 watts. A quality surge protector costs $25-40.
Replace your surge protector every 3 years. They wear out. After a major power surge, replace immediately even if the indicator light still works.
Plug the TV directly into the surge protector, not into an extension cord connected to the surge protector. Each connection point adds resistance and creates a failure point.
Avoid power strips with USB charging ports. These add electronic components that can fail and take down everything connected.
Proper Ventilation Requirements
Philips TVs need 4 inches of clearance on all sides. Heat kills electronics. Capacitors rated at 85C will fail in 3 years if they run at 75C constantly. Capacitors rated at 105C last 7+ years.
Don’t put your TV in a closed cabinet. Don’t block the rear vents. Don’t stack devices on top of the TV.
Clean the vents yearly with compressed air. Dust buildup reduces airflow by 40%.
If the back of your TV feels hot to the touch during normal use, improve ventilation immediately.
Software Update Schedule
Enable automatic updates if your TV has the option. Philips releases firmware updates 3-4 times per year for current models.
Updates fix:
- Boot loop issues
- HDMI handshake problems
- App crashes
- Security vulnerabilities
Check manually every 3 months: Settings > System > Software Update
Don’t update if your TV is working perfectly and you don’t need new features. Some updates introduce new bugs. Wait 2 weeks after release and check forums for problems. This is important for avoiding issues similar to Sony TV freezing problems and Vizio TV slowness.
Warning Signs Before Failure
Your TV will usually warn you before it dies completely:
Early warning signs:
- Takes longer to turn on (30+ seconds)
- Random reboots during use
- LED blinks briefly before turning on
- Slight delay when pressing power button
- Buzzing or whining sound from back panel
Immediate action needed:
- Burning smell
- Visible smoke
- Screen flickers constantly
- TV shuts off after 5-10 minutes
- LED blinks error code every time
If you see early warning signs, back up your settings and prepare for failure. You might have weeks or months left.
If you see immediate action signs, unplug the TV and diagnose the problem. Continuing to use it can cause permanent damage. Similar warning signs appear in other brands like Sharp TV flashing red light and ONN TV power issues.
FAQ: Philips TV Power Issues
Why does my Philips TV turn on then immediately turn off?
This is a protection mode response. The power board detected a problem and shut down to prevent damage. Common causes: shorted backlight LED, failed capacitor, or overheating component. Try power cycling first. If it repeats, open the TV and check for bulging capacitors.
How long should I unplug my Philips TV to reset it?
Unplug for 2 full minutes. Press and hold the power button for 30 seconds while unplugged to speed up capacitor discharge. Don’t just unplug for 10 seconds. That’s not enough time.
Can a power surge damage my Philips TV permanently?
Yes. Power surges blow diodes and fuses on the power board. The damage isn’t always immediate. A surge might weaken capacitors that fail weeks later. Always use a surge protector rated for at least 2000 joules.
What does 3 blinks on Philips TV mean?
Three blinks indicate a PFC (Power Factor Correction) circuit failure. This means the power supply board can’t convert AC to DC properly. Usually caused by failed capacitors or a blown SB3200 Schottky diode. Repair cost: $15-80 depending on DIY or professional.
Why won’t my Philips Android TV turn on after an update?
Firmware updates sometimes fail mid-install. This corrupts the boot sequence. Force a recovery mode boot by unplugging the TV, holding the physical power button, and plugging it back in while still holding. The recovery menu should appear. Select “wipe cache partition” first, then try booting normally.
How do I know if my Philips TV power supply is bad?
Test the standby voltage. You should measure 5V at the standby pin when the TV is plugged in but off. No voltage means a dead power supply. Also listen for clicking sounds when you plug in the TV. Rapid clicking indicates a failed power supply trying and failing to start.
Is it worth fixing a 7-year-old Philips TV?
Probably not. A 7-year-old TV uses more power, has lower resolution, lacks modern features, and costs $150-250 to repair professionally. New 55″ 4K TVs cost $400-500 with better picture quality and warranties. Repair only if it’s sentimental value or you can DIY for under $50.
Can I replace just the capacitors instead of the whole power board?
Yes, if you can solder. Capacitor replacement costs $5-15 in parts and takes 30-45 minutes. Use 105C rated capacitors that match or exceed the original voltage rating. If you see 4+ bulging capacitors, replace the whole board. The rest will fail soon.
Conclusion
Most Philips TV power problems resolve with a simple power cycle. Unplug the TV, hold the power button for 30 seconds, wait 2 minutes, and plug it back in.
If that doesn’t work, you have 11 more fixes to try. Check power sources, test your remote, remove external devices, and diagnose LED blink codes. Most issues trace back to the power supply board and failed capacitors.
For TVs under 3 years old, repair makes sense. For older TVs, compare repair costs to replacement prices. A $200 repair on a 6-year-old TV usually isn’t worth it.
Start with the quick fixes. If you reach the hardware diagnostics section and don’t feel confident opening your TV, contact Philips support or hire a professional. For other TV troubleshooting guides, check out our comprehensive TV service menu codes collection.
Your TV can probably be fixed. Start with Fix 1 and work through the list.