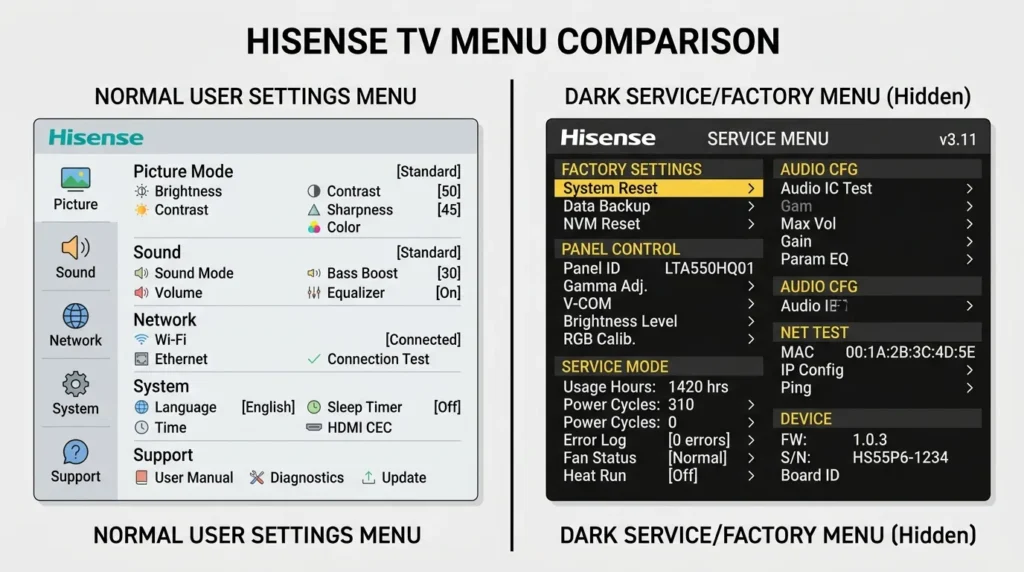
The Hisense TV service menu is a hidden diagnostic panel built into every Hisense television. It gives access to low-level settings that don’t appear in the regular picture or system menus — things like white balance calibration, backlight limits, audio EQ, and factory reset options. Technicians use it for repairs. DIY users use it to fix picture problems or restore a TV that’s behaving strangely.
This guide covers every working code and access method for 2026, broken down by TV platform — VIDAA, Roku, Android/Google TV, and older LCD/LED models. If you’re looking for service menu codes for other brands, check the full all LCD/LED TV service menu codes reference list.
What Is the Hisense TV Service Menu?
The service menu (also called factory mode or technician mode) is a separate settings layer that sits below the standard user interface. It’s not meant for everyday use. Hisense locks it behind a code or button sequence to prevent accidental changes.
Inside, you’ll find settings that directly affect how the TV processes picture and sound at a hardware level — panel voltage, color calibration, gain values, and software version data.
Before You Start — Important Warnings
Read this before entering any code.
- Wrong settings can permanently damage your TV. Changing values in the wrong section can cause a black screen, color errors, or audio failure that won’t reverse with a factory reset.
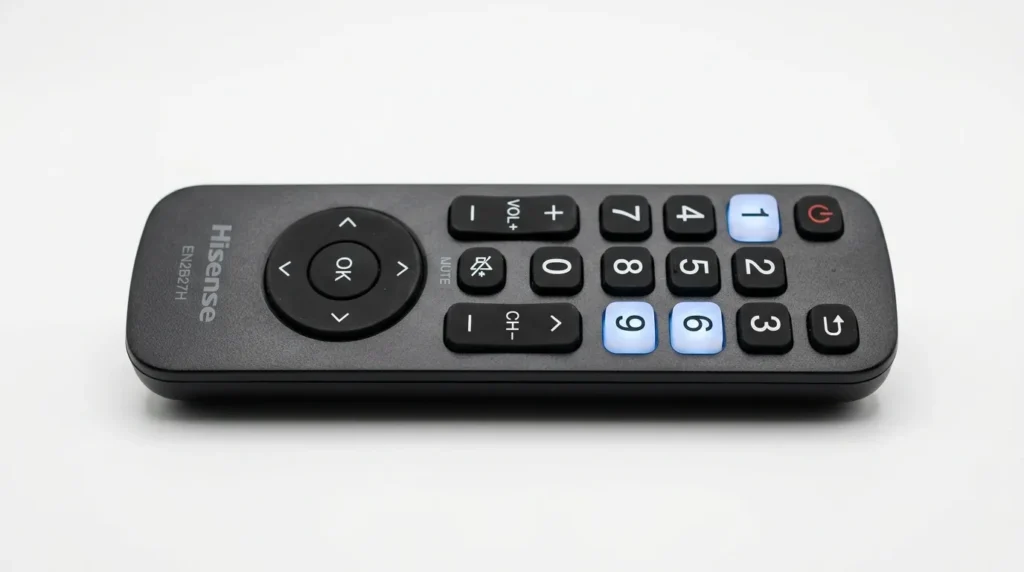
- Only use the original Hisense remote. Third-party and universal remotes often can’t send the right IR codes for service menu entry.
- Write down any setting before you change it. There is no undo button in most service menu sections.
- If your TV is under warranty, accessing the service menu may void it. Check your warranty terms first.
- Don’t change anything you don’t recognize. Browsing is safe. Changing unknown values is not.
If your TV has a black screen or display fault you’re trying to diagnose first, read this guide on how to fix a dark TV screen before going into service mode.
Hisense Service Menu Codes by TV Type
Hisense uses different operating systems across its lineup. The code — and sometimes the method — changes depending on which platform your TV runs.
VIDAA Smart TVs (2019–2026 Models)
VIDAA is Hisense’s own smart TV operating system. Most mid-range and premium Hisense TVs sold between 2019 and 2026 run VIDAA, including the U7, U8, A6, and E7 series.
Primary code: 1969
This is the master service code for VIDAA TVs. On some models it triggers a PIN entry screen — type 1969 when prompted.
Backup code: 0532
If 1969 doesn’t work, try 0532. This code was used on earlier VIDAA builds (VIDAA 2 and 3) and still works on some 2022–2023 models.
How to confirm you’re on VIDAA: Go to Settings → Support → About. If it says VIDAA OS, use these codes.
2024–2025 model note (N and Q series): Some VIDAA 6 and VIDAA 7 models require you to set the audio balance to 0 in regular settings before entering the code. If the code fails, check that your balance is centered at 0 first.
Older Hisense LCD/LED TVs (Pre-2018 Models)
These televisions run a basic menu system with no smart OS. The service menu access is simpler.
Code: 0532
On older models, press Menu on the remote, then enter 0532 using the number keys. Some units require you to press and hold the Menu button for 5 seconds first until the screen dims slightly.
Other codes that work on specific older chassis:
| Code | Model Series |
|---|---|
| 2673 | H65B, H65BE series |
| 9735 | 2016–2017 chassis |
| 0000 | Entry-level models (default PIN + service entry) |
| 1234 | Some 2015–2016 budget models |
Hisense Roku TV
Hisense Roku TVs don’t use a numeric code for service menu access. Roku OS controls the interface and restricts direct service menu entry. Instead, Roku provides a limited secret menu through a button sequence.
Secret screen access (Roku):
- Press Home 5 times
- Press Fast Forward 3 times
- Press Rewind 2 times
This opens a diagnostics/secret menu with options including platform version, Wi-Fi signal data, and display settings. This is not the full hardware service menu — it’s Roku’s built-in diagnostic panel.
For full hardware access on Hisense Roku TVs, a physical button combination is sometimes required:
- Power off the TV
- Hold the physical Reset button on the TV for 15 seconds (location varies by model — usually on the back panel or the bottom edge)
- This forces a factory reset, not service menu access
There is no publicly available code that opens a full hardware service menu on Hisense Roku TVs. If you’ve lost your Roku remote, see how to turn on a Roku TV without a remote before attempting any service menu steps.
Hisense Android TV / Google TV (2021–2026)
Models running Android TV or Google TV — the U6GR, U7G, U8G, and newer Google TV-based sets — use a button sequence rather than a numeric code.
Access method:
- With the TV on and showing a live source, press Settings on the remote
- Navigate to Device Preferences → About
- Scroll to Build and click it 7 times rapidly
- This enables Developer Options (Android standard method)
This is Android’s developer mode — not a full hardware service menu. For the deeper hardware-level service menu on these models, the 1969 code still works on some units via:
- Press Menu (or the three-line icon on newer remotes) → type 1969
If the Menu button doesn’t exist on your remote, try: Home → Volume Down → Home → Volume Down in rapid sequence.
Hisense Fire TV / XClass / Xumo TV
These platforms do not have a user-accessible service menu. Amazon Fire TV OS and Comcast XClass OS lock hardware-level settings entirely. There is no known code or button sequence that opens a service panel on these models.
If you need a factory reset on these models, use: Settings → Device & Software → Reset to Factory Defaults.
If you’re having trouble with a Fire TV device separately, this guide on how to reset an Amazon Fire TV Stick covers the full reset process.
Step-by-Step: How to Enter the Service Menu
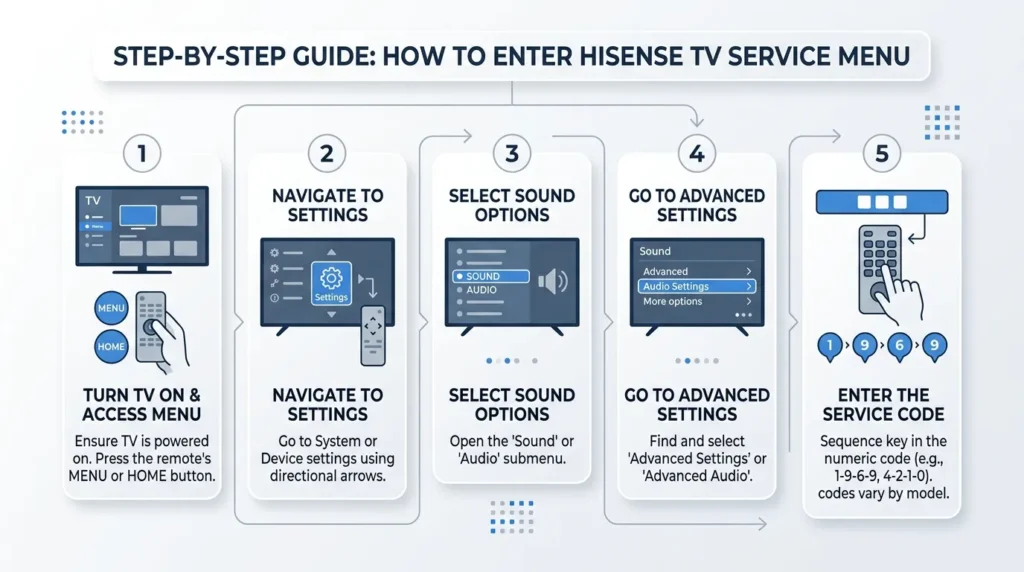
Method 1 — VIDAA TV (Code 1969)
- Turn on the TV and wait for the home screen to fully load
- Set audio balance to 0 via Settings → Sound → Balance (skip if already at 0)
- Press Menu on the original Hisense remote
- Using the number pad, type 1969
- A PIN/code entry box will appear — type 1969 again if prompted
- The service menu will open
Method 2 — Older Models (Code 0532)
- Turn on the TV
- Press and hold Menu for 5 seconds
- When the screen dims or a dialog appears, type 0532
- If nothing happens, try pressing Menu once (not held) then typing 0532 immediately
Method 3 — Roku TV Button Sequence
- Grab your Roku remote (original, not app)
- Press Home, Home, Home, Home, Home (5 times)
- Press Fast Forward 3 times
- Press Rewind 2 times
- Wait 3 seconds — the secret diagnostics screen will load
What You Can Do Inside the Service Menu
Once inside, you’ll typically find these sections:
Picture / Panel settings
- Backlight maximum and minimum limits
- White balance (R/G/B gain and offset values)
- Color temperature calibration
- Gamma curve adjustment
Audio settings
- Hardware EQ bands
- Speaker output levels
- Audio delay offset
System information
- Firmware build number
- Chassis ID
- MAC address (network hardware identifier)
- Panel serial code
Factory reset A deeper reset than the standard user-facing option — this clears calibration data as well as user settings. If you’re dealing with a TV with no picture, the service menu factory reset can sometimes clear a corrupted display calibration that a standard reset won’t fix.
Settings You Should Never Change
Even if you’re comfortable in technical menus, avoid these unless you have calibration equipment and know exactly what you’re doing:
- White balance gain/offset values — Incorrect values produce a permanently tinted screen
- Panel voltage settings — Can reduce panel lifespan or cause immediate damage
- LVDS/EDID settings — Affects how the TV communicates with the display panel
- HDCP keys — Changing these will break HDMI connections with protected content
- Software version fields — Editing these can break OTA firmware update compatibility
How to Exit the Service Menu
On most VIDAA and older models: press the Exit or Back button until you return to the normal interface, then turn the TV off and back on using the power button.
On Android/Google TV: press Home to exit immediately.
Always power cycle after a service menu session — turn the TV fully off (not standby), wait 10 seconds, then turn it back on. This ensures all settings are written correctly to memory.
Stuck in Service Mode? Here’s the Fix
If your TV is stuck showing service mode, displaying a green “M” in the corner, or behaving differently after entering the menu:
What the green M means: The green “M” icon in the top corner of a Hisense screen indicates the TV is running in a maintenance or engineer mode. It’s not a fault — it’s a mode indicator.
Fix it:
- Press Exit or Back repeatedly
- If that fails, unplug the TV from the wall for 60 seconds
- Plug back in — the TV will reboot into normal mode
- If the green M persists after a reboot, perform a factory reset via Settings → Support → Factory Reset
In rare cases, a corrupt service menu session requires a firmware re-flash. This is uncommon and only happens if power was interrupted mid-session. If the screen stays black after exiting, this fix for TV black screen guide covers the next diagnostic steps.
Related Service Menu Codes for Other Brands
If you’re working on other TVs in the same household or professionally, these brand-specific guides cover the same process:
- Sony TV service menu codes
- Samsung TV service menu codes
- LG TV service menu codes
- Panasonic TV service menu codes
- Toshiba TV service menu codes
- Vizio TV service menu codes
- Philips TV service menu codes
- Haier TV service menu codes
Frequently Asked Questions
What is the service menu code for Hisense TV? The most common Hisense service menu code is 1969, used on VIDAA-based models. Older models use 0532. Roku TVs don’t use a numeric code — they use a button sequence instead.
Why isn’t my Hisense service menu code working? Three common reasons: you’re not using the original remote, your TV’s audio balance isn’t set to 0 before entry, or your TV runs Roku/Fire TV OS which doesn’t support numeric code access.
Does accessing the service menu void my Hisense warranty? Hisense’s official warranty terms state that unauthorized modifications can void coverage. Service menu access may qualify as a modification if it results in a changed factory calibration.
Can I use a phone app to enter the service menu? No. The Hisense RemoteNOW app and similar apps don’t support the IR code sequences needed for service menu access. Only a physical remote works.
What’s the default PIN on Hisense TVs? The default parental/system PIN is 0000. Some models also accept 1234. These are different from service menu codes.
Last updated: 2026. Codes verified against VIDAA 6, VIDAA 7, Android TV 11/12, and Roku OS 12 builds.
I did the following on my Hisense tv but there in an M and U and i changed it to M but the has refused to work with the remote i need help please how can I reverse it
me too. i need help for the same exact problem
I messed with logo. Xhanged to panasonic. Also changed another option in service menu. I think it was build id or similar.
Now the remote refuses to work.
Reset button not hard resetting phone.
Cant access menu with remote. Only volume mute and power button working
you have to use VIDAA remote app. it is universal with all TVs using VIDAA