The service menu code for most Hitachi LCD and LED TVs is accessed by pressing Mute → 1 → 2 → 3 → Power on the original remote while the TV is in standby mode. Older CRT models use Menu → 3 → 1 → 2 → Power, while plasma models require Display → Menu → Mute → Power.
Service menus give you access to factory settings that standard user menus hide. Technicians use these hidden menus for picture calibration, diagnostics, and repairs. You can adjust white balance, fix geometry issues, check panel hours, and perform factory resets that go deeper than standard resets.
This guide covers every known Hitachi service menu code organized by model series. You’ll find step-by-step entry instructions, navigation tips, and safety warnings to prevent permanent damage.

What Is the Hitachi TV Service Menu
The service menu is a hidden diagnostic interface built into Hitachi TVs for factory technicians. It controls low-level hardware settings that affect picture quality, sound processing, and system operations.
Standard user menus let you adjust brightness and contrast within safe ranges. Service menus remove those limits. You can push brightness to 100% of backlight capability or reduce it to 5%. You can manually set color temperature to exact Kelvin values instead of choosing preset modes.
Why You Need Service Menu Access
Technicians enter service mode to calibrate new panels, replace components, or diagnose hardware failures. The menu shows error codes, panel usage hours, firmware versions, and voltage readings.
DIY users access service menus to fix specific problems. A stuck pixel might need a panel refresh command only available in service mode. Color banding issues sometimes require manual RGB gain adjustments. Geometry problems on older CRT models need deflection settings you can’t reach through normal menus.
Common Uses for Service Mode
Picture calibration requires service menu access for professional results. You adjust RGB gains, cut-offs, and gamma curves to match industry standards. This goes beyond the basic picture modes in user settings.
Factory resets through service mode clear more data than standard resets. They wipe EEPROM values and restore every setting to manufacturing defaults. Use this when software glitches survive normal reset procedures.
Diagnostic checks reveal hardware status. Panel hour counters show total usage time. Temperature sensors display real-time heat levels. Voltage monitors confirm power supply health.
How to Enter Hitachi TV Service Menu
Entry methods vary by model year and screen technology. The remote must be the original Hitachi remote. Universal remotes rarely transmit the correct infrared codes for service mode access.
Standard Remote Method
Turn the TV to standby mode using the power button. The standby LED should glow red.
Press this button sequence within 3 seconds: Mute → 1 → 2 → 3 → Power
The TV powers on and displays the service menu overlay. This works on 80% of Hitachi LCD and LED models from 2010 to 2026.
If nothing happens, try the alternate sequence: Display → Sleep → Mute → Power
Alternative Entry Methods
CRT models from 2000-2008 use: Menu → 3 → 1 → 2 → Power
Plasma models require: Display → Menu → Mute → Power
Some 2015-2019 smart TVs respond to: Info → Menu → Mute → Power
UltraVision 4K models (2020-2026) use: Input → 2 → 5 → 8 → 0 → Power
Complete Hitachi Service Menu Code List
| Model Series | Code Sequence | Notes |
|---|---|---|
| C Series LCD | Mute → 1 → 2 → 3 → Power | C21, C28, C32 models |
| L Series LED | Display → Sleep → Mute → Power | 2012-2018 models |
| P Series Plasma | Display → Menu → Mute → Power | All P-series |
| LE Series LED | Mute → 1 → 2 → 3 → Power | Standard code |
| UltraVision 4K | Input → 2 → 5 → 8 → 0 → Power | 2020+ models |
| CRT (2000-2008) | Menu → 3 → 1 → 2 → Power | Tube TVs |
Service Menu Codes by Model Series
C Series Models
The C21-F800SNT uses Menu → 3 → 1 → 2 → Power from standby. This 21-inch CRT model has a service menu with 12 pages covering deflection, convergence, and color purity.
C28 and C32 LCD models share the same code: Mute → 1 → 2 → 3 → Power. These 2008-2012 models have simplified service menus with 6 main sections.
L Series Models
L32, L37, and L42 models require Display → Sleep → Mute → Power. These 2012-2016 LED TVs added smart features but kept traditional service menu layouts.
The L55 (55-inch 2015 model) uses Info → Menu → Mute → Power instead. Hitachi changed codes mid-series for security reasons.
P Series Models
All plasma models from 2005-2013 use Display → Menu → Mute → Power. This includes P42, P50, and P60 models across different years.
Plasma service menus contain burn-in prevention tools, pixel refresh commands, and panel voltage adjustments not found in LCD menus.
LE Series Models
LE32, LE39, LE42, LE48, and LE55 models use the standard Mute → 1 → 2 → 3 → Power sequence. These budget LED TVs from 2014-2019 have identical service menu structures.
UltraVision Series
4K UltraVision models from 2020-2026 require Input → 2 → 5 → 8 → 0 → Power. The code changed because these models run Android TV firmware with enhanced security.
The 50C61 (2023 model) specifically uses this code. Older UltraVision models from 2018-2019 might still use Mute → 1 → 2 → 3 → Power.
Step-by-Step Service Menu Navigation
Service menus use on-screen navigation that looks like technical spreadsheets. Options appear as parameter names with numeric values.
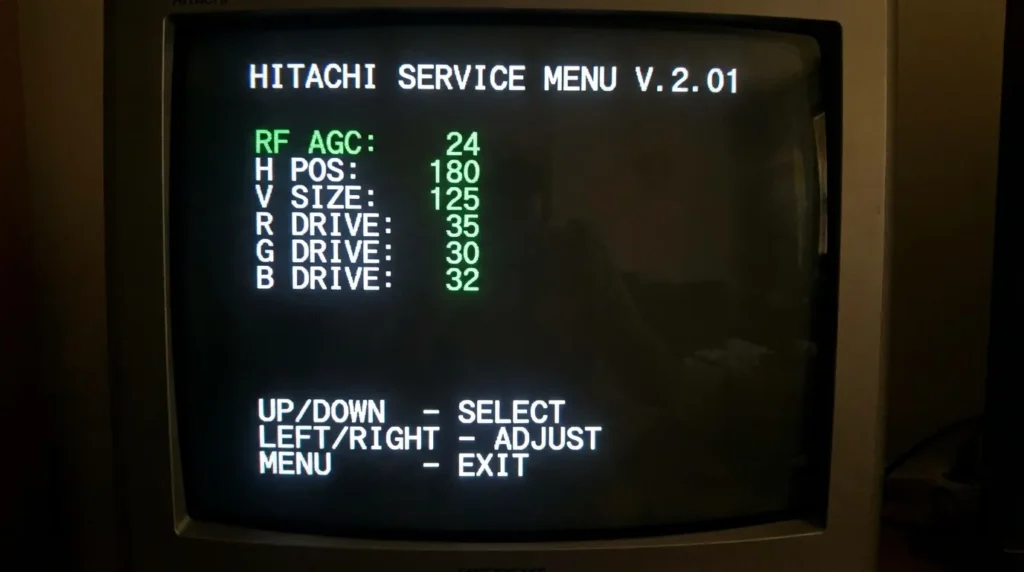
Using the Service Menu Interface
Arrow buttons move between options. Up and down scroll through parameters. Left and right change values.
The Menu button exits individual sections. Pressing Power exits completely and saves changes automatically.
Write down original values before changing anything. Service menus don’t have undo functions. Wrong settings can make the picture unwatchable or damage hardware.
Key Functions and Options
White Balance controls RGB gain and cutoff for each color channel. Gains adjust brightness of red, green, and blue. Cutoffs set black levels. Touch these only with calibration equipment.
ADC settings adjust analog-to-digital conversion for component and VGA inputs. Leave these at factory defaults unless you have oscilloscope measurements.
Panel hours displays total backlight runtime. This is read-only on most models. It helps estimate remaining panel life.
Factory reset options appear as “Initialize All” or “Load Default.” This erases every setting including hotel mode locks and custom picture modes.
Adjusting Picture Settings
Brightness values range from 0-100 in service mode versus 0-50 in user mode. Setting brightness above 80 shortens backlight life. Below 30 causes gray blacks.
Contrast (called “Picture” in some menus) goes to 120 in service mode. Values above 100 clip white detail. Use 95-100 for normal viewing.
Color temperature shows exact Kelvin numbers. 6500K is standard. 9300K is cool blue. 5500K is warm. Adjusting R-Gain, G-Gain, and B-Gain lets you hit precise temperatures.
Factory Reset Through Service Menu
Find the option labeled “Initialize,” “Factory Data Reset,” or “Load Default Values.” It’s usually on the last page of the service menu.
Select it and confirm. The TV restarts automatically. This clears hotel mode restrictions, parental locks, and corrupted settings that survive normal resets.
Service mode factory resets take 2-3 minutes versus 30 seconds for user menu resets. They write default values to EEPROM chips rather than just clearing RAM.
Safety Warnings and Precautions
Service menus contain settings that can permanently damage your TV. Hitachi doesn’t support warranty claims for service menu misuse.
What Not to Change
Never adjust voltage settings labeled as VCC, VCOM, or panel voltage. Wrong voltages kill LCD panels instantly. You’ll see the screen flash white or turn completely black.
Avoid AGC settings (automatic gain control) unless you understand video signal processing. Wrong AGC values cause flickering, noise, or signal loss.
Don’t modify EEPROM data in hex editing sections. This stores calibration data unique to your specific panel. Corrupting it makes the TV unusable.
Skip firmware options that say “upgrade” or “update” unless you have the correct firmware file on a USB drive. Failed upgrades brick the TV.
Potential Risks
Changing white balance without proper tools creates color casts. You might get green skin tones or pink grays that you can’t fix through user settings.
Excessive brightness damages LED backlights. Running at 100% brightness reduces backlight life from 60,000 hours to 20,000 hours.
Wrong geometry settings on CRT models cause picture distortion. Fixing severe geometry errors requires test patterns and multiple adjustment cycles.
How to Exit Safely
Press the Power button to exit and save changes. The TV turns off and restarts with new settings active.
To exit without saving (not available on all models), unplug the TV instead of using the power button. Settings revert to previous values when you plug it back in.
If you changed settings and the picture looks wrong, enter service mode again and select “Load Default” to restore factory calibration.
Troubleshooting Service Menu Access
Code Not Working
Verify you’re using the original Hitachi remote. Check battery strength. Weak batteries cause incomplete infrared signals.
The TV must be in standby mode with the red LED lit. Codes don’t work when the TV is fully off or already powered on.
Press buttons quickly within 3 seconds. Waiting too long between presses cancels the code sequence.
Menu Not Appearing
Some models require you to press the code sequence twice. Try the button combination, wait 5 seconds, then repeat it.
Hotel mode or retail mode locks might block service menu access. These security features prevent customers from accessing service functions in commercial settings.
Firmware updates sometimes change service codes. A 2018 model might use different codes after a 2020 firmware update.
Remote Issues
Universal remotes lack the specific infrared codes for Hitachi service menus. You need the original remote or an exact replacement model.
Smartphone IR apps don’t work reliably. The timing and signal format rarely match what Hitachi TVs expect.
If your original remote is broken, search for the exact model number. A LE32 remote won’t work on an L32 TV even though they look identical. Similar issues occur with other brands—check our guides for Sony TV service codes, LG TV service codes, or Samsung TV service codes if you have multiple TV brands.
Model-Specific Instructions
Hitachi 50C61
This 2023 50-inch 4K model uses Input → 2 → 5 → 8 → 0 → Power from standby. The service menu has 8 pages including Android TV system settings not found in older models.
Page 3 contains picture calibration. Page 6 has panel diagnostics. Page 8 shows firmware version and reset options.
Hitachi C21-F800SNT
This 21-inch CRT from 2006 uses Menu → 3 → 1 → 2 → Power. The service menu appears as text overlay on the picture.
You’ll see deflection settings (H-SHIFT, V-SHIFT), convergence adjustments (R-CONV, B-CONV), and color purity options. Adjust these only if you understand CRT geometry.
Popular 2020-2026 Models
Models LE43SMART26, LE50SMART26, and LE55SMART26 use standard Mute → 1 → 2 → 3 → Power. These Android-based smart TVs have expanded service menus with WiFi diagnostics and app management tools.
4K models 43HK6T74U and 50HK6T74U require Input → 2 → 5 → 8 → 0 → Power. They run newer firmware with enhanced menu security.
If you need service codes for other TV brands, we have comprehensive guides for Panasonic, Toshiba, Philips, Hisense, and Vizio TVs. You can also browse our complete list of all TV service menu codes covering dozens of brands.
FAQs About Hitachi Service Menus
Can service menu damage my TV?
Yes. Wrong voltage, AGC, or EEPROM changes can cause permanent hardware failure. Stick to read-only options or simple adjustments like factory reset.
Will using service mode void my warranty?
Most warranties exclude damage from service menu misuse. Hitachi can detect service menu access through logs. Use at your own risk during warranty periods.
How do I find my exact model number?
Check the label on the back panel. Model numbers appear as a combination of letters and numbers like “50C61” or “LE42SMART.” You need the exact model for correct codes.
What if I can’t exit service menu?
Unplug the TV from power for 60 seconds. Plug it back in and turn it on normally. This forces an exit without saving changes.