Home Blog Page 15

How to Connect Alexa to Your LG TV: Step-by-Step Guide

0
How to Connect Alexa to Your LG TV
How to Connect Alexa to Your LG TV: Step-by-Step Guide

Controlling your LG smart TV with voice commands is simple with Amazon Alexa. You can turn your TV on or off, open apps, adjust volume, or even manage other smart home devices. This guide provides clear steps to connect Alexa to your LG TV, whether it has Alexa built-in or requires the LG ThinQ app. We’ve also included troubleshooting tips and voice command examples to ensure a smooth experience. If you’re facing other TV issues, check our guides on fixing LG TV sound problems or changing the screensaver.

Prerequisites

Before you begin, gather these essentials:

  • LG Smart TV: Models from 2018 or later (WebOS 4.0+) are typically compatible. OLED and NanoCell TVs from 2019 onwards often have Alexa built-in.
  • Amazon Account: Needed to sign into the Alexa app or TV.
  • LG Account: Required for the LG ThinQ app.
  • Internet Connection: Ensure your TV and smartphone are on the same Wi-Fi network.
  • LG Magic Remote: Necessary for TVs with built-in Alexa. Some models may require purchasing it separately.
  • Smartphone Apps: Download the LG ThinQ app and Amazon Alexa app for non-built-in setups.

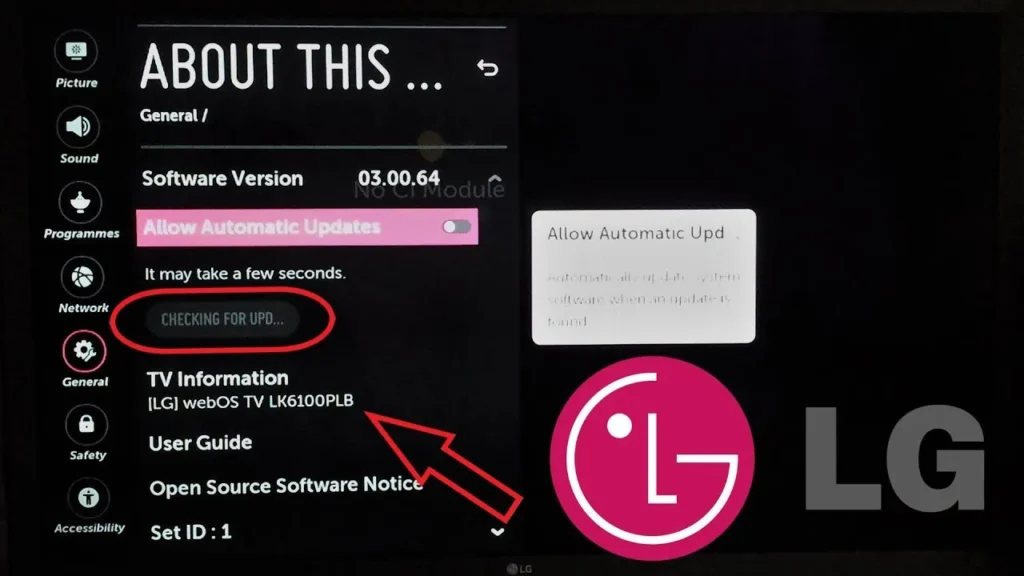
To check your TV’s WebOS version, go to Settings > General > Devices > TV > TV Information or Settings > All Settings > Support > TV Information. WebOS 4.0 (2018) and later supports Alexa integration.

LG TV settings screen displaying WebOS version.
LG TV settings menu showing TV Information.

Method 1: Connecting LG TVs with Built-in Alexa

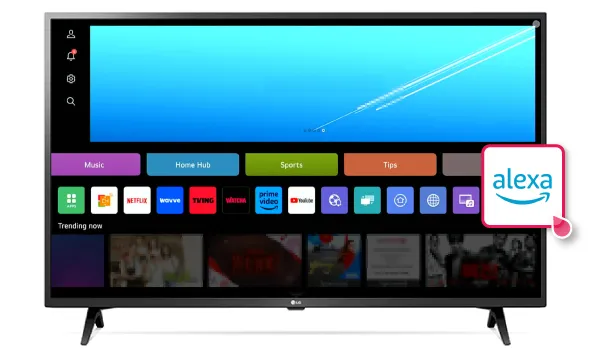
Many LG smart TVs, particularly OLED and NanoCell models from 2019 and later (WebOS 4.0+), come with Alexa built-in. This feature is common in models like the LG C9, G4, or 2025 B5, C5, G5, and M5 series. To confirm, check if your TV has an Alexa app or a dedicated Alexa/Prime Video button on the Magic Remote. Here’s how to set it up:

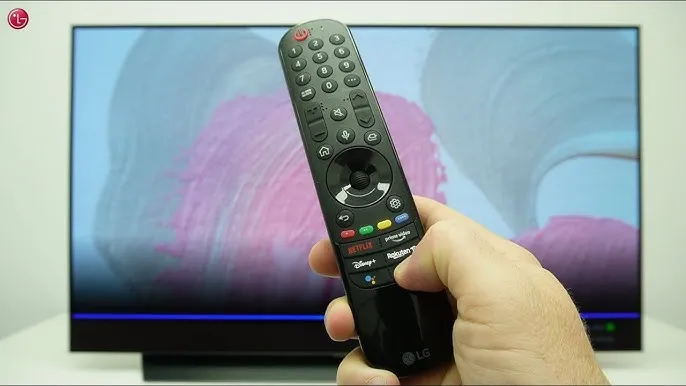
  1. Access the Home Screen: Press the Home button on your LG Magic Remote.
  2. Open the Alexa App: Navigate to the Amazon Alexa app or press the Alexa/Prime Video button (2020 models use the Prime Video button, 2021-2022 models use the Alexa button).
  3. Sign In: Follow the on-screen prompt to sign into your Amazon account. Scan the QR code with your phone’s camera or visit amazon.com/code and enter the displayed code.
  4. Enable Hands-Free Mode (Optional): If available, turn on Alexa Hands-Free to use voice commands without pressing a button. Go to the Alexa app on your TV to toggle this setting.
  5. Test Alexa: Try a sample command like “Alexa, open YouTube” to ensure it works.

After setup, access the Alexa TV app on your home screen for more command examples and features.

LG TV home screen showing Amazon Alexa app icon.
LG TV home screen with Alexa app highlighted.

LG TV Models with Built-in Alexa

YearWebOS VersionModels with Built-in AlexaNotes
2018WebOS 4.0Select OLED, NanoCellCheck TV settings for Alexa app
2019WebOS 4.xOLED (e.g., C9, E9), NanoCellCommon in premium models
2020WebOS 5.0OLED, NanoCellUse Prime Video button for Alexa
2021WebOS 6.0OLED, NanoCellDedicated Alexa button on remote
2022WebOS 22OLED, NanoCell, QNEDSupports Hands-Free mode
2023WebOS 23OLED, NanoCell, QNEDEnhanced Alexa integration
2024WebOS 24OLED, NanoCell, QNEDLatest features, Chromecast support
2025WebOS 25B5, C5, G5, M5 OLED seriesConfirmed Alexa support

Method 2: Using the LG ThinQ App for Older Models or Extra Controls

If your LG TV lacks built-in Alexa or you want features like power on/off, use the LG ThinQ app with the Amazon Alexa app. This method works for most LG smart TVs with WebOS 4.0 (2018) and later, including models without built-in Alexa. Follow these steps:

  1. Install LG ThinQ App: Download it from the Google Play Store or Apple App Store.
  2. Set Up LG Account: Log in or create an LG account in the app.
  3. Connect Your TV: In the LG ThinQ app, tap the plus sign to add a device. Choose to scan a QR code, search nearby devices, or select your TV manually. Ensure your TV and phone are on the same Wi-Fi network. Enter the 8-digit code displayed on your TV if prompted.
  4. Open Alexa App: Launch the Amazon Alexa app on your smartphone.
  5. Enable LG ThinQ Skill: Go to More > Skills & Games, search for “LG ThinQ,” and tap Enable to Use. Sign in with your LG account to link it.
  6. Discover Devices: In the Alexa app, go to Devices > Add > Add Device, select TV, choose LG, and tap Discover Devices. Your TV should appear in the device list.
  7. Test the Connection: Say “Alexa, turn on the TV” to confirm it works.

Using Voice Commands with Alexa

Once Alexa is connected, you can control your TV and smart home devices with voice commands. Here are examples:

  • TV Control: “Alexa, turn on/off the TV,” “Alexa, change to HDMI 1,” “Alexa, set volume to 20.”
  • App Navigation: “Alexa, open Netflix,” “Alexa, launch YouTube.”
  • Content Search: “Alexa, search for comedy movies,” “Alexa, play Thriller album.”
  • Smart Home: “Alexa, dim the lights,” “Alexa, set thermostat to 72 degrees.”

For TVs with Hands-Free mode, say “Alexa” followed by the command. Otherwise, press and hold the Alexa/Prime Video button on the Magic Remote before speaking.

LG Magic Remote showing Alexa button.
LG Magic Remote with Alexa button.

Troubleshooting Common Issues

If you face issues, try these solutions:

  • TV Not Responding to Commands: Ensure your TV is online and Alexa is set up correctly. Restart your TV and router. Re-link accounts in the Alexa app.
  • Account Linking Fails: Use the same email for LG and Amazon accounts to avoid conflicts. Double-check credentials and accept all terms of use.
  • Hands-Free Mode Not Working: Verify your TV supports it (common in 2021+ models). Enable it in the Alexa app on your TV.
  • TV Won’t Turn On with Alexa: Ensure the “Turn on via Wi-Fi” feature is enabled in your TV’s settings. This is required for power control via Alexa.
  • App Connection Issues: Confirm your phone and TV are on the same Wi-Fi network. Update both the LG ThinQ and Alexa apps to the latest versions.

For persistent problems, visit LG’s support page or contact their 24/7 chat support.

Common Issues and Solutions

IssuePossible CauseSolution
TV not respondingPoor internet connectionRestart router, ensure TV is online
Account linking failsMismatched emailsUse same email for LG and Amazon accounts
Hands-Free mode not workingUnsupported modelCheck TV model, enable in Alexa app
TV won’t turn on“Turn on via Wi-Fi” disabledEnable in TV settings
App not finding TVDifferent Wi-Fi networksConnect phone and TV to same network

Conclusion

Connecting Alexa to your LG TV makes controlling your entertainment effortless. Whether your TV has Alexa built-in or you use the LG ThinQ app, setup takes just a few minutes. Enjoy voice-controlled convenience for apps, volume, and smart home devices. For more LG TV tips, explore our guides on resetting your TV or fixing sound issues.

How to Sync Roku Remote Without Pairing Button

0
Thumbnail of Roku remote with text “Sync Your Roku Remote!”
Guide to Syncing Roku Remote Without Pairing Button

Having trouble syncing your Roku remote because it lacks a pairing button or the button isn’t working? You’re not alone. Many Roku users face this issue, but there are simple solutions to get your remote working again. This guide provides clear, step-by-step instructions to sync both simple IR and voice remotes without a pairing button. Whether you’re using a Roku Express, Ultra, or Streaming Stick, these methods, updated for 2025, will help you resume streaming quickly.

Understanding Your Roku Remote

Before syncing, identify your remote type, as the process differs based on whether it’s a simple IR or voice remote.

Simple IR Remote

  • Uses infrared technology.
  • No pairing button or pairing required.
  • Works by pointing directly at the Roku device.
  • Compatible with models like Roku Express 3960R.

Voice Remote

  • Features voice control, often with a microphone icon.
  • Typically has a pairing button in the battery compartment or on the back.
  • If no button exists or it’s broken, alternative methods are available.
  • Works with most Roku devices, including TVs and streaming sticks.

To check your remote, open the battery compartment or inspect the back. No pairing button or status light usually means it’s a simple IR remote. A microphone icon or pairing button indicates a voice remote.

Syncing a Simple IR Remote

Simple IR remotes don’t require pairing because they use infrared signals. Follow these steps to ensure it works:

  1. Insert Fresh Batteries: Use new or fully charged batteries to avoid weak signals.
  2. Point at the Roku Device: Ensure a direct line of sight with no obstacles like furniture or glass.
  3. Test the Remote: Press any button (e.g., OK or arrow keys) while aiming at the device.
  4. Check Response: If the Roku responds, the remote is working. If not, proceed to troubleshooting.

Troubleshooting Simple IR Remote Issues

  • Clean the IR Sensor: Dust or debris on the remote’s front can block the signal. Wipe it with a soft cloth.
  • Remove Obstructions: Ensure nothing blocks the path between the remote and Roku device.
  • Verify Compatibility: Some IR remotes don’t work with Roku Streaming Sticks.
  • Test with a Camera: Point the remote at a smartphone camera and press a button. If you see a light flash, the IR signal is working.

If the remote still doesn’t work, it may be faulty or incompatible. Consider replacing it with a compatible model from Roku Accessories.

Syncing a Voice Remote Without Pairing Button

Voice remotes typically need pairing, but if the pairing button is missing or broken, try these methods.

Method 1: Button Combination

Some voice remotes without a pairing button can be paired using the Home and Back buttons.

  1. Insert Batteries: Ensure the remote has fresh batteries.
  2. Locate Buttons: Find the Home (house icon) and Back (arrow pointing left) buttons, usually near the top.
  3. Press and Hold: Hold both buttons for 5 seconds until the status light flashes (often in the battery compartment).
  4. Follow On-Screen Prompts: If the Roku detects the remote, it may display instructions to complete pairing.
Close-up of Home and Back buttons on a Roku voice remote.
Home and Back Buttons on Roku Voice Remote

Method 2: Using the Roku Mobile App

The Roku mobile app can control your device and help pair a voice remote.

  1. Download the App: Get the Roku app from the App Store (iOS) or Google Play Store.
  2. Connect to Wi-Fi: Ensure your phone and Roku are on the same Wi-Fi network.
  3. Open the App: Launch the app and select your Roku device.
  4. Use Remote Feature: Tap the Remote icon to control your Roku.
  5. Pair the Remote: Go to Settings > Remotes & devices > Set up a new device > Remote. Insert batteries into the physical remote and follow on-screen instructions.
Screenshot of the Roku mobile app’s remote control interface.
Roku Mobile App Remote Interface

Method 3: Hard Restart

A hard restart can sometimes resolve pairing issues by resetting the Roku device.

  1. Unplug the Roku: Disconnect the power cord from your Roku device.
  2. Wait 10 Seconds: Allow the device to rest for at least 10 seconds.
  3. Plug It Back In: Reconnect the power and wait for the device to restart.
  4. Test the Remote: Try using the remote after the device boots up.

Additional Tips and Troubleshooting

If the above methods don’t work, consider these steps:

  • Check Compatibility: Ensure your remote is compatible with your Roku model. For example, IR remotes don’t work with some Streaming Sticks. Visit Roku Support for compatibility details.
  • Replace the Remote: If syncing fails, purchase a new remote from Roku Accessories.
  • Contact Support: Reach out to Roku Support or check the Roku Community for additional help.
  • Factory Reset: As a last resort, reset your Roku device. Learn how at How to Reset JVC Roku TV.

Conclusion

Syncing a Roku remote without a pairing button is straightforward once you know your remote type. Simple IR remotes work instantly with a clear line of sight, while voice remotes can be paired using button combinations, the Roku app, or a hard restart. By following these steps, you can quickly resolve syncing issues and enjoy your Roku streaming experience. For related issues, check out Fix Roku App Not Finding Device or How to Pair Philips Soundbar with Roku TV.

FAQs

How do I know if my remote is a simple IR or voice remote?

Check for a microphone icon or pairing button. No button or status light means it’s likely a simple IR remote. A microphone or button indicates a voice remote.

What if my voice remote has a pairing button but it’s not working?

Use the Home and Back button combination (hold for 5 seconds) or the Roku app to pair it.

Can I use the Roku app permanently instead of a physical remote?

Yes, the Roku app offers full remote functionality and can be used long-term.

What if none of these methods work?

Verify remote compatibility, replace batteries, or contact Roku Support for assistance.

Explore More:

How to Fix Fire TV Black Screen Issue: Quick Solutions

0

The Amazon Fire TV Stick lets you stream movies, shows, and apps directly on your TV. But sometimes, you might see a black screen instead of your content. This issue can stop you from enjoying your favorite programs. Don’t worry—most black screen problems can be fixed with simple steps. This guide explains the causes and provides clear solutions to get your Fire TV Stick working again. If you’re facing other TV issues, check out our guides on fixing Element TV black screen or troubleshooting TV no picture.

Common Causes of Fire TV Black Screen

Understanding why the black screen happens can help you fix it faster. Here are the main reasons:

  • HDMI Connection Problems: A loose or damaged HDMI cable or port can block the signal.
  • Power Supply Issues: The Fire TV Stick may not get enough power to function properly.
  • Software Glitches: Bugs in the Fire TV’s operating system can cause display issues.
  • TV Compatibility: Some older TVs may not work well with the Fire TV Stick.
  • Overheating: If the device gets too hot, it may stop displaying content.
  • Internet Connectivity: A weak or unstable Wi-Fi connection can affect streaming.

Step-by-Step Solutions

Follow these solutions in order, starting with the easiest fixes. These steps are based on common troubleshooting methods.

Solution 1: Restart Your Fire TV Stick

A quick restart can fix many temporary glitches.

  • Using the Remote: Press and hold the Select and Play/Pause buttons on your Fire TV remote for 5-10 seconds. The device should restart, and you may see the Fire TV logo.
  • Power Cycling: Unplug the Fire TV Stick from its power source. Wait 30 seconds, then plug it back in. Allow it to boot up.
How to restart Fire TV with remote
Restarting Fire TV Stick using the remote.

Solution 2: Check HDMI Connections

Faulty HDMI connections are a common cause of black screens.

  • Try a Different HDMI Port: Plug the Fire TV Stick into another HDMI port on your TV. This checks if the current port is faulty.
  • Direct Connection: If you’re using an HDMI extender or adapter, remove it and connect the Fire TV Stick directly to the TV.
  • Replace HDMI Cable: If your Fire TV Stick uses a separate HDMI cable (like the Fire TV Cube), try a new one. Use a High-Speed HDMI cable for 4K streaming.
TV HDMI ports for Fire TV Stick
HDMI ports on a TV.

Note for LG OLED TV Users: Some users report issues with LG OLED TVs when using HDMI ports 1 or 2. Try using HDMI port 3 instead, as suggested in a Reddit discussion.

Solution 3: Verify TV Compatibility

Your TV must support the Fire TV Stick’s requirements.

  • Check HDCP Support: The Fire TV Stick needs a TV that supports HDCP (High-bandwidth Digital Content Protection). Search your TV model online to confirm compatibility.
  • Correct Input Source: Use your TV remote to select the HDMI input where the Fire TV Stick is connected. For example, if it’s in HDMI 2, set the TV to HDMI 2.

Solution 4: Address Overheating

Overheating can cause the Fire TV Stick to malfunction.

  • Ensure Ventilation: Place the Fire TV Stick in an open area, not enclosed or covered.
  • Cool Down: If the device feels hot, unplug it for 10-15 minutes to let it cool before reconnecting.

Solution 5: Check Internet Connection

A stable internet connection is essential for streaming.

  • Wi-Fi Signal: Make sure the Fire TV Stick is within range of your Wi-Fi router. Check the signal strength in Settings > Network.
  • Restart Router: Unplug your router for 30 seconds, then plug it back in to reset the connection.

For more connectivity tips, see our guide on fixing Vizio TV Wi-Fi issues.

Solution 6: Update Fire OS

Outdated software can cause black screen issues.

  • Check for Updates: If you can access the menu, go to Settings > My Fire TV > About > Check for Updates. Install any available updates. This process may take a few minutes.

Solution 7: Cycle Display Resolutions

If the screen is black due to a resolution mismatch, you can cycle through available resolutions.

  • Using the Remote: Press and hold the Up and Rewind buttons on your Fire TV remote for 5 seconds. This cycles through different resolutions to find one compatible with your TV.

This tip comes from recent Amazon forum posts.

Solution 8: Factory Reset Fire TV Stick

A factory reset can fix persistent software issues but will erase all apps and settings.

  • Using Remote: Press and hold the Right and Back buttons for 10 seconds to start the reset process. Follow on-screen instructions if visible.
  • From Settings: If you can access the menu, go to Settings > My Fire TV > Reset to Factory Defaults.

For more reset instructions, see our guide on resetting a Toshiba TV.

Solution 9: Contact Amazon Support

If none of these steps work, the Fire TV Stick or TV may have a hardware issue. Contact Amazon Customer Support for further help or to request a replacement. Provide details of the steps you’ve tried.

Specific Scenarios

Black Screen with Sound

If you hear audio but see a black screen, try these fixes:

  • Resolution Mismatch: Cycle through resolutions using the Up and Rewind buttons for 5 seconds.
  • HDMI Issues: Check the HDMI cable and port, as described in Solution 2.
  • App-Specific Problem: If the issue occurs only with certain apps (e.g., Netflix), restart the app or reinstall it. A user on iFixit reported success by power cycling their router for app-specific black screens.

Black Screen After Update

A recent software update might introduce bugs, causing a black screen.

  • Wait for a Patch: Check for new updates in Settings > My Fire TV > About > Check for Updates.
  • Factory Reset: If the issue persists, perform a factory reset as described in Solution 8.

Black Screen on Startup

If the Fire TV Stick shows a black screen right after powering on:

  • Power Cycle: Unplug the device for 30 seconds, then plug it back in.
  • Check Power Supply: Use the original power adapter and cable to ensure sufficient power.
  • Test on Another TV: Connect the Fire TV Stick to a different TV to rule out TV-specific issues.

Preventing Future Issues

To avoid black screen problems in the future:

  • Keep Software Updated: Regularly check for Fire OS updates.
  • Use Original Accessories: Always use the provided power adapter and cable.
  • Ensure Ventilation: Keep the Fire TV Stick in a well-ventilated area.
  • Stable Internet: Maintain a strong Wi-Fi connection for smooth streaming.

Conclusion

The Fire TV black screen issue can be frustrating, but most cases can be resolved with these troubleshooting steps. Start with simple fixes like restarting the device or checking HDMI connections. If the problem persists, try updating the software or performing a factory reset. For unresolved issues, Amazon Customer Support can provide further assistance. Get back to streaming your favorite content quickly with these solutions.

FAQ

Why is my Fire TV screen black but I can hear sound?

This may be due to a resolution mismatch or HDMI issue. Try cycling resolutions with the Up and Rewind buttons or check your HDMI connections.

How do I restart my Fire TV when the screen is black?

Unplug the Fire TV Stick for 30 seconds and plug it back in. Alternatively, press and hold the Select and Play/Pause buttons for 5-10 seconds.

What if none of the solutions work?

Contact Amazon Customer Support for further help or a possible replacement.

Why does my Fire TV show a black screen after an update?

A software bug may be the cause. Check for new updates or perform a factory reset to resolve it.

How to Watch StreamEast on Roku: Complete Guide

0
How to Watch StreamEast on Roku
How to Watch StreamEast on Roku: Complete Guide

StreamEast is a popular online platform that lets you stream live sports events for free. It covers a wide range of sports, including soccer, basketball, NFL, NBA, MMA, and F1. Fans love it because it doesn’t require a subscription. However, StreamEast operates in a legal gray area, which means using it may involve risks. This guide explains how to watch StreamEast on your Roku device. We also recommend considering legal alternatives for safer sports streaming.

Roku is a versatile streaming device with access to thousands of channels, but StreamEast does not have an official app in the Roku Channel Store. The main way to access StreamEast on Roku is by screen mirroring from a smartphone or computer. Screen mirroring displays your device’s screen on your TV through Roku.

What You Need

Before starting, ensure you have:

  • A Roku device connected to your TV.
  • A smartphone (Android or iPhone) or computer (Windows PC or Mac).
  • Both devices connected to the same Wi-Fi network.
  • Optionally, a VPN service for privacy.

Methods to Watch StreamEast on Roku

Method 1: Screen Mirroring from Android

You can mirror your Android phone’s screen to Roku to watch StreamEast. Follow these steps:

  1. Connect your Android phone and Roku to the same Wi-Fi network.
  2. On your Roku, go to Settings > System > Screen Mirroring > Screen Mirroring Mode > Always Allow.
  3. Open a web browser on your Android phone and search for “StreamEast” on Google to find the official website.
  4. Play the desired sports event on the website.
  5. Swipe down from the top of your phone’s screen to open the notification panel.
  6. Tap “Cast” or “Screen Mirroring” (the name varies by device).
  7. Select your Roku device from the list.
  8. Your phone’s screen will appear on your TV, showing the StreamEast content.
Android phone mirroring to Roku
Screen mirroring StreamEast from Android to Roku

Method 2: Screen Mirroring from iPhone Using AirPlay

iPhone users can use AirPlay to mirror StreamEast to Roku. Here’s how:

  1. Ensure your iPhone and Roku are on the same Wi-Fi network.
  2. On your Roku, go to Settings > Apple AirPlay and HomeKit > AirPlay > On.
  3. Open the Safari browser on your iPhone and search for “StreamEast” on Google.
  4. Play the sports event you want to watch.
  5. Swipe down from the top-right corner of your iPhone to open the Control Center.
  6. Tap “Screen Mirroring.”
  7. Select your Roku device from the list.
  8. Your iPhone’s screen will appear on your TV.
iPhone AirPlay to Roku
AirPlay mirroring StreamEast from iPhone to Roku

Method 3: Screen Mirroring from Windows PC

You can mirror your Windows PC screen to Roku to watch StreamEast. Follow these steps:

  1. Connect your PC and Roku to the same Wi-Fi network.
  2. On your Roku, enable screen mirroring (Settings > System > Screen Mirroring > Always Allow).
  3. Open a web browser on your PC and search for “StreamEast” on Google.
  4. Play the desired sports event.
  5. Press Windows key + K to open the Connect panel.
  6. Select your Roku device.
  7. Your PC’s screen will appear on your TV.
Windows PC mirroring to Roku
Screen mirroring StreamEast from PC to Roku

Method 4: Screen Mirroring from Mac Using AirPlay

Mac users can use AirPlay to mirror StreamEast to Roku. Here’s how:

  1. Connect your Mac and Roku to the same Wi-Fi network.
  2. On your Roku, ensure AirPlay is enabled (Settings > Apple AirPlay and HomeKit > AirPlay > On).
  3. Open a browser on your Mac and search for “StreamEast” on Google.
  4. Play the desired sports event.
  5. Click the Control Center icon in the Mac menu bar.
  6. Click “Screen Mirroring.”
  7. Select your Roku device.
  8. Your Mac’s screen will appear on your TV.

Using a VPN for Safety

StreamEast may not be legal in all regions due to copyright issues. Using a Virtual Private Network (VPN) can protect your privacy by masking your IP address and encrypting your internet traffic. Install a VPN on your device before accessing StreamEast.

Recommended VPN services:

  • NordVPN
  • ExpressVPN
  • Surfshark

Legal Alternatives for Watching Sports on Roku

To avoid legal risks, consider these official sports streaming services on Roku:

  • CBS Sports: Offers live sports with a cable subscription. Add it via the Roku Channel Store.
  • Redbull TV: Free extreme sports content. Available in the Roku Channel Store.
  • DAZN: Subscription-based live and on-demand sports for $9.99/month. Find it in the Roku Channel Store.
  • ESPN: Requires a cable or streaming service subscription like Sling TV.
  • NBC Sports: Covers Premier League, NFL, and more with a subscription.

These channels are available in the Roku Channel Store and provide legal, high-quality sports streaming.

Troubleshooting Tips

If you encounter issues while screen mirroring:

  • Ensure both devices are on the same Wi-Fi network.
  • Restart your Roku and your device.
  • Check for software updates on both devices.
  • Use a 5GHz Wi-Fi network for better performance.
  • Close unnecessary apps on your device to free up resources.

Conclusion

StreamEast offers a convenient way to watch live sports for free, but its legal status is questionable. You can access it on Roku by screen mirroring from an Android, iPhone, Windows PC, or Mac, as outlined above. For a safer experience, consider legal alternatives like CBS Sports, Redbull TV, or DAZN.

For more streaming guides, check out:

If you found this guide helpful, please share it with others!

How to Add Apps to Samsung Smart TV: A Complete Guide

0
Samsung Smart TV Apps section with search icon.
Searching for apps on Samsung Smart TV.

Samsung Smart TVs let you enjoy a variety of apps, from streaming services like Netflix to music apps like Spotify. Adding apps enhances your TV experience, whether you want to watch shows, play games, or check social media. This guide explains how to install apps from the Samsung App Store, manage them, troubleshoot issues, and even add third-party apps for advanced users. Follow these simple steps to get started.

Why Add Apps to Your Samsung Smart TV?

Samsung Smart TVs run on the Tizen operating system, which supports a wide range of apps through the Smart Hub. Apps let you:

  • Stream movies and TV shows.
  • Listen to music.
  • Play games.
  • Access news, weather, or social media.

Adding apps is easy, and managing them keeps your TV organized and secure.

Samsung Smart TV Smart Hub interface.
The Samsung Smart Hub home screen.

Step 1: Install Apps from the Samsung App Store

To download apps, you’ll use the Samsung App Store via the Smart Hub. Here’s how:

  1. Turn on your TV and connect it to the internet.
  2. Press the Home button on your remote to open the Smart Hub.
  3. Navigate to Apps using the directional pad.
  4. Select the Search icon in the top-right corner.
  5. Type the app name (e.g., Netflix) using the on-screen keyboard.
  6. Select the app from the search results.
  7. Click Install to download and install the app.

After installation, you can open the app or add it to your Home screen. You’ll need a Samsung account to download apps. If you don’t have one, create it on the TV or website.

Note: Only apps in the Samsung App Store can be installed this way. Steps may vary by model or software version.

Samsung Smart TV Apps section with search icon.
Searching for apps on Samsung Smart TV.

Step 2: Add Apps to Your Home Screen

To access apps quickly, add them to your Home screen:

  1. Press the Home button on your remote.
  2. Go to Apps.
  3. Select the Settings icon in the top-right corner.
  4. Highlight the app you want to add.
  5. Choose Add to Home.

To rearrange apps, select an app and choose Move, then use the directional pad to reposition it.

Step 3: Manage Your Apps

You can move, delete, lock, or update apps to keep your TV organized.

Move Apps

  1. Press the Home button.
  2. Navigate to the app you want to move.
  3. Press the Down key on your remote.
  4. Select Move and reposition the app using the directional pad.

Delete Apps

  1. Press the Home button.
  2. Go to Apps, then select the Settings icon.
  3. Select the app to delete.
  4. Choose Delete.

Note: Some pre-installed apps cannot be deleted.

Lock or Unlock Apps

To secure apps with a PIN (default is 0000):

  1. Press the Home button.
  2. Go to Apps, then select the Settings icon.
  3. Select the app to lock.
  4. Choose Lock and enter your PIN.

To unlock, follow the same steps and select Unlock.

Update Apps

To keep apps current:

  1. Press the Home button.
  2. Go to Apps, then select the Settings icon.
  3. Navigate to Auto Update and turn it on.

Step 4: Troubleshoot Common App Issues

If you face issues with apps, try these solutions:

App Not Appearing

  • Check if you’ve agreed to the Smart Hub’s Terms and Conditions. If not, only the Apps tile shows. Agree via the pop-up to see the Apps List.

Slow or Unresponsive Apps

  • Reset the Smart Hub: Go to Home > Menu > Settings > Support > Device Care > Self Diagnosis > Reset Smart Hub. Enter your PIN (default 0000).
  • Update your TV’s software: Go to Settings > Support > Software Update > Update Now.

These steps often fix common problems. If issues persist, contact Samsung Support.

Step 5: Install Third-Party Apps (Advanced)

To install apps not in the Samsung App Store, enable developer mode. This is complex and may void your warranty or pose security risks. Proceed with caution.

Enable Developer Mode

  1. Open the Smart Hub.
  2. Select the Apps panel.
  3. Enter “12345” using your remote or on-screen keypad.
  4. In the developer mode popup, turn Developer Mode On.
  5. Enter your computer’s IP address.
  6. Reboot the TV.
Samsung Smart TV developer mode screen.
Enabling developer mode on Samsung Smart TV.

Install Apps via USB

  1. Download the .apk file from a trusted source.
  2. Copy the .apk to a USB drive formatted to FAT32 or exFAT.
  3. Plug the USB into your TV.
  4. Use a file manager app (if available) to install the .apk.

Install Apps via ADB

  1. Ensure your TV and computer are on the same network.
  2. Find your TV’s IP address: Settings > Network > Information.
  3. On your computer, open Command Prompt and run:
    • adb connect [TV IP]
    • adb install [path to .apk]
    • adb disconnect [TV IP]

Warning: Third-party apps may not work well or could harm your TV. Only use trusted sources.

Popular Apps for Samsung Smart TVs

The Samsung App Store offers many apps, including:

  • Streaming: Netflix, Hulu, Disney+, Amazon Prime Video, HBO Max
  • Music: Spotify, Pandora, Tidal
  • Social Media: Facebook, Twitter
  • Games: Various games in the App Store
  • News/Weather: CNN, BBC, Weather Channel

Explore the Samsung App Store to find more. Some apps may be pre-installed.

People Also Ask

QuestionAnswer
Can I install apps not in the Samsung App Store?Yes, but it requires enabling developer mode and technical steps. See Step 5.
How do I update apps on my Samsung Smart TV?Enable Auto Update in the Apps settings or manually check for updates.
Why can’t I find an app on my TV?The app may not be available in your region or compatible with your model. Check the App Store or contact Samsung Support.
How do I free up space on my TV?Delete unused apps or reset the Smart Hub to clear data.

Conclusion

Adding apps to your Samsung Smart TV is simple with the Smart Hub. You can install, manage, and troubleshoot apps easily to enjoy a personalized experience. For advanced users, third-party apps offer more options but require caution. Keep your TV’s software updated and explore the App Store to find apps that suit you.

For more TV tips, check these Soft4led posts:

How to Find the Serial Number of Your TV: A Comprehensive Guide for All Brands

0
How to Find the Serial Number of Your TV
How to Find the Serial Number of Your TV: A Comprehensive Guide for All Brands

Knowing your TV’s serial number is essential for warranty claims, service requests, or product registration. This guide provides clear, step-by-step instructions to locate the serial number on TVs from all major brands, including Samsung, LG, Sony, and more. Whether your TV is wall-mounted or you’ve lost the box, we’ve got you covered.

What is a Serial Number and Why is it Important?

A serial number is a unique code assigned to your TV by the manufacturer. It acts like a fingerprint, identifying your specific unit. Here’s why it matters:

  • Warranty Claims: Manufacturers need the serial number to verify your warranty.
  • Service Requests: Repair centers use it to track your TV’s history.
  • Product Registration: Registering your TV with the serial number ensures you get safety updates or recall notices.
  • Insurance or Resale: You may need it for insurance claims or when selling your TV.

General Methods to Find the Serial Number

Before diving into brand-specific steps, try these common methods that work for most TVs:

  1. Check the Back of the TV: Most TVs have a sticker or label on the back panel with the serial number, often near the model number.
  2. Look at the Original Packaging: If you kept the box, the serial number is usually on a label or sticker.
  3. Review the User Manual: Some manuals include the serial number, especially if noted during purchase.
  4. Access the Settings Menu: Smart TVs often display the serial number in the on-screen menu.
TV back with serial number sticker
Typical location of the serial number sticker on the back of a TV.

Brand-Specific Instructions

Each TV brand has unique ways to locate the serial number. Below are detailed steps for major brands, based on the latest available information as of June 19, 2025.

Samsung

Samsung TVs have their serial number in two main places:

  • Physical Location: Look for a silver sticker on the back of the TV.
  • Settings Menu:
    1. Press the Home button on your remote to open the Smart Hub.
    2. Navigate to Settings > Support.
    3. Select About This TV or Contact Samsung to view the serial number.

Note: If your TV was serviced and the main board replaced, the settings menu may not show the correct serial number. Check the back sticker instead.

For Samsung TV issues, see our guide on Fix Samsung TV Turning On and Off.

LG

LG TVs offer multiple ways to find the serial number:

  • Physical Location: Check the back of the TV for a label, typically on the right or left side.
  • Remote Method (2018 Models and Newer):
    • Press the MUTE button three times in a row. The serial number will appear on the screen.
  • Settings Menu (Older Models):
    1. Press the HOME button.
    2. Go to Settings > Support.
    3. Select Product/Service Info to view the serial number.

Learn how to Fix LG TV Sound Not Working.

Sony

Sony TVs have consistent methods across models:

  • Physical Location: Find the product sticker on the back of the TV, often in a corner.
  • Settings Menu (2015 Models and Later):
    1. Press the Home button on your remote.
    2. Select Settings > System Settings or Product Support.
    3. Choose Customer Support or System Information.
    4. Select Product Information to view the serial number.

Tip: For older models (2014 or earlier), press the Home button, then the question mark icon, and navigate to Customer Support > System Information.

Check out Sony TV Freezing Fixes.

Panasonic

Panasonic TVs have several label locations:

  • Physical Locations:
    • On the carton (original box).
    • Side label (select models).
    • Back label.
    • Bottom underside of the frame (2017 models).

TCL

TCL keeps it simple:

  • Physical Location: Check the rear or back panel, either on the left or right side.

For TCL settings, see How to Access TCL TV Settings Without Remote.

Vizio

Vizio offers multiple methods:

  • Physical Location: Look for a silver or white sticker on the back of the TV, sometimes on the side or engraved.
  • Settings Menu:
    • Older TVs (Pre-2011):
      1. Press MENU on the remote.
      2. Navigate to Help > System Info.
    • Newer TVs (2011 and Later):
      1. Press MENU on the remote.
      2. Select System > System Info.
  • Vizio SmartCast App:
    1. Power on the TV and open the SmartCast app.
    2. Select your device and tap the settings gear.
    3. Choose System > System Information.
  • Other Methods:
    • Check the TV box for a label.
    • Log into your purchase account (e.g., Amazon) to view order details.

Troubleshoot with Vizio TV Not Connecting to WiFi Fixes.

TV remote with settings button
Using the TV remote to access settings for serial number information.

Hisense

Hisense TVs have several options:

  • Physical Location: Find a white sticker on the back, usually below the barcode.
  • Settings Menu:
    1. Press Menu on the remote.
    2. Select Settings > Support > System Info > Version.
  • Other Locations:
    • Original packaging.
    • Warranty or registration paperwork.

Note: If the main board was replaced, the settings menu may show a different serial number. Always verify with the back sticker.

Sharp

Sharp TVs are straightforward:

  • Physical Location: Check the sticker on the back of the TV.
  • Other Sources: The serial number may also appear in the user manual or quick start guide.

For Sharp TV issues, see Fix Sharp TV Flashing Red Light.

Philips

Philips TVs keep it simple:

  • Physical Location: Look for a label on the back or side of the TV.

Learn how to Pair Philips Soundbar with Roku TV.

What to Do If You Can’t Find the Serial Number

If the serial number isn’t visible or accessible, try these solutions:

  • Wall-Mounted TVs: Use a small hand mirror to view the back label. Alternatively, take a photo with your smartphone and flip the image horizontally for readability.
  • Contact Manufacturer Support: Provide the model number and purchase details to the brand’s customer service.
  • Check Online Accounts: If you registered your TV, the serial number may be in your account on the manufacturer’s website.
  • Review Purchase Records: Retailers like Amazon may list the serial number in your order history.

Frequently Asked Questions

Why do I need the serial number of my TV?

It’s used for warranty claims, repairs, registration, or insurance purposes.

Can I find the serial number without the remote?

Yes, check the back sticker, original box, or user manual.

What if the sticker is missing or unreadable?

Contact the manufacturer’s support or check online registration records.

Is the serial number the same as the model number?

No, the model number identifies the TV type, while the serial number is unique to your unit.

Conclusion

Locating your TV’s serial number is a simple task with the right guidance. Whether you’re dealing with a Samsung, Vizio, or any other brand, this guide covers all the methods you need. Keep your serial number recorded in a safe place for future reference, as it can save time when you need support or repairs.

Can a Smart Plug Turn On a TV? Everything You Need to Know

0

Smart plugs are handy devices for controlling your home appliances remotely. But can they turn on your TV? This question is common among smart home users looking to automate their entertainment systems. In this post, we’ll explain how smart plugs work with TVs, whether they can turn a TV on, and what alternatives exist if they can’t. We’ll also cover safety tips and how to check if your TV is compatible.

What is a Smart Plug?

A smart plug is a small device that plugs into a standard wall outlet. You can plug any appliance, like a TV, into the smart plug. Using a smartphone app or voice assistant, such as Amazon Alexa or Google Assistant, you can turn the appliance on or off remotely. Some smart plugs also let you set schedules or monitor energy use.

Smart plugs are easy to set up and affordable, making them popular for smart home beginners. They work by controlling the flow of electricity to the connected device. For example, you can turn off a lamp or fan with a tap on your phone.

Smart plug plugged into a wall outlet.
A modern smart plug ready to control devices.

How Do Smart Plugs Work with TVs?

Smart plugs can control the power supply to a TV, allowing you to turn it off by cutting the electricity. This is similar to unplugging the TV from the wall. However, turning the TV back on is not always possible with a smart plug alone.

The Standby Mode Issue

When you turn off a TV using its remote, it doesn’t fully power down. Instead, it enters standby mode, a low-power state where the TV waits for a signal to turn back on. In standby mode, the TV uses minimal electricity and can respond to the remote or power button.

A smart plug cuts all power to the TV, effectively shutting it down completely. When you use the smart plug to restore power, most TVs return to standby mode, not fully on. This means you’ll still need to press a button on the remote or TV to turn it on.

Television with standby light glowing.
A TV in standby mode with a small indicator light.

Why This Matters

For devices like fans or lamps, a smart plug works perfectly because they turn on immediately when power is restored. TVs, however, require an additional step to exit standby mode. This limitation makes smart plugs less effective for turning on most TVs.

Can Some TVs Be Turned On with a Smart Plug?

Yes, some TVs can be turned on with a smart plug, but it depends on the TV’s features. Certain models, especially those designed for commercial use or digital signage, have an auto power-on setting. This feature makes the TV turn on automatically when power is restored.

How to Check for Auto Power-On

To find out if your TV supports this feature, try these steps:

  1. Check the Manual: Look for terms like “Auto Power On,” “Power On Behavior,” or “Startup Settings” in your TV’s user manual.
  2. Explore Settings Menu: Navigate to the TV’s power or system settings. Look for options related to power management.
  3. Search Online: Search for your TV model plus “auto power on” to see if other users have discussed this feature. For example, some Samsung TVs support this via HDMI-CEC settings .
  4. Contact Support: Reach out to the TV manufacturer’s customer service for clarification.

Examples of TVs with Auto Power-On

While specific models vary, TVs used in public spaces, like lobbies or stores, often have this feature. For instance:

  • Samsung Commercial Displays: Some models include auto power-on for signage purposes.
  • Roku TVs: Certain Roku TVs may have auto power-on, though it’s not universal.
  • Insignia Models: Some Insignia TVs support “TV Auto Power On” via HDMI-CEC.

If your TV has this feature, a smart plug can turn it on by restoring power. However, this is not common in most consumer TVs.

TV Auto Power-On Compatibility

TV BrandAuto Power-On SupportNotes
SamsungLimitedAvailable in some commercial models or via HDMI-CEC settings.
Roku (TCL)VariesSome models have auto power-on; check settings or manual.
InsigniaYes (some models)Supports “TV Auto Power On” with HDMI-CEC devices.
SonyUncommonMay require disabling standby mode; check manual .
VizioRareTypically requires manual input after power restoration.

Alternatives to Using Smart Plugs for Controlling TVs

If your TV can’t be turned on with a smart plug, there are other ways to automate or control it remotely. Here are some effective alternatives:

HDMI-CEC Devices

HDMI-CEC (Consumer Electronics Control) allows devices connected via HDMI to control each other. For example:

  • Chromecast with Google Home: If your TV supports HDMI-CEC (e.g., LG SimpLink or Samsung Anynet+), saying “Hey Google, play Netflix on TV” can turn on the TV and start playback.
  • Amazon Fire Stick with Alexa: Similar to Chromecast, Alexa can control the TV via HDMI-CEC.

To use this, ensure HDMI-CEC is enabled in your TV’s settings and pair the device with a compatible voice assistant.

Smart Home Hubs

Smart home hubs like the Logitech Harmony Hub can control TVs using infrared (IR) signals or Wi-Fi. You can set up routines to turn the TV on or off with voice commands like “Alexa, turn on the TV” .

IR Blasters

IR blasters mimic a TV remote’s signals to turn the TV on or off. Devices like Broadlink or cheap smart IR blasters can be controlled via apps or voice assistants.

Smart TV Features

Many smart TVs have built-in scheduling or voice control options. For example:

  • Samsung Smart TVs: Allow scheduling power on/off times.
  • Roku TVs: Support voice control via Alexa or Google Assistant.

Check your TV’s settings or manual for these features. Learn more about smart TV capabilities at Soft4led Smart TV Guide.

Smart speaker and TV in a living room.
A smart home with voice-controlled TV.

Safety Considerations

Using a smart plug with a TV is generally safe, as it’s similar to unplugging the device. However, keep these points in mind:

  • Avoid Power Cuts During Updates: Cutting power during a firmware update could cause issues. Wait until updates are complete before using the smart plug.
  • Check Wattage Compatibility: Ensure the TV’s power draw doesn’t exceed the smart plug’s capacity. Most smart plugs handle TV wattage, but check the plug’s specifications.
  • Use Surge Protection: Pair the smart plug with a surge protector to safeguard your TV from power surges.

Research suggests that cutting power to a TV doesn’t cause significant harm, as TVs are designed to handle power interruptions.

How to Check if Your TV Can Be Controlled with a Smart Plug

To determine if a smart plug can turn on your TV, follow these steps:

  1. Review the Manual: Look for information on power settings or auto power-on features.
  2. Check Settings: Navigate to the TV’s power or system settings for “Auto Power On” or “Quick Start” options.
  3. Test with a Smart Plug: Plug the TV into a smart plug, cut power, and restore it to see if the TV turns on automatically.
  4. Research Online: Search for your TV model with terms like “auto power on” or “smart plug compatibility.”
  5. Contact Manufacturer: Ask customer support if your TV supports auto power-on.

If your TV doesn’t support this feature, consider the alternatives listed above. For troubleshooting TV power issues, see Soft4led Samsung TV Fixes.

Conclusion

Smart plugs are great for turning off TVs by cutting power, but turning them on is usually not possible due to the standby mode. Some TVs with auto power-on features can work with smart plugs, but this is rare in consumer models. If your TV doesn’t support this, alternatives like HDMI-CEC devices, smart home hubs, or IR blasters offer better control. Always check your TV’s settings or manual to confirm compatibility, and ensure safe use by following wattage and surge protection guidelines.

By understanding your TV’s capabilities and exploring smart home options, you can create a convenient and automated entertainment setup.

Explore more at Soft4led:

How to Fix a JVC TV That Won’t Turn On: Step-by-Step Guide

0
JVC TV won’t turn on guide

A JVC TV that won’t turn on can disrupt your entertainment plans. Whether it’s a blank screen, no power, or a red standby light, many issues can be fixed with simple troubleshooting. This guide, based on research from top-ranking websites, provides clear steps to diagnose and resolve the problem. For advanced fixes, safety is key, and professional help may be needed.

Checking JVC TV power cord
Verifying the power cord connection.

1. Basic Troubleshooting Steps

Start with these simple checks to rule out common issues.

1.1 Check the Power Source

  • Plug the TV into a working outlet. Test the outlet with another device, like a phone charger.
  • Try a different outlet to ensure the current one isn’t faulty.
  • Use a surge protector to safeguard against power fluctuations.

1.2 Inspect the Power Cord

  • Examine the power cord for fraying or damage. If damaged, replace it with a compatible cord.
  • Ensure the cord is firmly connected to both the TV and the outlet.

1.3 Test the Remote Control

  • Replace the remote’s batteries with fresh ones.
  • If the remote doesn’t work, use the TV’s physical power button, usually located on the side or bottom.
  • Test the remote with another device to confirm it’s functioning.
Changing batteries in TV remote
Replacing remote control batteries.

1.4 Perform a Power Reset

  • Unplug the TV from the outlet for 10–30 seconds.
  • Plug it back in and try turning it on.
  • For some JVC models, try a specific reset: hold “Menu” and “Volume Down” buttons while plugging in, then press the “Power” .

Learn how to reset other TV brands, like Toshiba TV Reset.

2. Understanding Standby Lights

The standby light on your JVC TV provides clues about the issue.

  • Red Light On: Indicates the TV is in standby mode but receiving power. If pressing the power button doesn’t work, the mainboard may be faulty.
  • No Light: Suggests no power is reaching the TV, possibly due to a failed power supply or blown fuse.
  • Light Changes (e.g., Red to Blue): If the light changes but the screen stays blank, it could be a display or backlight issue.
JVC TV standby light
Checking the standby light status.

3. Advanced Troubleshooting

If basic steps fail, consider these advanced checks. Proceed with caution, as they involve opening the TV.

3.1 Check for Blown Fuses

  • Some JVC TVs have internal fuses. Unplug the TV, remove the back panel, and locate the power board.
  • Look for a blown fuse (a cloudy or broken filament). Replace it with an identical fuse if found.
  • Warning: Only attempt this if you’re experienced with electronics.

3.2 Inspect for Bad Capacitors

  • Capacitors on the power board can fail, causing power issues. Look for bulging or leaking capacitors.
  • Replacing them can fix the problem.
  • Tools Needed: Soldering iron, screwdriver, replacement capacitors.
Checking TV power board capacitors
Inspecting capacitors on the power board.

3.3 Power Supply or Mainboard Issues

  • A faulty power supply board or mainboard is a common cause. Symptoms include no power or a clicking sound.
  • Replacing these boards requires technical skill. Purchase a compatible board using your TV’s model number.
  • Average repair cost: $225, per expert estimates.

See similar issues with Insignia TV Won’t Turn On.

4. When to Seek Professional Help

If troubleshooting doesn’t work, contact a professional:

  • Find an authorized JVC service center via JVC Support.
  • Local TV repair shops can diagnose and fix hardware issues.
  • If repair costs exceed the TV’s value, consider replacing it.

5. Preventive Measures

Protect your JVC TV from future issues:

  • Use a surge protector to prevent damage from power surges.
  • Avoid frequent power cycling, which can stress components.
  • Keep the TV in a well-ventilated area to prevent overheating.

Conclusion

This guide covers everything from basic checks to advanced fixes for a JVC TV that won’t turn on. Start with simple steps like checking the power cord and remote. If the problem persists, consider hardware issues or professional repair. With patience, you can get your TV back in action.

FAQ

Why won’t my JVC TV turn on?

It could be a loose power cord, dead remote batteries, or a faulty power board.

How do I reset my JVC TV?

Unplug it for 10 seconds or try holding “Menu” and “Volume Down” while plugging in.

What does the red light on my JVC TV mean?

It indicates standby mode, but if the TV won’t turn on, it may signal a mainboard issue.

Can I repair my JVC TV myself?

Basic fixes are DIY-friendly, but hardware repairs like replacing capacitors require skill.

Explore more:

Why Does Google Home Disconnect from WiFi? [And How to Fix It]

0
Google Home WiFi disconnection fix
Troubleshoot Google Home WiFi Disconnections

Google Home is a smart speaker that lets you control your home with your voice. It plays music, answers questions, and manages smart devices. But it needs a WiFi connection to work. When it disconnects, it can be annoying. This post explains why Google Home loses WiFi and how to fix it.

Common Causes of Google Home WiFi Disconnection

Several factors can cause your Google Home to disconnect from WiFi. Here are the main ones.

Router Issues

Your router might be the problem. If too many devices are connected, it can get overloaded. Outdated router firmware or incompatible settings can also cause issues. WiFi channel interference from nearby networks can disrupt the signal, as noted in user discussions https://www.reddit.com/r/googlehome/comments/b8hfln/anyone_elses_google_home_keep_disconnecting_from/.

Network Configuration Problems

Incorrect network settings can lead to disconnections. If you changed your WiFi name (SSID) or password, your Google Home might try to connect to the old network. This is common when setting up a new router.

Device-Specific Issues

Sometimes, the Google Home itself is at fault. Software bugs or hardware problems can cause it to lose connection. Firmware updates may fix bugs, but hardware issues might need support.

Environmental Factors

Physical barriers can weaken WiFi signals. If your Google Home is far from the router, or if walls, furniture, or other devices are in the way, the connection may drop. Electronic devices like microwaves can also interfere.

Google Home and WiFi router

How to Fix Google Home WiFi Disconnection

Here are step-by-step solutions to get your Google Home back online. Start with basic fixes before trying advanced ones.

Basic Troubleshooting Steps

These simple steps often resolve WiFi issues quickly.

  1. Reboot Google Home:
    Unplug your Google Home, wait one minute, and plug it back in. Or, use the Google Home app: Open the app, select your device, go to Settings > More > Reboot. This clears temporary glitches.
  2. Restart Router:
    Turn off your router, wait one minute, and turn it back on. This refreshes the network and can fix connectivity problems.
  3. Check WiFi Network:
    Ensure your WiFi is working. Test if other devices, like your phone, can connect. If not, contact your internet provider.

Advanced Solutions

If basic steps don’t work, try these more technical fixes.

  1. Change WiFi Channel:
    WiFi channels can get crowded. Use a WiFi analyzer app on your phone to find a less congested channel. Log into your router’s settings to change it. This worked for some users.
  2. Update Router Firmware:
    Check your router manufacturer’s website for firmware updates. Install them to improve compatibility and performance.
  3. Connect to 5GHz Band:
    If your router has 2.4GHz and 5GHz bands, try the 5GHz band. It’s faster but has a shorter range, so keep devices close.
  4. Forget and Reconnect Network:
    In the Google Home app, select your device, go to Settings > Wi-Fi > Forget this network. Then, set it up again with the correct network details.
  5. Factory Reset Google Home:
    As a last resort, reset your device. Press and hold the microphone button for 15 seconds until you hear a confirmation. Set it up again in the app. Note: This erases all settings.

When to Contact Support

If none of these work, reach out to Google Support. They can check for hardware issues or provide advanced troubleshooting. Be ready to share what steps you’ve tried.

Preventive Measures

To avoid future WiFi disconnections, follow these tips:

  • Update Router Firmware Regularly: Keep your router up to date to prevent compatibility issues.
  • Optimize Router Placement: Place your router centrally, away from walls and electronics, for better coverage.
  • Limit Connected Devices: Reduce the number of devices on your network to avoid overload.
  • Consider a Mesh Network: For large homes, a mesh system like Google Nest Wifi can improve signal strength.

Conclusion

Google Home WiFi disconnections are frustrating but fixable. Start with a reboot, check your network, and try advanced fixes if needed. Regular maintenance can prevent future issues. If you’re still stuck, Google Support is there to help. Have questions? Leave a comment below!

Related Posts:

Do You Need a Fire TV Stick with a Smart TV?

0
Do You Need a Fire TV Stick with a Smart TV?

Streaming is a big part of how we watch TV today. With so many devices out there, it can be hard to know what you need. If you have a Smart TV, you might be asking if an Amazon Fire TV Stick is worth getting. This article explains what each device does, the pros and cons of using a Fire TV Stick with a Smart TV, and when it makes sense to get one. Let’s dive in to help you make the right choice for your setup.

Understanding Smart TVs and Fire TV Sticks

To decide if you need both, let’s first look at what each device is.

What is a Smart TV?

A Smart TV connects to the internet, letting you use apps like Netflix, Hulu, and YouTube right on your TV. It runs on an operating system, such as Android TV, webOS, or Tizen. These systems give you a menu to find and open apps. Most Smart TVs also support streaming in high quality, like 4K, and some have voice assistants.

What is a Fire TV Stick?

The Amazon Fire TV Stick is a small device that plugs into your TV’s HDMI port. It uses Amazon’s Fire OS to access streaming apps, including Amazon Prime Video, Netflix, Disney+, and more. It comes with an Alexa voice remote, so you can search for shows or control your TV with voice commands. Models range from the Fire TV Stick Lite ($30) to the Fire TV Stick 4K Max ($60), offering features like 4K streaming and HDR.

Image of a Fire TV Stick in a Smart TV’s HDMI port, showing the Fire TV interface.
A Fire TV Stick plugged into a Smart TV for streaming.

Can You Use a Fire TV Stick on a Smart TV?

Yes, you can use a Fire TV Stick on a Smart TV. It plugs into an HDMI port, which all Smart TVs have. After setup, you switch your TV’s input to the HDMI port to use the Fire TV Stick. This works the same as on a non-Smart TV.

Benefits of Using a Fire TV Stick on a Smart TV

Even if your Smart TV streams apps, a Fire TV Stick can offer advantages. Here are the main benefits:

  • Faster Performance: Many users say Fire TV Sticks load apps and menus quicker than Smart TVs, especially older or budget models. This can make your streaming smoother.
  • More Apps: Fire TV Sticks may have a wider range of apps. While major services like Netflix are on most Smart TVs, some niche apps or new services might only be on streaming devices.
  • Easy-to-Use Interface: The Fire TV menu is simple and clear. If your Smart TV’s interface feels clunky, you might prefer Fire TV’s design.
  • Alexa Voice Control: The Alexa remote lets you search for content or control your TV with voice commands. This is handy if your Smart TV lacks voice features.
  • Portability: Fire TV Sticks are small and easy to move. You can take them on trips or use them on different TVs at home.
  • Extra Features: Some models support 4K, HDR, or Dolby Atmos, which older Smart TVs might not have. The Fire TV Stick 4K Max also has an Ambient Experience, showing art or widgets when idle.
  • Advanced Options: Tech-savvy users can jailbreak Fire TV Sticks to install third-party apps for more content. Be cautious, as this may void warranties or pose risks.

Also check: How to Install IPTV on Roku.

Drawbacks of Using a Fire TV Stick on a Smart TV

There are also reasons you might not need a Fire TV Stick. Here are the downsides:

  • Extra Cost: Fire TV Sticks cost $30 to $60. If your Smart TV works fine, this might be an unnecessary expense.
  • Overlap in Features: Smart TVs already have streaming apps, so a Fire TV Stick might do the same things. This can feel redundant.
  • Setup Hassle: You’ll need to plug in the Fire TV Stick, connect it to Wi-Fi, and switch HDMI inputs. Using two remotes can also be annoying.
  • Power Needs: The Fire TV Stick needs power, either from your TV’s USB port or a wall outlet, adding a small inconvenience.

When Should You Get a Fire TV Stick for Your Smart TV?

A Fire TV Stick makes sense in certain cases. Consider getting one if:

  • Your Smart TV is Slow: If apps take forever to load or menus lag, a Fire TV Stick can speed things up.
  • You Want Specific Apps: Check if apps you need are missing on your Smart TV but available on Fire TV.
  • You Like the Fire TV Interface: If you’ve used Fire TV before and prefer it, it might improve your experience.
  • You Want Alexa: If your Smart TV doesn’t have voice control, Alexa can make navigation easier.
  • You Need Portability: If you travel or switch TVs often, a Fire TV Stick is easy to move.
  • You Want New Features: If your Smart TV doesn’t support 4K or HDR, a Fire TV Stick can add these without buying a new TV.

For tips on managing ads on Fire TV devices, see Block Ads on Insignia Fire TV.

Alternatives to Fire TV Stick

If you’re thinking about a streaming device, there are other options:

  • Roku: Known for a simple interface and wide app selection. Learn more at Roku’s site.
  • Google Chromecast: Casts content from your phone or runs Google TV for apps. Check it out at Google’s store.
  • Apple TV: Offers Apple services and a premium experience, but it’s pricier. Visit Apple’s site.

Each has unique features, so compare them to find the best fit.

People Also Ask

Here are answers to common questions about Fire TV Sticks and Smart TVs:

Can I use a Fire TV Stick on a Smart TV?

Yes, it works with any TV that has an HDMI port.

What does a Fire TV Stick do that a Smart TV doesn’t?

It may offer faster performance, more apps, Alexa, and portability.

Is a Fire TV Stick better than a Smart TV?

Not necessarily—it depends on your Smart TV’s features and your needs.

Do I need a Fire TV Stick if my TV is already smart?

Only if your Smart TV is slow, missing apps, or lacks features you want.

Conclusion

Whether you need a Fire TV Stick with a Smart TV depends on your setup and preferences. If your Smart TV is fast, has all your apps, and works well, you might not need one. But if it’s slow, lacks apps, or you want features like Alexa or portability, a Fire TV Stick can be a great addition. Weigh the costs and benefits to decide what’s right for you. For more details, check out Amazon’s Fire TV Stick page.

Explore more: