The Sansui TV service menu is a hidden diagnostic interface built into most Sansui televisions. It lets you adjust factory-level picture and audio parameters that the normal on-screen menu doesn’t expose. Technicians use it to calibrate new units and fix problems that standard settings can’t reach.
This guide covers every known access method, what each parameter does, and how to get out without corrupting anything.
What Is the Sansui TV Service Menu?
It’s a second-layer menu locked behind a button sequence or numeric code. Sansui hides it from regular users on purpose. The settings inside control things like vertical image size, horizontal position, automatic gain, OSD placement, and chroma levels. These are calibration values set during manufacturing.
Change the wrong one and the picture breaks. Change the right one and you fix a problem that’s been frustrating you for months.
The service menu is not the same as a factory reset. A factory reset clears your user preferences. The service menu lets you rewrite the underlying display parameters. If you’re looking for a broader reference, our guide to all LCD and LED TV service menu codes covers the same hidden menu systems across dozens of brands.
Warning — Read Before Entering Service Mode
Do not enter the service menu unless you have a specific problem to fix.
These are the rules that protect you:
- Write down the current value of any parameter before you change it
- Change one parameter at a time
- Do not press “Clear” or “Reset All” unless you know exactly what it does on your specific model — on some Sansui units, “Clear” wipes firmware-level calibration and cannot be undone without a service manual and a programmer
- Use the original factory remote, not a universal remote — universal remotes sometimes trigger wrong codes or skip keypresses
- If the TV is under warranty, entering the service menu may void it
The risk is real. A wrong value in the vertical output section can overdrive the deflection circuit and damage the vertical IC. Work slowly.
Sansui TV Service Menu Codes — All Known Methods
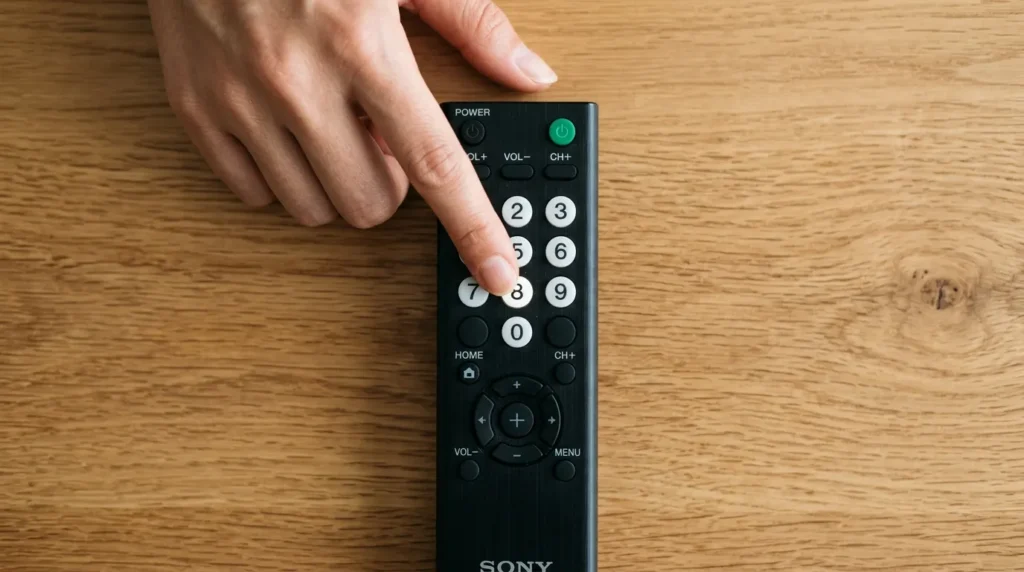
Method 1 — Code 8523 via Audio Settings (Most Common)
This works on the majority of Sansui LCD and LED models produced after 2008.
- Turn the TV on. Make sure it’s showing a live picture or a channel.
- Press the Menu button on the original Sansui remote.
- Navigate to Audio Settings using the arrow keys.
- While the Audio Settings page is open, press 8, 5, 2, 3 on the number pad.
- The service menu appears immediately.
If nothing happens, you pressed the keys too fast or the remote dropped a keypress. Try again at a steady pace — roughly one key per second.
Method 2 — Code 1947 via Menu + Channel Down
This method works on several mid-range Sansui LED models and some 2012–2016 units.
- Turn the TV on.
- Press Menu on the remote.
- Press Channel Down (CH–) three times.
- Press 1, 9, 4, 7 on the number pad.
- Service mode opens.
Some users report needing to hold CH– on the third press for 2–3 seconds. If the first attempt fails, try that variation.
Method 3 — Hidden Service Key on Remote (CRT Models)
Older Sansui CRT televisions from the late 1990s and early 2000s used a physical hidden key built into the remote. It’s a small rubber button accessible through a pinhole on the back of the remote body — usually on the lower-left or lower-right corner.
- Flip the remote over.
- Find the small hole (approximately 2mm diameter).
- Insert a straightened paperclip and press the internal button once.
- The TV screen will display the service menu directly.
This method bypasses any code entry entirely. It was common on Sansui CRT models sold in Asian and European markets through the early 2000s.
Method 4 — Vol- Zero + Key 9 (TVS2746A / Toshiba-Shared Chassis)
The Sansui TVS2746A and several models built on the same Toshiba-shared chassis use a different entry method.
- Turn the TV on.
- Press Volume Down on the remote repeatedly until the volume reaches 0.
- Once volume shows 0, press the 9 key on the remote.
- Service menu loads.
This chassis was shared across Sansui, Akai, and some Orion units sold in South and Southeast Asian markets. If you have a model number starting with TVS or DTV, try this method first. The Toshiba chassis connection is worth knowing — Toshiba TV service menu codes follow the same entry logic on many shared-platform models.
How to Navigate the Service Menu
Once you’re inside, the controls are simple:
- Channel Up / Channel Down — moves between parameters (up and down the list)
- Volume Up / Volume Down — increases or decreases the selected parameter’s value
- 0 (zero) — exits the service menu on most models and saves changes
- Power button — on some models, pressing power exits without saving; on others it saves first — check your model behaviour before using power to exit
Do not use the arrow keys the same way you would in the normal menu. In service mode, CH+/CH– and VOL+/VOL– are the only reliable controls. Arrow key behaviour is inconsistent across models.
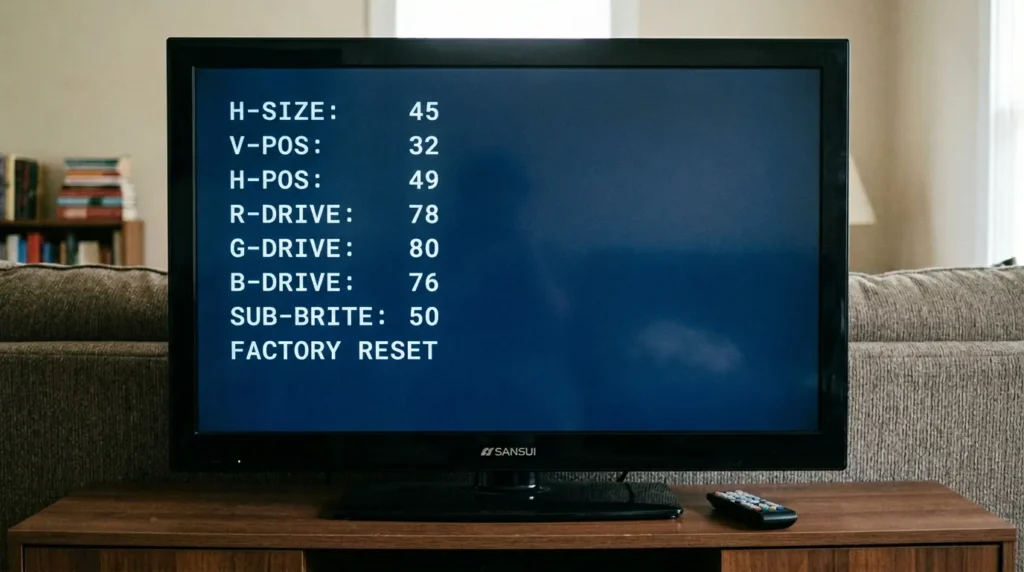
Sansui Service Menu Parameters Explained
These are the parameters you’ll encounter most often, what they control, and their typical value ranges.
AGC — Automatic Gain Control Controls the sensitivity of the tuner’s input signal amplifier. Range: 0–63. Default is typically 32. Reduce it if you have a strong signal causing overload noise. Increase it if reception is weak.
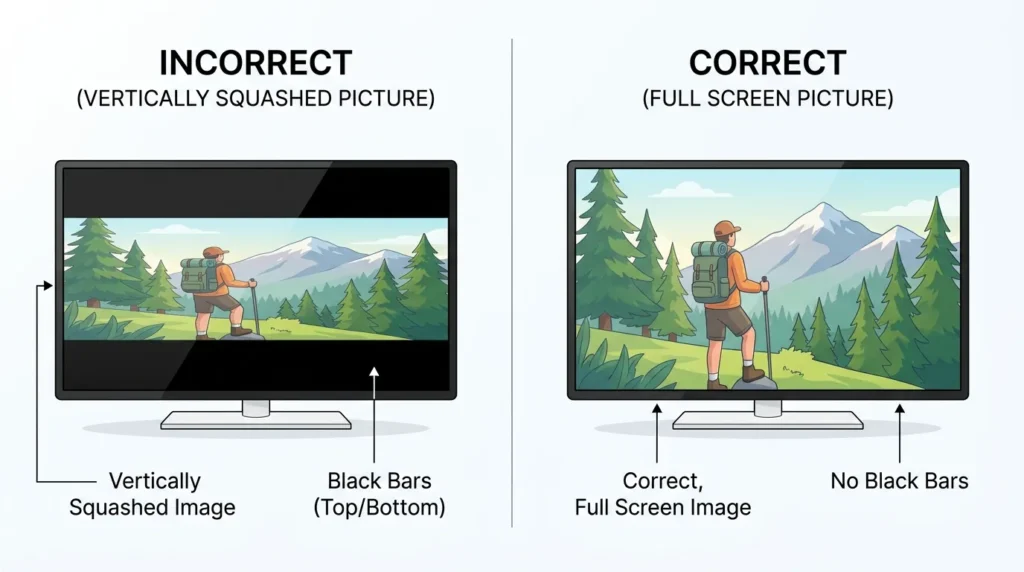
VA — Vertical Amplitude Controls the vertical height of the picture. Range: 0–63. If the image appears squashed vertically or doesn’t reach the top and bottom of the screen, adjust this. Increase to expand the height.
VSH — Vertical Shift Moves the picture up or down on the screen. Range: 0–7 on most models (some extend to 0–15). If the image is shifted too high or too low, use this to re-centre it vertically.
HSH — Horizontal Shift Moves the picture left or right. Range: 0–31. Useful when the image is off-centre horizontally or when overscan leaves a visible black bar on one side.
OSDH — OSD Horizontal Position Controls where the on-screen display (menus, volume bar, channel info) appears horizontally. Range: 0–31. This doesn’t affect the picture itself — only where menu overlays sit.
OSDV — OSD Vertical Position Same as OSDH but for vertical placement of on-screen overlays. Range: 0–31.
Chroma parameters (SUB, HUE, SAT) These control colour saturation, hue balance, and sub-colour levels. Only adjust these if you have a genuine colour problem and have eliminated the external source (cable box, antenna, HDMI device) as the cause.
Always record current values before making any changes. If a parameter has no label you recognise, do not touch it. Other brands use similar parameter structures — the Videocon TV service menu codes guide is a useful comparison since Videocon and Sansui share several platform architectures in South Asian markets.
Fixing Common Problems via Service Menu
Horizontal lines at the top of the screen
This is usually a vertical amplitude problem. Enter the service menu, go to VA, and slightly reduce the value (try decreasing by 2–3 points). Check the screen after each adjustment. If you’re also dealing with a completely dark display, see our guide on how to fix a dark TV screen before going into the service menu — some dark screen issues are backlight faults, not calibration problems.
Vertical squash — image doesn’t fill the full screen height
Increase VA. If increasing VA creates new problems (lines, overscan at the bottom), the issue may be in the vertical output circuit rather than the calibration value — in which case service menu adjustment won’t solve it.
Image shifted horizontally (black bar on left or right)
Adjust HSH in the direction that centres the image. Go one point at a time. If a black bar is on the left, increase HSH. If it’s on the right, decrease it. For persistent overscan problems that don’t respond to HSH adjustment, check how to fix Samsung TV not showing full screen — the aspect ratio and overscan logic described there applies across brands.
Colour appears wrong — too red, too blue, washed out
Go to the chroma parameters and reduce the affected channel by small increments. Washed-out colour usually points to SUB being too high. A strong colour cast points to HUE being off. If the problem appeared after an HDMI source change, check the source first. For broader colour and picture fault diagnosis, the TV no picture fix guide covers both software and hardware causes.
What Happens If You Accidentally Change Settings
This is the most common reason people search for this page. They opened the service menu out of curiosity, changed something, and the TV now looks wrong.
First option: Re-enter the service menu using the same code, find the parameter you changed, and return it to its original value. If you wrote the original values down, this takes 2 minutes.
If you didn’t write values down: Common safe defaults are: VA = 32, VSH = 4, HSH = 16, AGC = 32. These are midpoint values and give a reasonable starting point. They won’t be perfect for your specific set but they’ll get the picture functional.
If the “Clear” function was used: On some Sansui models this performs a deep calibration wipe. The TV may boot with a distorted picture, incorrect convergence, or no picture at all. This requires a service manual for your specific model and, in many cases, a firmware reload using a programmer connected to the main board’s IC. This is a professional repair job.
If the TV won’t turn on at all after service menu access: Check whether the remote’s power button is functioning (battery check). If the TV went into a locked state, try unplugging it from the wall for 60 seconds and reconnecting. Some models have a hardware reset by holding the physical power button on the TV itself for 10 seconds while it’s plugged in. The same forced-reset approach is covered in more detail in our Toshiba TV won’t turn on fixes guide — the boot recovery steps overlap on Toshiba-platform Sansui models.
How to Exit the Service Menu Safely
Correct exit method: Press 0 on the remote. On most Sansui models this saves all changes and returns to normal TV mode.
Alternate exit: Press Menu again. This works on some models but not all — test it on your specific unit before relying on it.
What to avoid: Do not unplug the TV mid-session. Service menu parameters on some Sansui models write to EEPROM only on a proper exit. If you pull the power during a session, the TV may boot with partially written values, which can cause strange display behaviour or a boot loop.
After exiting, observe the picture for a few minutes across different channels or inputs before confirming the adjustment worked.
Frequently Asked Questions
Does code 8523 work on all Sansui models? No. It works on most post-2008 LCD and LED Sansui models but not on CRT models or some budget LED units sold under Sansui’s licensed brand in regional markets. If 8523 doesn’t work, try 1947 or the Vol-zero + 9 method. Other regional brands with similar licensing situations — like Micromax TV service menu codes and Onida TV service menu codes — have the same multi-code situation for the same reason.
What if the service menu won’t open at all? First confirm you’re using the original factory remote, not a universal or third-party remote. Second, make sure the TV is showing a live picture, not a standby screen or setup wizard. Third, try each method slowly — one keypress per second. If all methods fail, the service menu may be disabled on your specific regional firmware version, or the remote’s number keys may have a fault.
Is it safe to use the Sansui TV service menu? Safe if used carefully. The risks are: (1) changing a value you didn’t intend to, (2) using “Clear” without knowing what it does, (3) losing power during a write. All three are avoidable. Write down values before changing them. Don’t use “Clear.” Don’t unplug during a session.
My Sansui TV is a licensed/regional brand — will these codes still work? Sansui has been licensed to multiple manufacturers in different regions, especially in Asia, Africa, and parts of Europe. Some regional Sansui sets share chassis with Videocon, Orion, or Akai platforms and may use different codes. The 8523 and 1947 codes have the widest coverage. If neither works, search for your specific model number alongside “service mode” for region-specific documentation. You might also check whether your unit shares a platform with Changhong Ruba TV service menu codes or Hisense TV service menu codes, both of which appear in regional Sansui OEM relationships.
Can I use the service menu to completely reset the TV to factory settings? The service menu is not the primary tool for a factory reset. For a standard factory reset, use the Settings → System → Reset option in the normal user menu. The service menu’s “Clear” function goes deeper than a factory reset and should only be used when directed by a service manual. For reference on how factory resets work across brands, the Samsung TV factory data reset guide covers the reset hierarchy clearly.
Always use the factory remote. Record values before changing them. Exit using the 0 key. Those three habits prevent 95% of service menu problems.